Supply and demand are the major determinants of foreign exchange prices. The bulls in the market drive demand pressure while the bears drive supply pressure.
Traders who comprehend demand and supply factors are better able to predict existing and anticipated price fluctuations in the currency market. Every forex trader’s progress requires an understanding of why a currency pair moves.
At its most fundamental level, the price fluctuates as a result of demand and supply discrepancies in the market. Once you’ve grasped this principle, you’ll be able to look at trading from a logical perspective.
Also Read: What Is Trade Volume All About?
Contents
- What is Supply and Demand?
- Supply and Demand in the Forex Market
- Supply and Demand Zones in Forex
- Understanding Supply and Demand Zones
- How to Find a Supply and Demand Zone in the Chart?
- Supply and Demand Trading Patterns
- Supply and Demand Continuation Patterns
- Supply and Demand Trading Strategies
- Supply and Demand Zones and Risk Management
- Identify Supply and Demand Zone Strength
- Conclusion
- FAQs
What is Supply and Demand?
Supply and demand are basic economic factors that market participants from various markets should understand. They are the driving forces behind the price of an asset or commodity. They can also be referred to as the “invisible hands.”
The economic theory of demand and supply states that if the supply of a commodity increases and the demand for that same commodity decreases or remains constant, the price of the commodity is expected to fall.
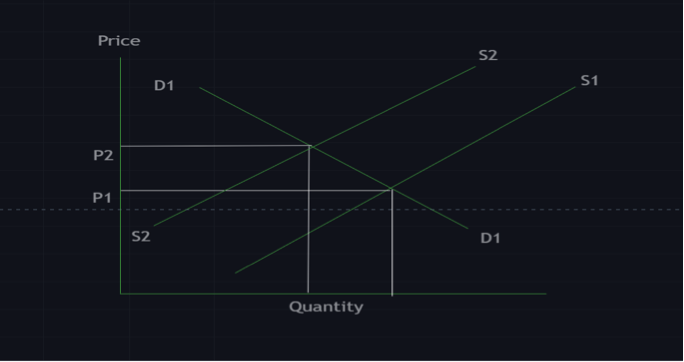
Increase in Supply
And if the demand for a commodity increases but the supply of that commodity remains the same or reduces, the price of that commodity is expected to rise due to higher demand.
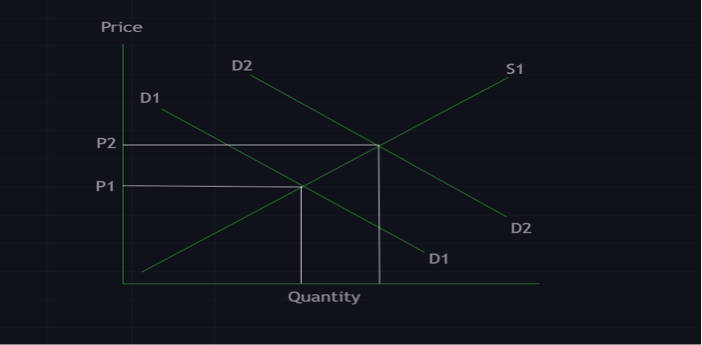
Increase in demand
Supply and Demand in the Forex Market
In the forex market, the prices of currency pairs is determined by the supply and demand for those currencies. Although other factors like announcements and government policies may determine the prices of currency pairs, but the invisible hands are the main determinants.
When there is a low supply of a currency pair and the demand for that same currency pair is high.
The excess demand pressure drives the price of that currency pair up. In a case where demand is low and supply is high, the price of that currency pair is expected to fall.
Supply and demand pressure is determined by major players in the market. These participants include institutional traders, governments, banks, investors, large commercial companies, spectators and lots more.
The supply and demand for currency pairs continually fluctuate in the foreign exchange market, causing the price to change.
When you initiate a currency trade, you are participating in the market’s supply and demand activities.
Supply and Demand Zones in Forex
Supply and demand zones are key market levels from which prices usually approach and react. Supply and demand zones can be marked up on the trading chart in order to keep traders informed on price action.
For instance, when the price of a currency pair is heading downwards due to selling pressure, certain traders will place pending purchase orders at specific levels (usually the demand zones) below the current price.
These traders don’t think the pair will fall much further than their purchase limit order.
They put buy bid orders for the pair at this area (demand zone), assuming that the drop base rally will likely stop.
If a significant number of people, or perhaps a huge organization, does this, a massive volume of pending orders will gather around this precise amount.
This means that as the price approaches this level, demand will increase and stop the price drop, the force will drive price higher.
The same thing would happen if price is on a strong bullish trend, traders can place sell orders on supply zones. If price reacts to those zones, the supply or selling pressure would push price to the opposite direction.
Anytime price action approaches a supply or demand zone, it is likely to revert. As a result, price action traders employ such areas to trade the market in the desired direction.
Supply and demand zones have very high tendencies to change. Supply and demand zones can be pushed higher or lower depending on the integrity of the levels price interacts with.
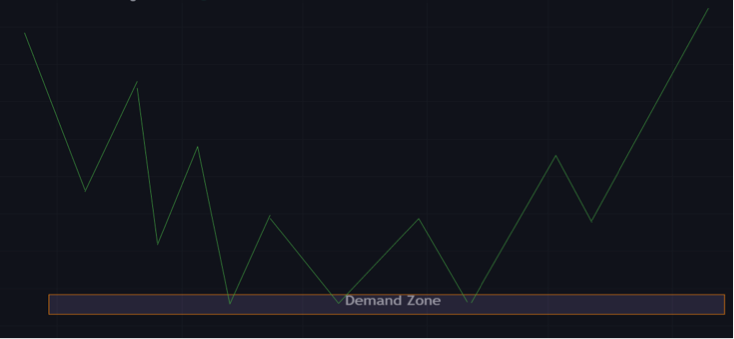
Demand Zone
The demand zone is a price (range) that is always below the current market price. It is an area where there is a lot of buying interest.
There are usually a lot of buy orders in this area of interest. Usually when price comes down to a demand level, there is usually a quick reaction.
Price react to these level is determined by the amount of bids at that price. A demand zone is the direct opposite of a supply zone.
Demand zone
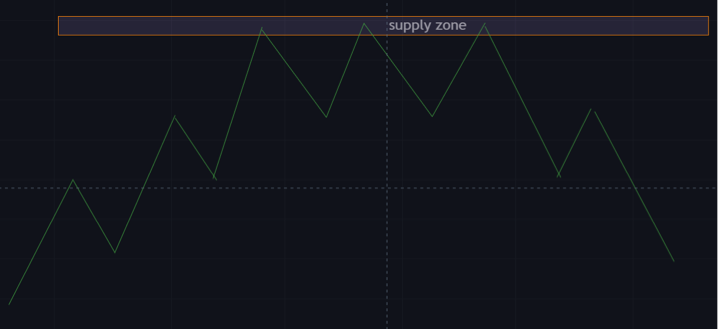
Supply Zone
A supply zone is the direct opposite of a demand zone. A supply zone can be found above the current market price on the forex trading price chart.
A large volume of pending sell orders can be found around the supply level. Orders begin to get executed once the price action hits this level.
The Forex pair is being sold by traders, and the price action is reversing to the downside. The Supply zone has no significant level. There are multiple supply zones in the daily chart.
When price ventures into a new region or makes a new all-time high, traders will find it impossible to locate the next supply zone using technical analysis.
Supply zone
Understanding Supply and Demand Zones
Supply and demand zones are visible regions that price has visited numerous times in the past. These mimic zones more closely than specific lines, as opposed to lines of support and resistance.
There are regions or prices traders and other market influencers are willing to buy or sell a currency.
How to Find a Supply and Demand Zone in the Chart?
The ability to locate supply and demand zones on a chart is one of the basic qualities of professional traders.
Identifying supply and demand can be very simple and straightforward once you know what you are looking for.
Take the following steps if you are having issues locating supply and demand zones.
Move to a convenient time frame
Sometimes, in order to locate supply and demand zones, you need to change your time frame. You may be too zoomed in or too zoomed out.
Most retail traders prefer to see the higher time frame to get a clearer picture of what the price is doing.
Locate price reversals
Trade zones where prices bounce off frequently might likely be supply or demand zones. A supply level is typically a turning point where the price moves fast away from the level downwards.
A demand level, on the other hand, is a turning point where the price rises fast away from the level upwards.
Mark out that zone
Use a rectangle-shaped drawing tool from your trading platform and expand it to the right once you’ve discovered the turning point zone.
Mark out these zones and check how many times the price has reacted to that level in the past. If you get enough bonuses, that region can be considered a supply and demand zone.
Supply and demand trading indicators
Some trading platforms (e.g., Trading View) come with indicators that automatically marks out supply and demand zones for forex trading.
Pivots is an example of such indicators, some of these indicators are paid. Supply and demand trading indicators can be really helpful in recognizing supply or demand zones.
Also Read: How to Read Forex Charts
Supply and Demand Trading Patterns
When price approaches a supply or demand zone, price usually forms two very common patterns or structures.
Knowledge of these patterns is very important when trading forex. There are supply and demand reversal patterns, and supply and demand trend continuation patterns.
Supply and demand reversal patterns
There are reversal patterns that form when the price reaches a supply or demand zone. These reversal patterns change the trend in a market.
They can easily be detected using technical analysis, and they are very popular in forex markets. We have 2 structures of reversal patterns.
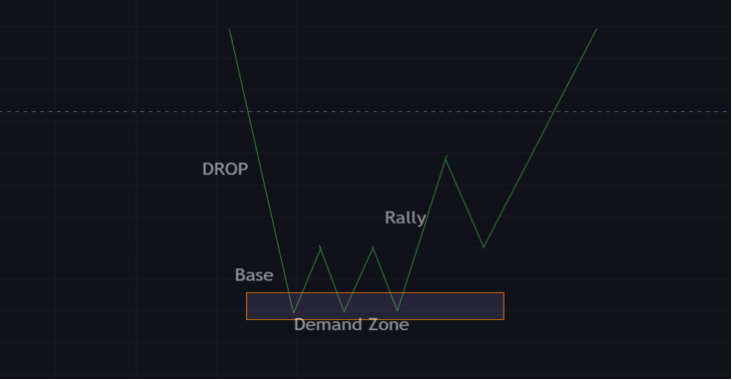
Drop base rally
This is a bullish reversal pattern. In this pattern, the price starts off by rallying downward until it hits the base which is considered the demand zone or a strong buying interest zone.
Price may consolidate in this area for a while or reject this zone immediately with a pin bar, whichever the case may be.
Price will then start a bullish trend, creating higher highs and lower highs.
Drop base rally
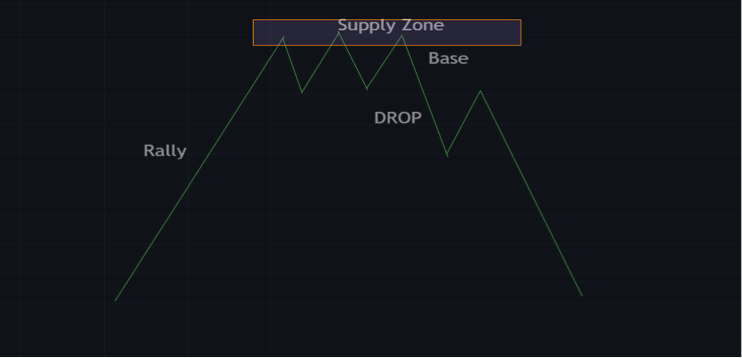
Rally base drop
This is a bearish reversal pattern. With the pattern, the price starts off on an upward trend and then reaches a strong supply zone.
Price may bounce off this zone, or consolidate while forming a reversal pattern like a triple top, heads and shoulders pattern, or a double top pattern.
After that, the price would start trending downwards from the supply zone. This would create lower lows and higher lows.
Rally base drop
Supply and Demand Continuation Patterns
Supply and demand continuation patterns are trend continuation patterns in demand and supply zones.
These patterns can come in the form of a flag, consolidation, or redistribution patterns.
They are patterns that the price forms before continuing its upward or downward trend, they are sometimes referred to as the accumulation zone.
There are two types of supply and demand continuation patterns. If you are looking to trade forex, a good understanding of these patterns would help.
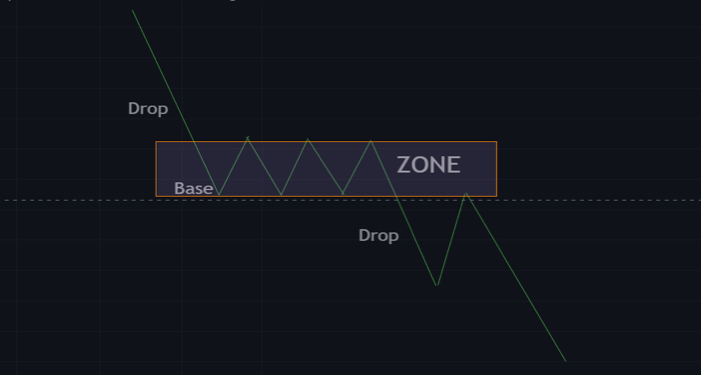
Drop base drop
This is a bearish continuation pattern. In a drop base drop pattern, price moves in a downtrend and approaches a demand trading zone where demand traders have their pending orders.
Price reacts to this zone and eventually continues its downtrend.
Drop base drop
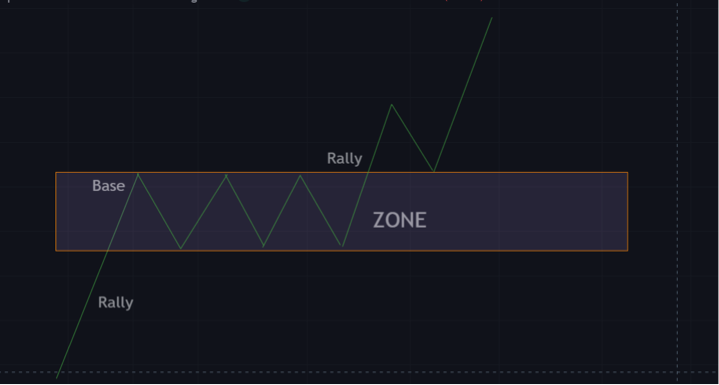
Rally base rally
This pattern is a bullish continuation pattern. A rally base rally pattern starts with an uptrend, then price action moves to a demand or supply zone.
Price reacts to this zone and continues its uptrend, creating higher highs and lower highs. Sometimes the price returns to this strong demand and supply zone for a retest before continuing its uptrend.
Rally base rally
Drawing supply and demand zones
There are two common ways of drawing demand and supply zones. They are from a button and from an individual candlestick.
Supply and demand zones have a base or bottom. A base is a small group of candles in a tight consolidation in the context of supply and demand.
You can draw supply and demand zones using this technique.

From a base
This occurs when only one candlestick is used to draw the zone. A typical Japanese candlestick pattern, such as a hammer or shooting star, or bullish and bearish engulfing candlestick patterns, is often formed when the two candlesticks are combined.

From a candlestick
Supply and Demand Trading Strategies
Proper knowledge of supply and demand zones can help you implement or improve a trading strategy. These zones can serve as major key points of price.
There are several ways traders can take advantage of the supply and demand concept to make a successful trade.
Range trading
This is a supply and demand trading strategy. Traders can trade a range if demand and supply zones have been properly established.
Traders can use indicators like the Relative Strength Index (RSI) or stochastic indicator to help identify these zones.
Trading supply and demand zones is similar to trading support and resistance levels. This is because there is no clear trend and no direction to price movement.
Trading a range is basically just buying and selling at support and resistance till price breaks out of the trading range.
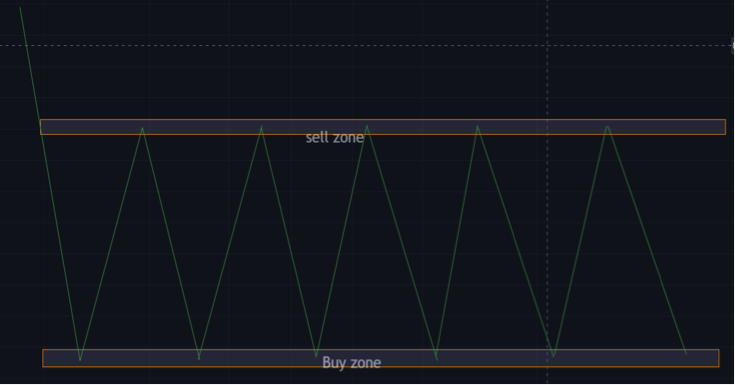
Range trading
Breakout strategy
The breakout strategy is amongst the most well-known supply and demand trading strategies in forex markets.
This strategy requires price to range and a breakout of its range. Retail traders look to take their positions after the breakout in the direction of the breakout.
It may be the start of a strong trend. This strategy is prone to fake outs.
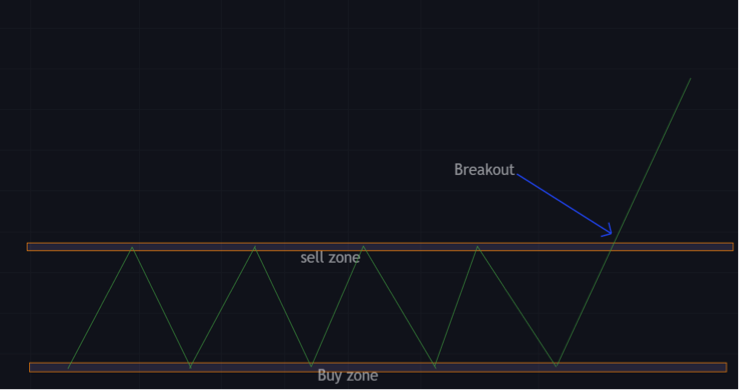
Breakout strategy
Retest strategy
Some traders take positions immediately after a breakout as it applies to their strategies, while others wait for more price action, like a retest.
A retest strategy is basically taking a trade when the demand zone turns into the supply zone, or when the supply zone turns into the demand zone.
This strategy is more efficient than the breakout strategy because it leaves little room for pullbacks and reduces the risks involved.
This strategy is best for higher probability trades and better entries.
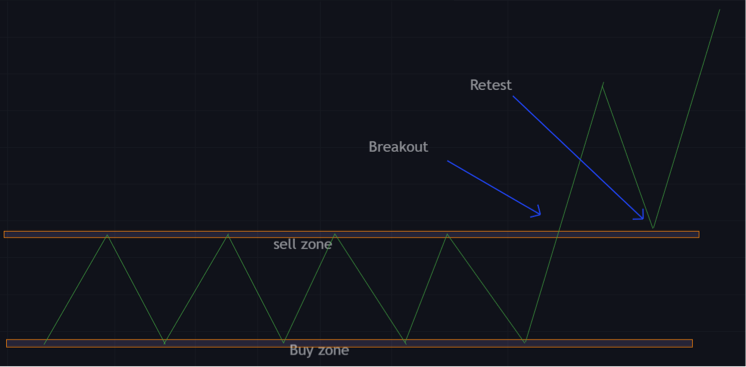
Retest strategy
Supply and Demand Zones and Risk Management
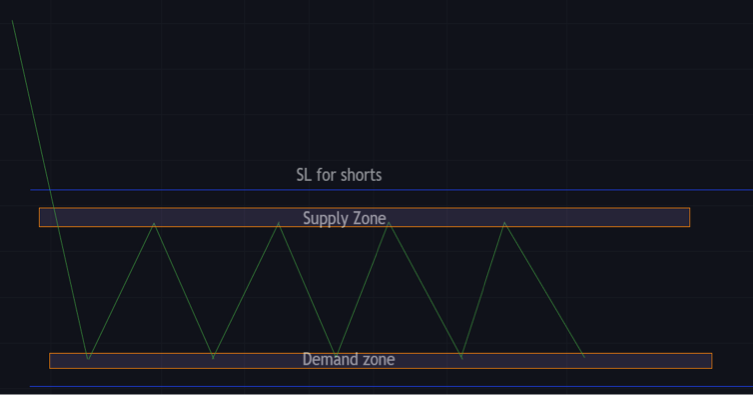
Demand and supply zones are similar to support and resistance zones, therefore they may be used to determine where a trader should put stops and limits.
Traders may use these zones to apply a good risk-to-reward strategy to all orders.
Selling at the supply zone, range, and retest traders can set stop loss above the supply zone and aim to take profits at the demand zone.
Cautious traders might put their aim above the demand zone or use a variety of risk management strategies.
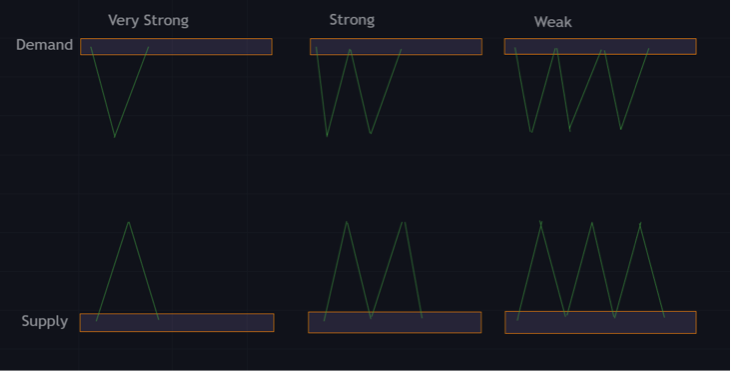
Identify Supply and Demand Zone Strength
There are various ways to check the strength of a supply and demand zone to trade forex. Knowing the strength of these zones gives traders a higher probability of a successful trade.
This information can help traders with lot size allocation, risk management, and pending orders.
The zones with higher strength give more confidence to traders. Traders will be more comfortable risking more when betting on those zones.
Trading in weaker zones would mean lower risk for traders. On a trading day, knowing the strength of a zone can increase your trade success rate.
Most traders tend to leave pending orders in a region with high demand and supply strength. There are various factors to consider when checking the strength of a supply and demand zone, while bearing in mind that these zones change.
Strength of reaction
Price action in a zone is a very important factor to consider. How the price reacts and how fast it reacts shows the strength of that zone.
If there are long marubozu candlesticks (a long candlestick with little or no wicks) after the price comes into contact with a zone.
This would basically mean that there is a lot of strength in that zone. If price leaves the zone with short varying candlesticks, that would mean the zone isn’t so strong.
Time in the zone
You can easily know how long price spends in a zone by the number of candlesticks.
Spending too much time would mean that the zone isn’t strong and there is a lot of conflict between bulls and bears. This is a bad sign and could mean the zone isn’t strong enough to hold.
Frequency of tests
This is a major factor to consider if a zone is new or if the price has visited those zones before. This situation is very common with weekly supply zones, when prices make new all-time highs.
If price keeps coming back to test a potential supply zone, this is a sign that the zone is not so strong.
Trend direction
Demand and supply traders, like other forex traders, include the understanding of trends in their market research.
A trader will often look at the daily chart and observe that the general trend is up, therefore they will only take trades in demand zones, because they’ve been instructed to always bet in the favor of the daily trend.
There’s nothing bad with this as long as the trader is using the daily chart to place his orders.
Problems might develop if the trader is trading on a lesser time-frame since they will constantly be going against the direction of the market on the time-frame they are trading on.
Conclusion
Most new traders find it difficult to be profitable in the foreign exchange market, and they are usually misled by people trying to sell them a course or a strategy.
Aside from using a good trading platform, and getting fundamentals from Forex Factory, a proper understanding of demand and supply trading could be the difference between a struggling trader and a profitable trader.
More than 50% of the time, the proper use of pending orders is determined by a trader’s knowledge of demand and supply zones.
Pending orders can be game changers in the foreign exchange market, put them to good use and it could change your trading day.
Trading is based on aligning oneself with major participants in the Forex market. We are all so insignificant as retail traders that we cannot even change the price by half a percentage point.
This is why it’s so important to understand how to approach the market and what tools to use.
One of the finest tools accessible to the general public at large to trade the FX market and emulate expert trading techniques to become continuously profitable in the future is the supply and demand approach.
This does not guarantee success, but only improves your chances of success. The market smiles with nobody and it can be very unpredictable.
Demand and supply zones can help improve your trading strategy, but use technical analysis and other indicators for confirmation before taking a trade.
FAQs
How does supply and demand trading work?
The rules of supply and demand are an analytical framework for determining the relationship between supply and demand for something, such as a price. High demand causes price increases, whereas stable or low trade supply and high demand lower them.
Is supply and demand a good forex strategy?
This is a fairly basic form of technical analysis and an extremely effective trading style that allows you to discover a certain entry price, as well as identify supply or demand zone, because the market price is dictated by previous prices. The levels of stop-loss and take-profit are also plainly discernible.
What timeframe is best for supply and demand?
Trading supply and demand zones are ideally better to swing traders that trade daily supply or daily demand zone. Ideally, the daily chart or the 4-hour time frame is what most traders would prefer, because those timeframes have stronger demand and supply zones. Scalpers can trade demand and supply levels on the lower times frames but those zones are not the best.
Is supply and demand the same as support and resistance?
Supply and demand are regions that are more precise and exact on a trading chart. In terms of price levels, support and resistance are larger zones.
These two zones are frequently the most important levels on the chart, as well as the ideal levels to trade after they are established.
In most cases, they tend to share the same price area and react the same way to price action. Traders also place a market order on these zones (both supply and demand and supply and resistance levels)