
Learn To Trade Forex • Best Forex Trading Course • AsiaForexMentor

ICT Order Block Strategy Proven Across 5,242 Real Trades

Written by:

Ezekiel Chew

Last updated on:

September 7, 2026

Most traders following the ICT order block strategy are using a method that turned a $10,000 account into $571. The checklist looked clean on every single trade.

About This Guide
Written by Ezekiel Chew, founder of Asia Forex Mentor and institutional forex trader with over 20 years of experience. This article examines the ICT order block strategy as stress-tested across 5,242 EURUSD trades by AFM Research Lab. It covers why the textbook method fails, what the data shows, and the exact 4-filter system that produces a genuine edge. Asia Forex Mentor has trained more than 100,000 traders across 50+ countries.
Quick Answer
The ICT order block strategy works as context, not a standalone trigger. The textbook method loses money at scale. Four filters, trend alignment, a 4 ATR launch, a 20-bar freshness window, and a full-body close above the zone high, convert order blocks into high-probability setups with a verified edge across thousands of trades.

🎥 Watch the full method explained on video:
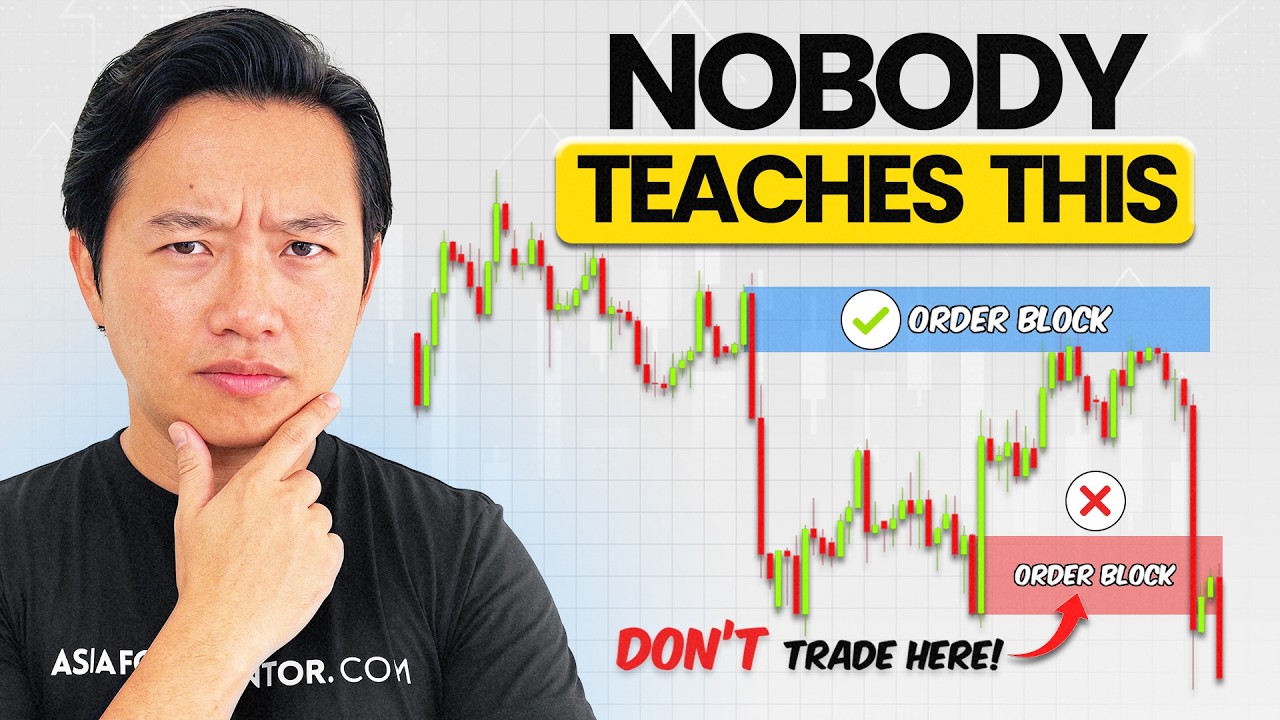
The ICT Order Block Rule Nobody Teaches You — Proven in 5,242 Trades

Key Takeaways

 The following points frame the strategy before each section covers it in detail:

  • The textbook ICT order block method fails at scale because it treats the zone as a trigger rather than as context.
  • Adding a strong move filter changes which setups qualify but does not change why they lose. Filters cannot detect a zone that has already been visited and absorbed.
  • Trend alignment on the higher timeframe determines whether an order block carries weight or is nothing more than a speed bump.
  • A launch of at least 4 ATR away from the zone is the minimum threshold. Weaker moves produce zones that do not hold on the retest.
  • Any zone older than 20 bars is spent. Fresh zones only.
  • The trigger is a full-body candle close above the zone high on the 4-hour chart. A wick into the zone is not confirmation.

The ICT Order Block Rule

Everything you have been taught about the ICT order blocks the normal way is costing you money. The AFM Research Lab tested the textbook order block across 5,242 trades on EURUSD. Then they added the two fixes that all traders reach for, a strong move filter and fully optimized rules. Every single version lost money.

At the AFM Research Lab, one approach was found that actually holds up, and it changes everything about how this concept is used. Get this one rule right and you stop entering zones that price blows through.

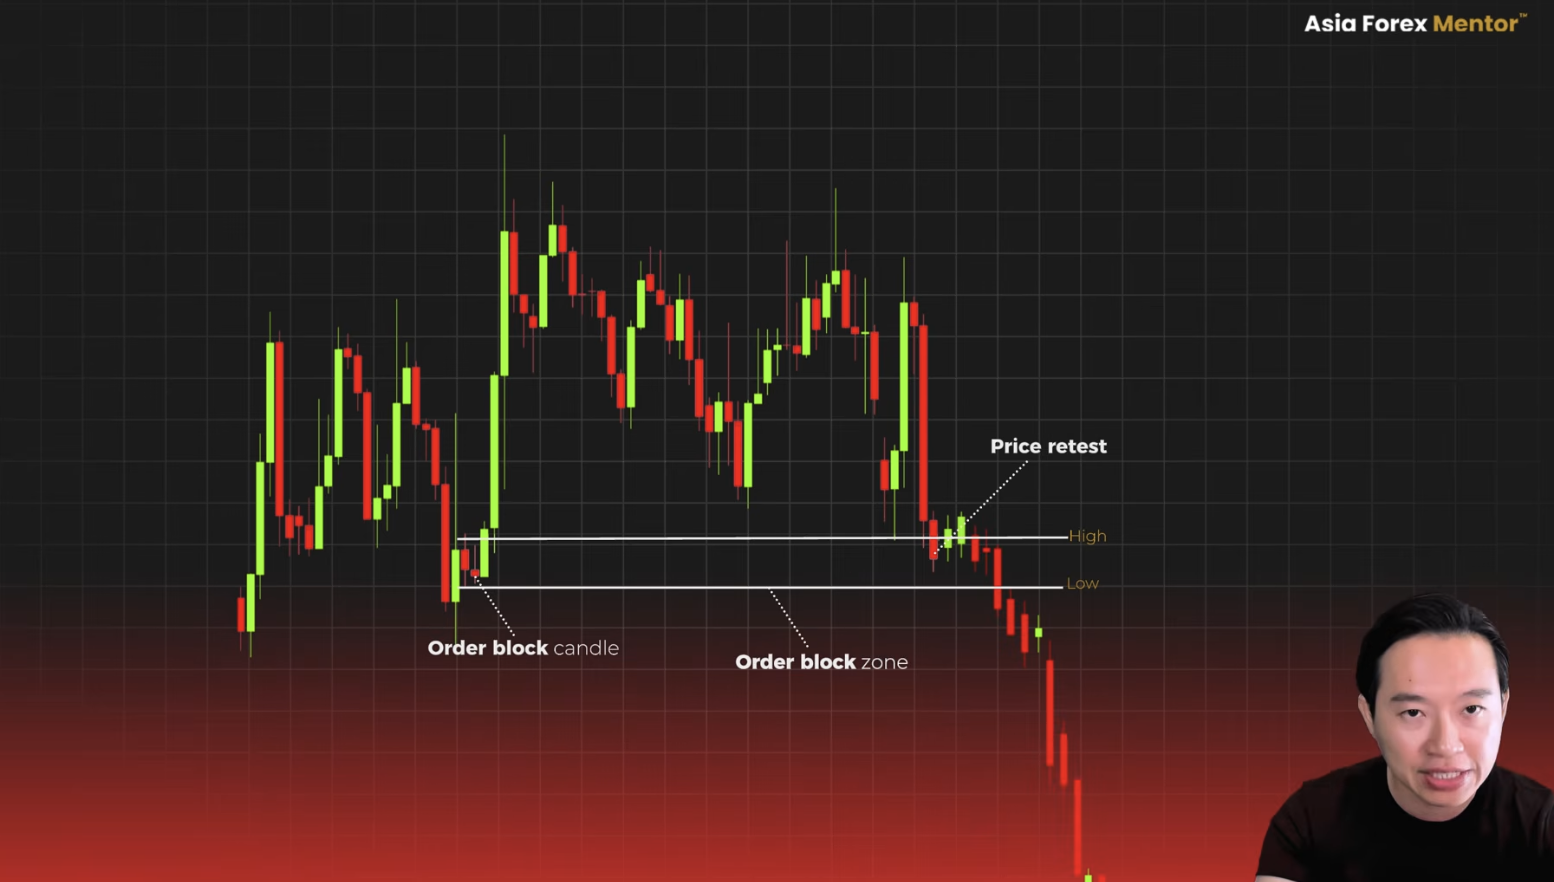
Take a look at this chart. Price comes back to the zone. It hits the exact level where the candle had formed. And then it reverses hard.
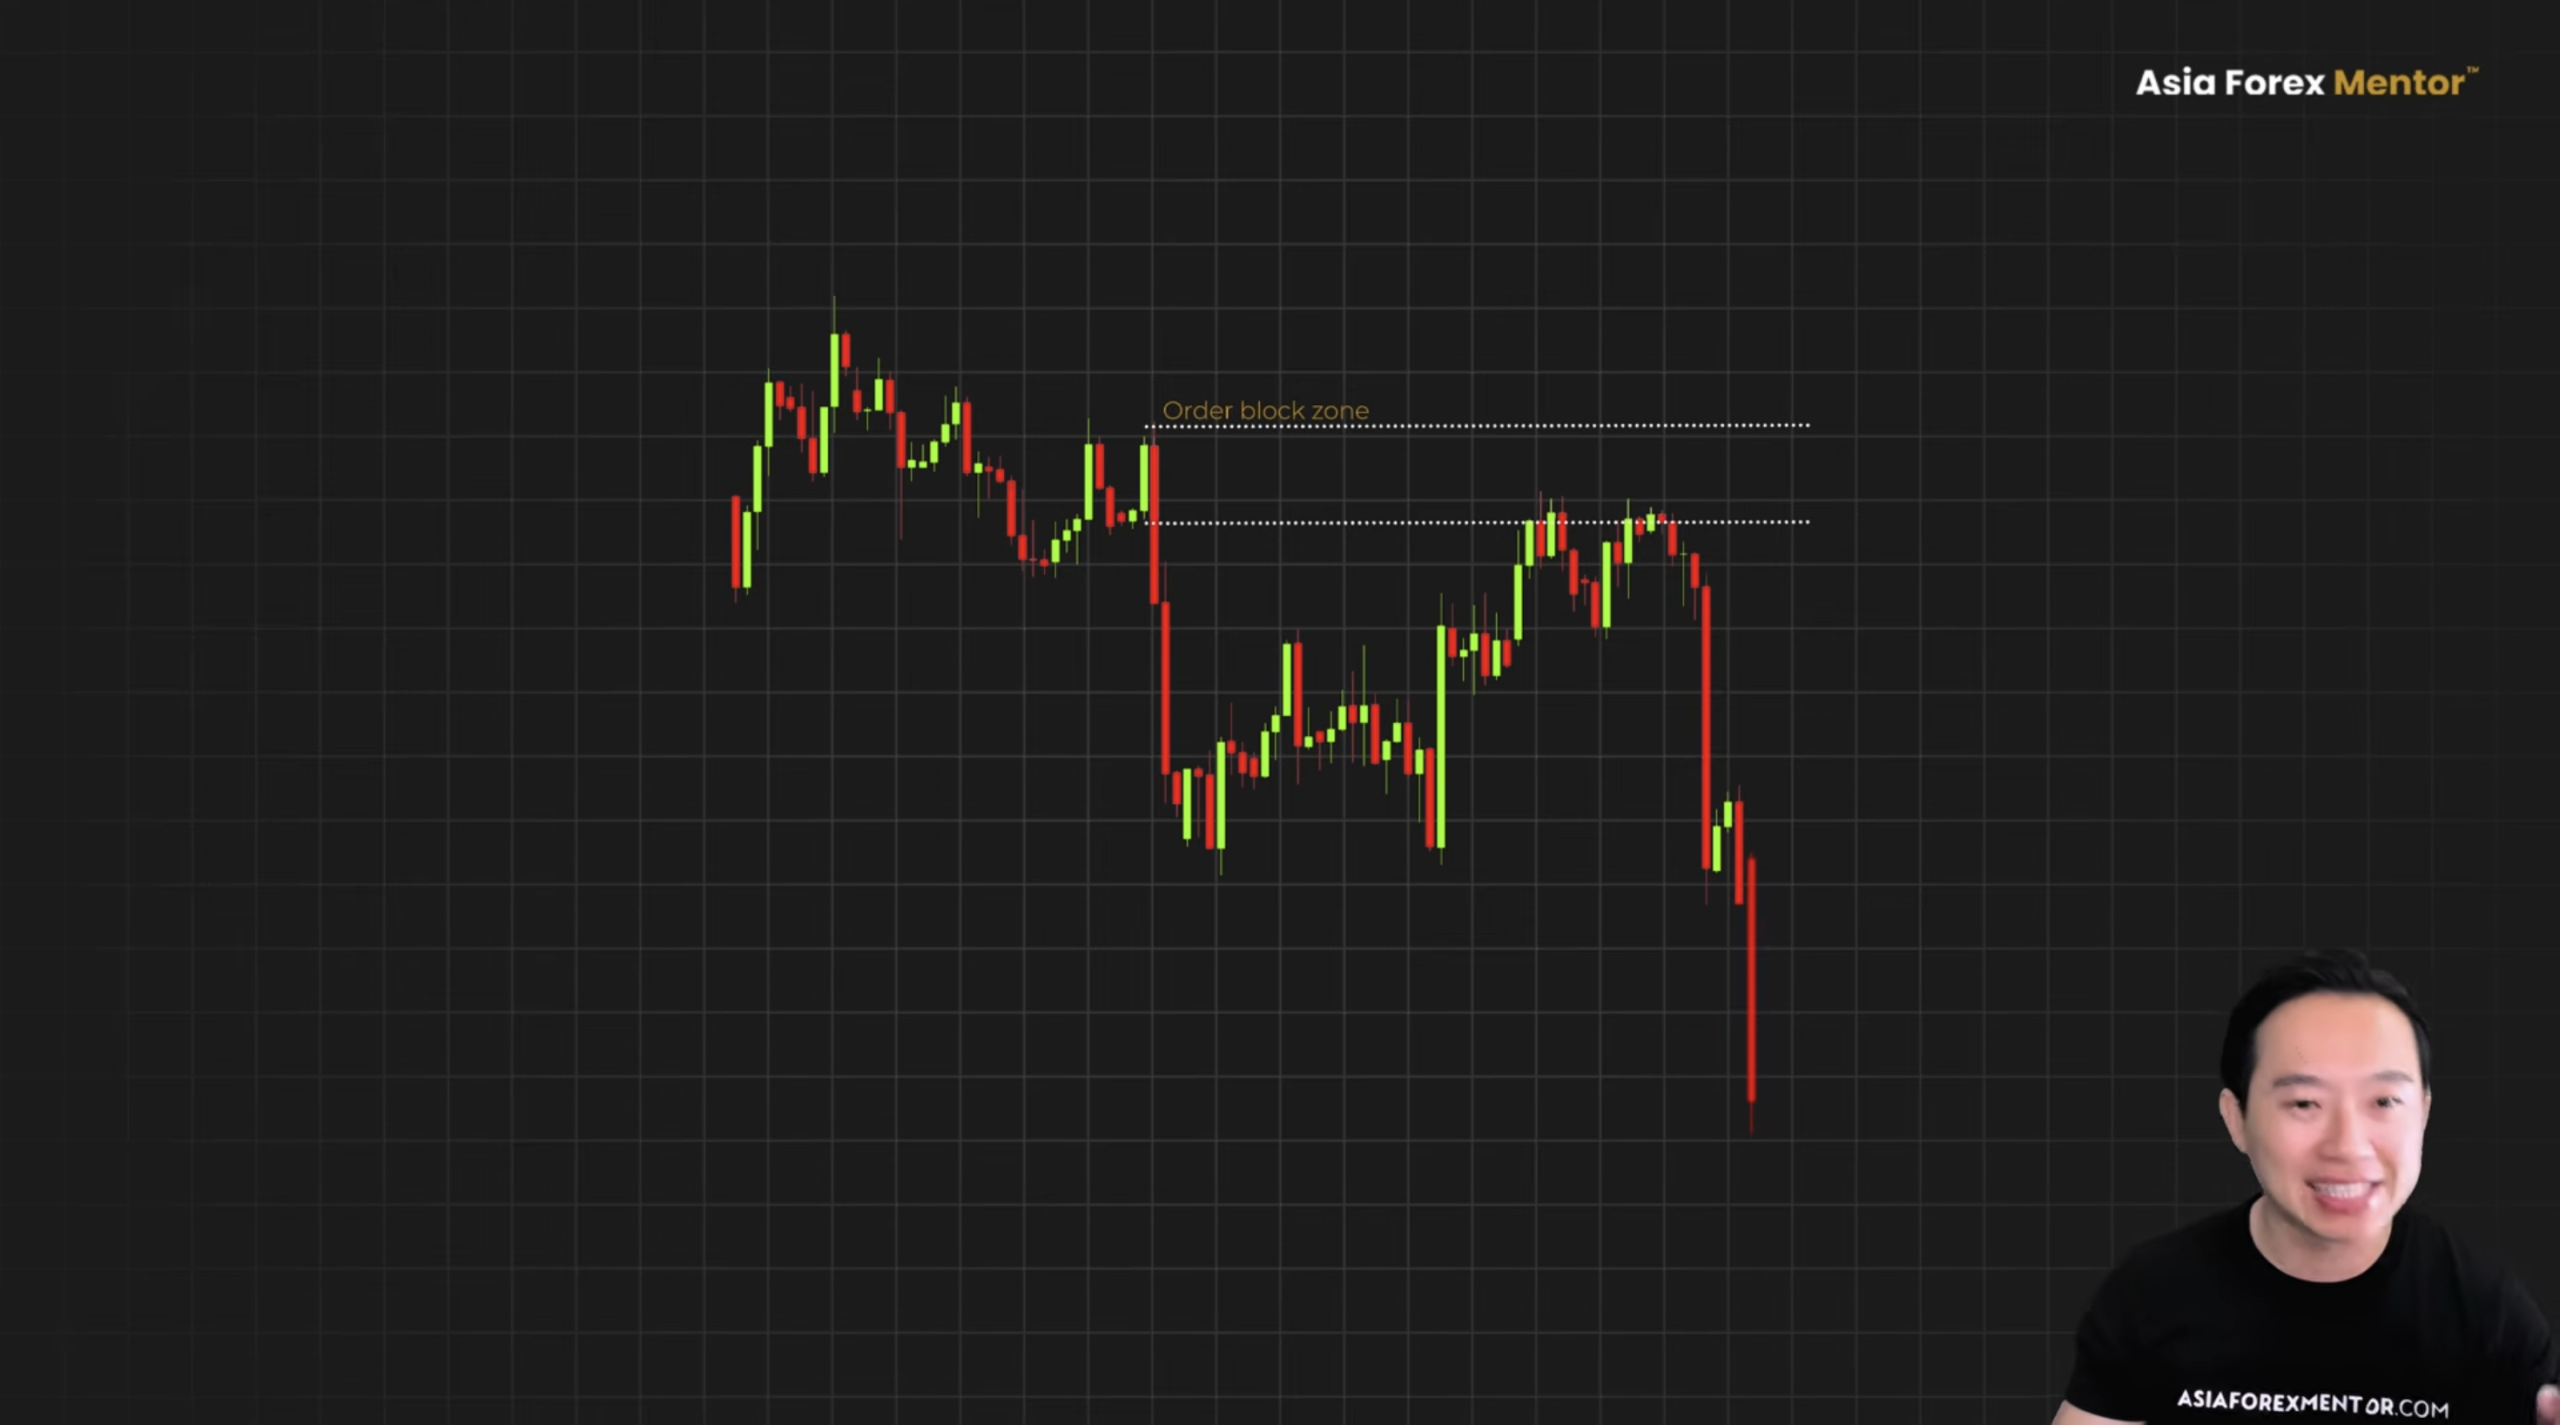
The Setup Everyone Starts With

Find the candle right before the big move. Mark the high to the low as your zone. Wait for price to come back to it and enter.
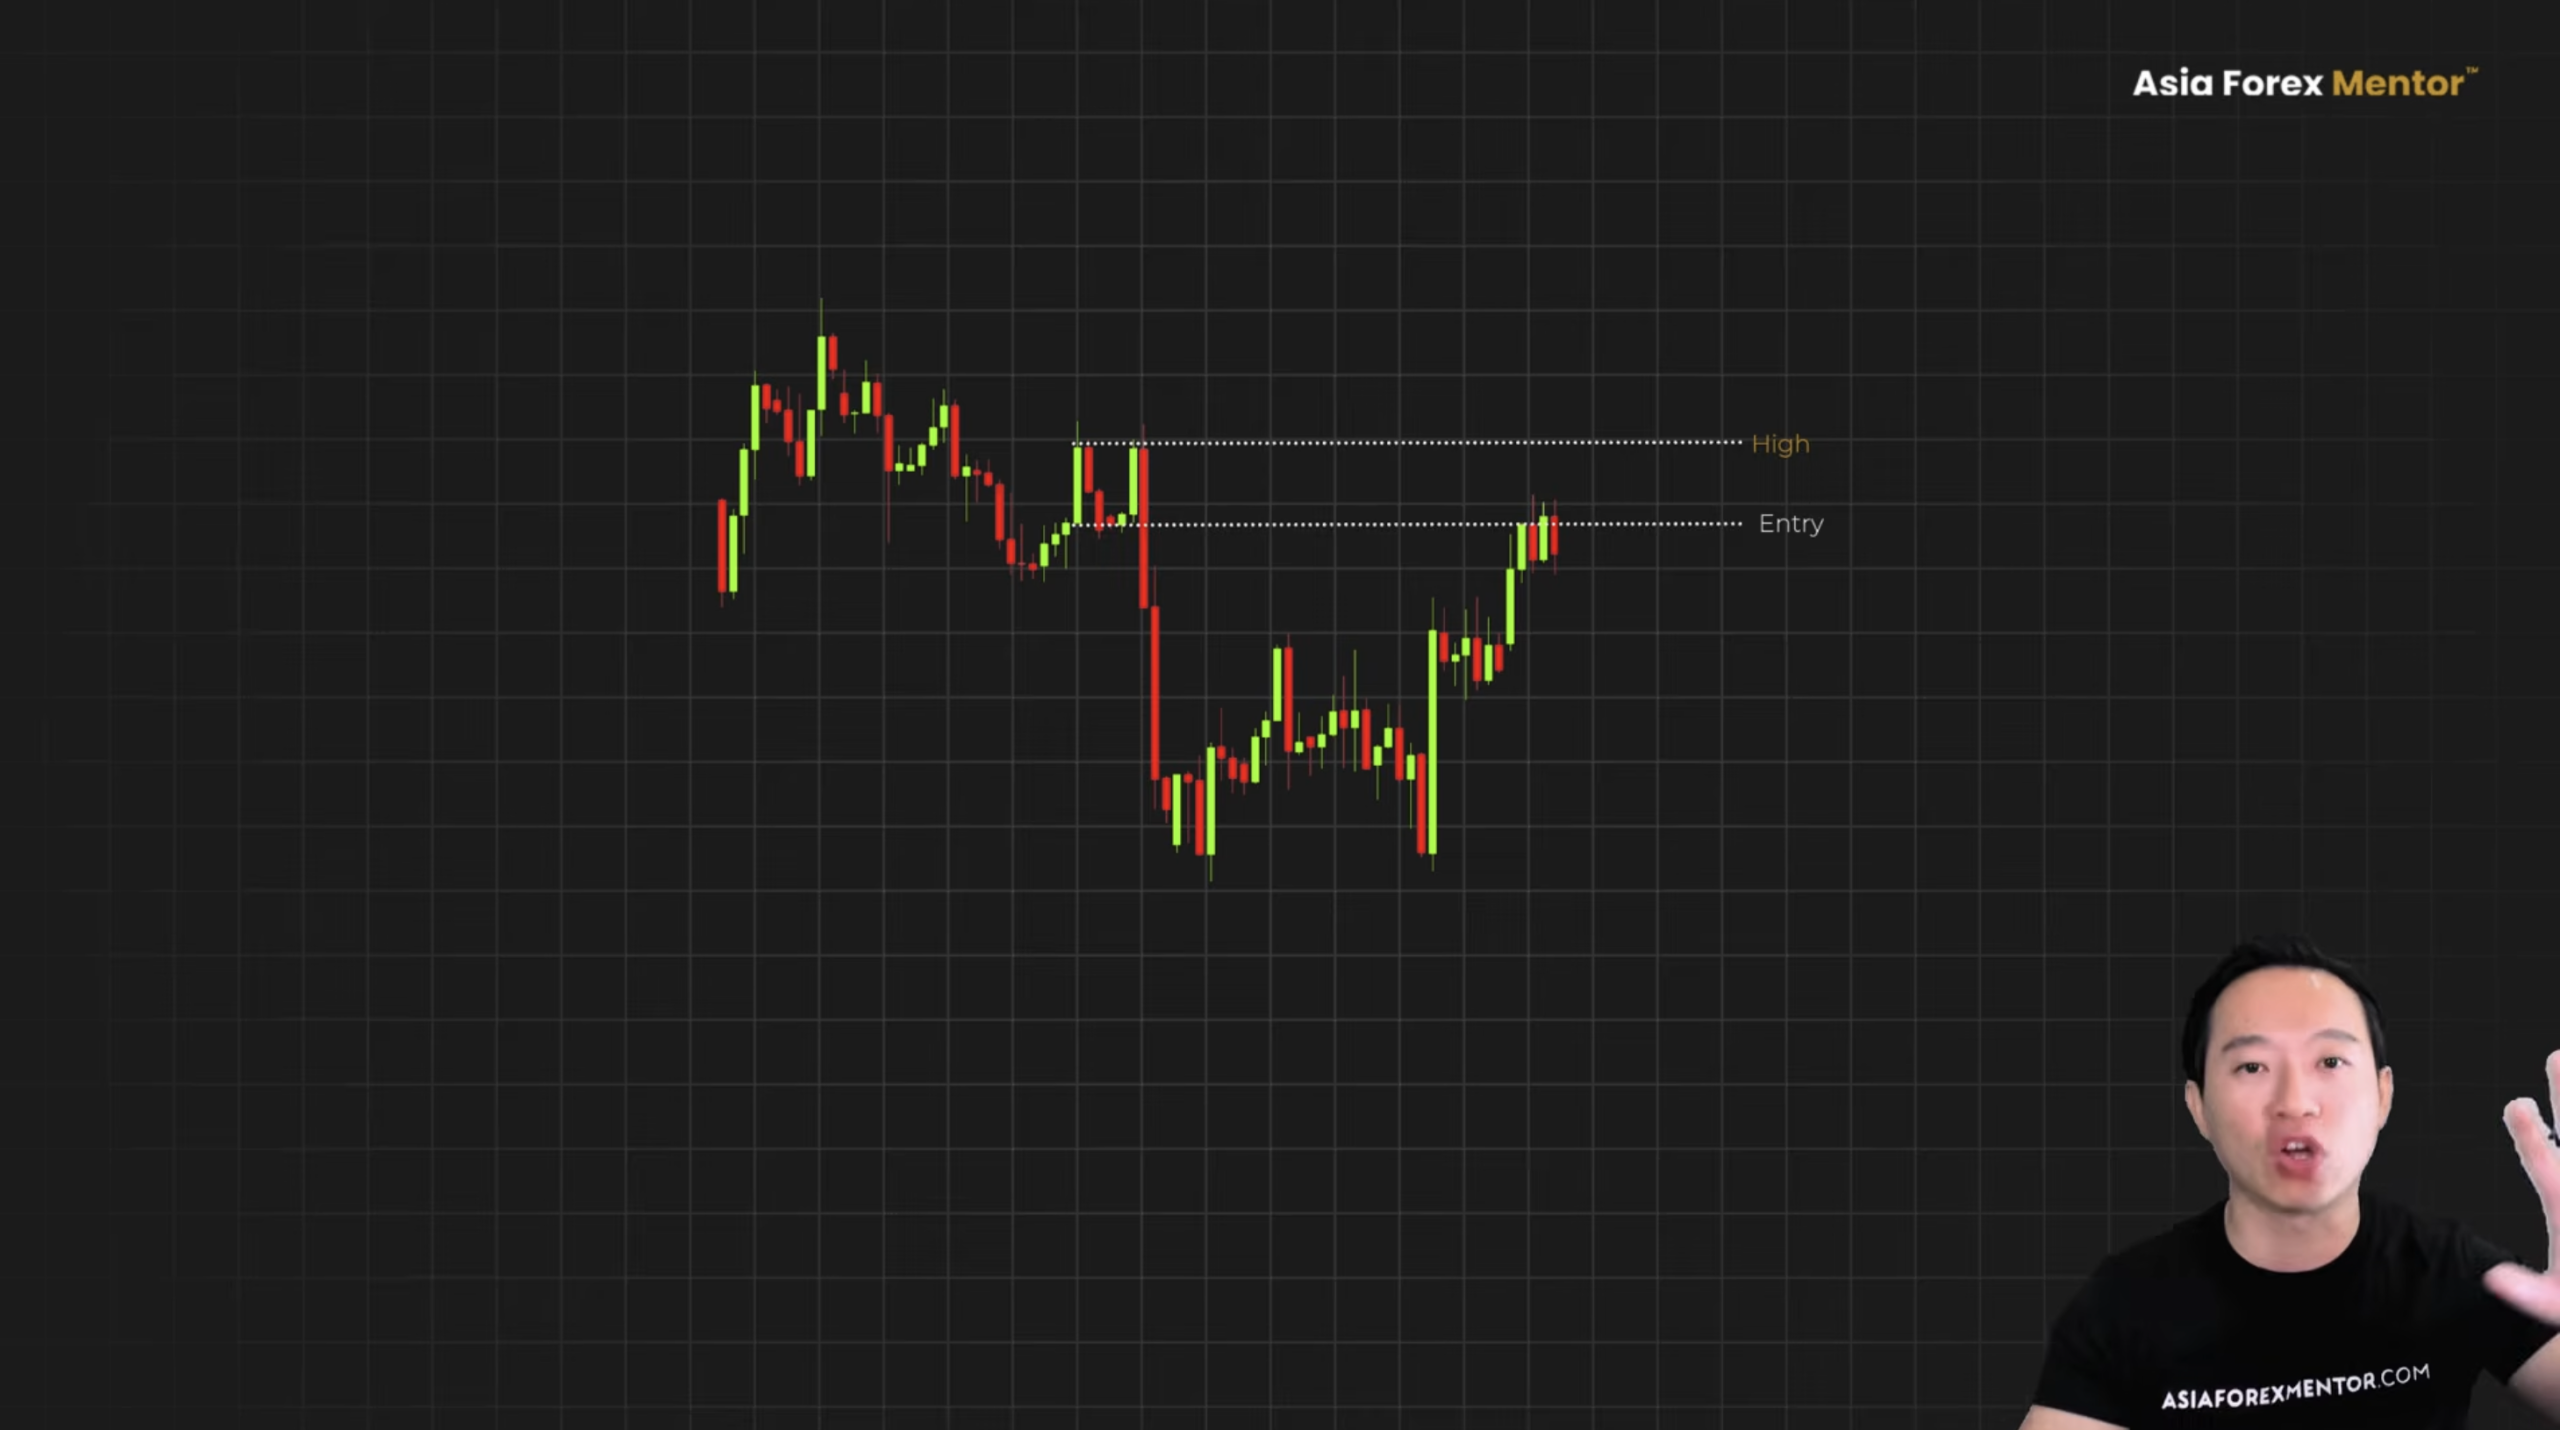
That is the version taught everywhere. On the surface, the logic is sound. But that is exactly where the problem starts. The concept is not wrong. What costs traders money is the application. What they actually do once that zone is drawn.

If you look at this chart, one bear candle and then price launches hard. The candle is your order block. You mark it high to low. You draw the zone, you wait for price to come back to it. The idea is that the big institutional orders are still sitting there. On the chart, it looks airtight.

Price comes back, closes inside the zone, that is a trigger. You go long. Put your stop loss below the candle low and target 2R above it. This is what retail traders have been taught for years. It looks clean.
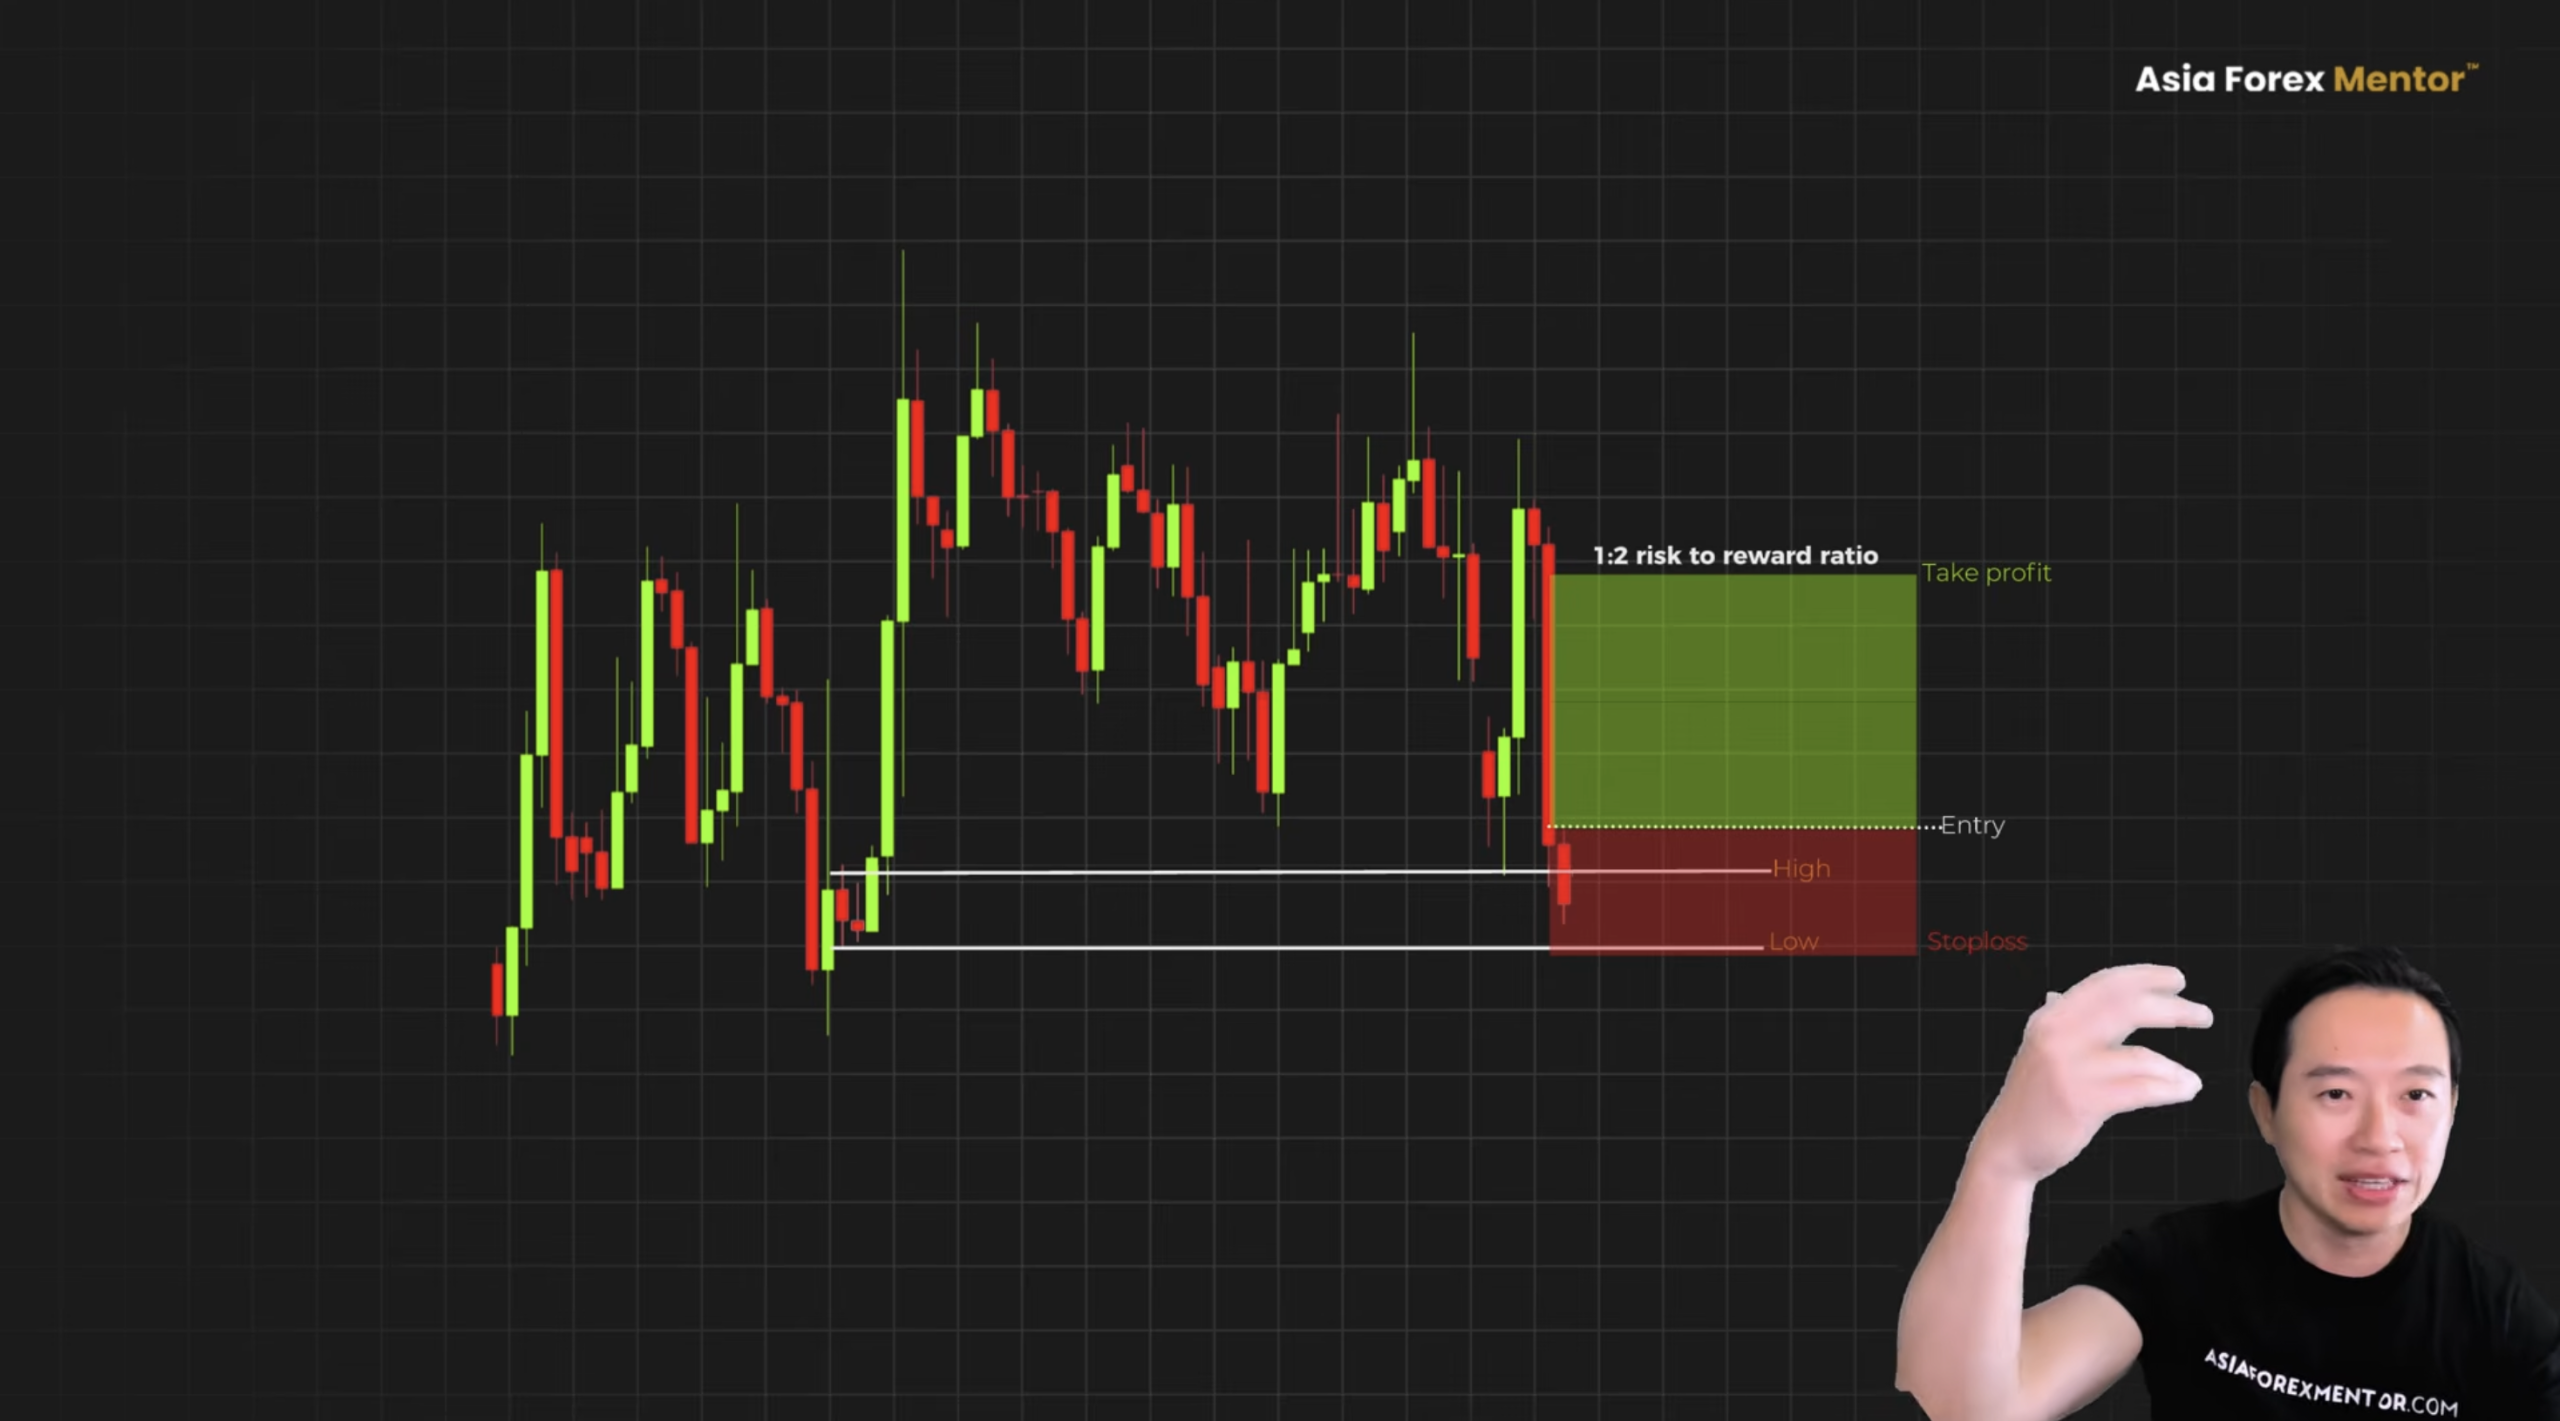
Watch this. Price hits the zone and stalls for a candle or two. Then it blows straight through. The stop loss got hit.
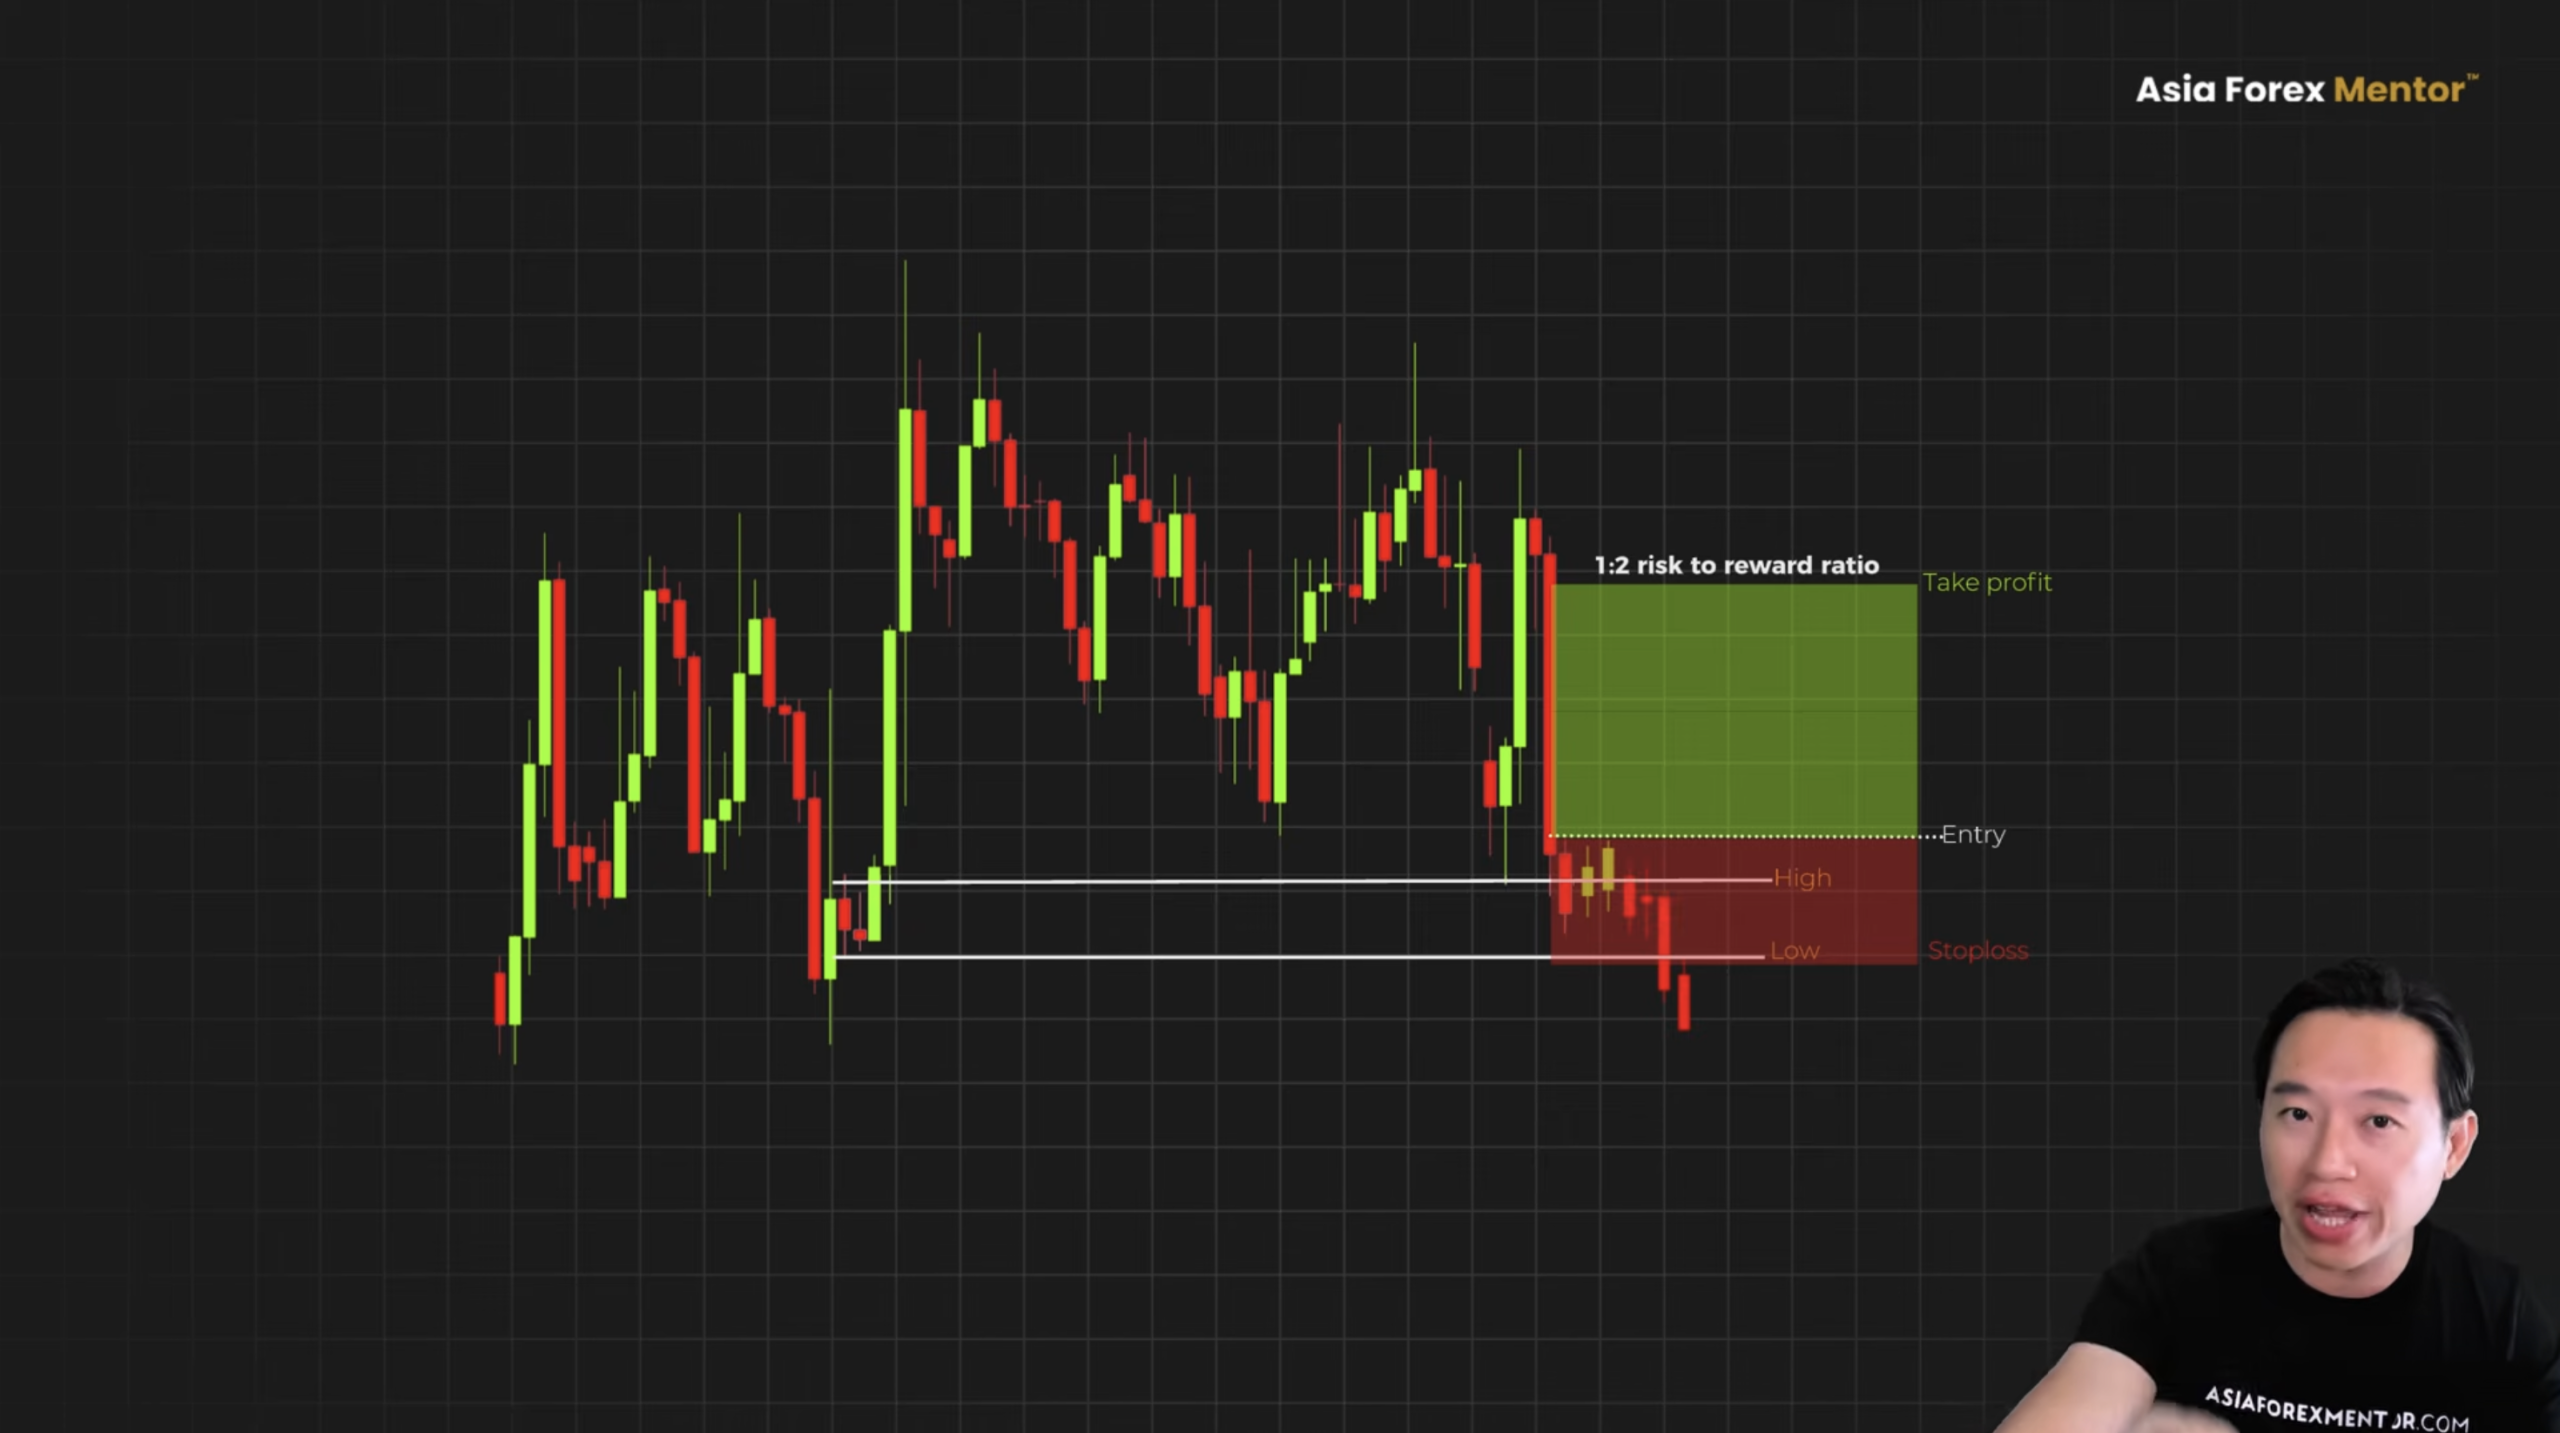
The AFM Research Lab ran through this exact setup across 5,242 trades. A $10,000 account became $571. That is not a rough patch. That is the strategy bleeding the account dry.

Here is the real take from the data. Every textbook condition was met. The candle, the zone, the retest, they were all clean. Price tapped in and kept right on going. Nothing on the checklist told you this one would fail. The checklist was never the problem.
The Mistake Traders Make

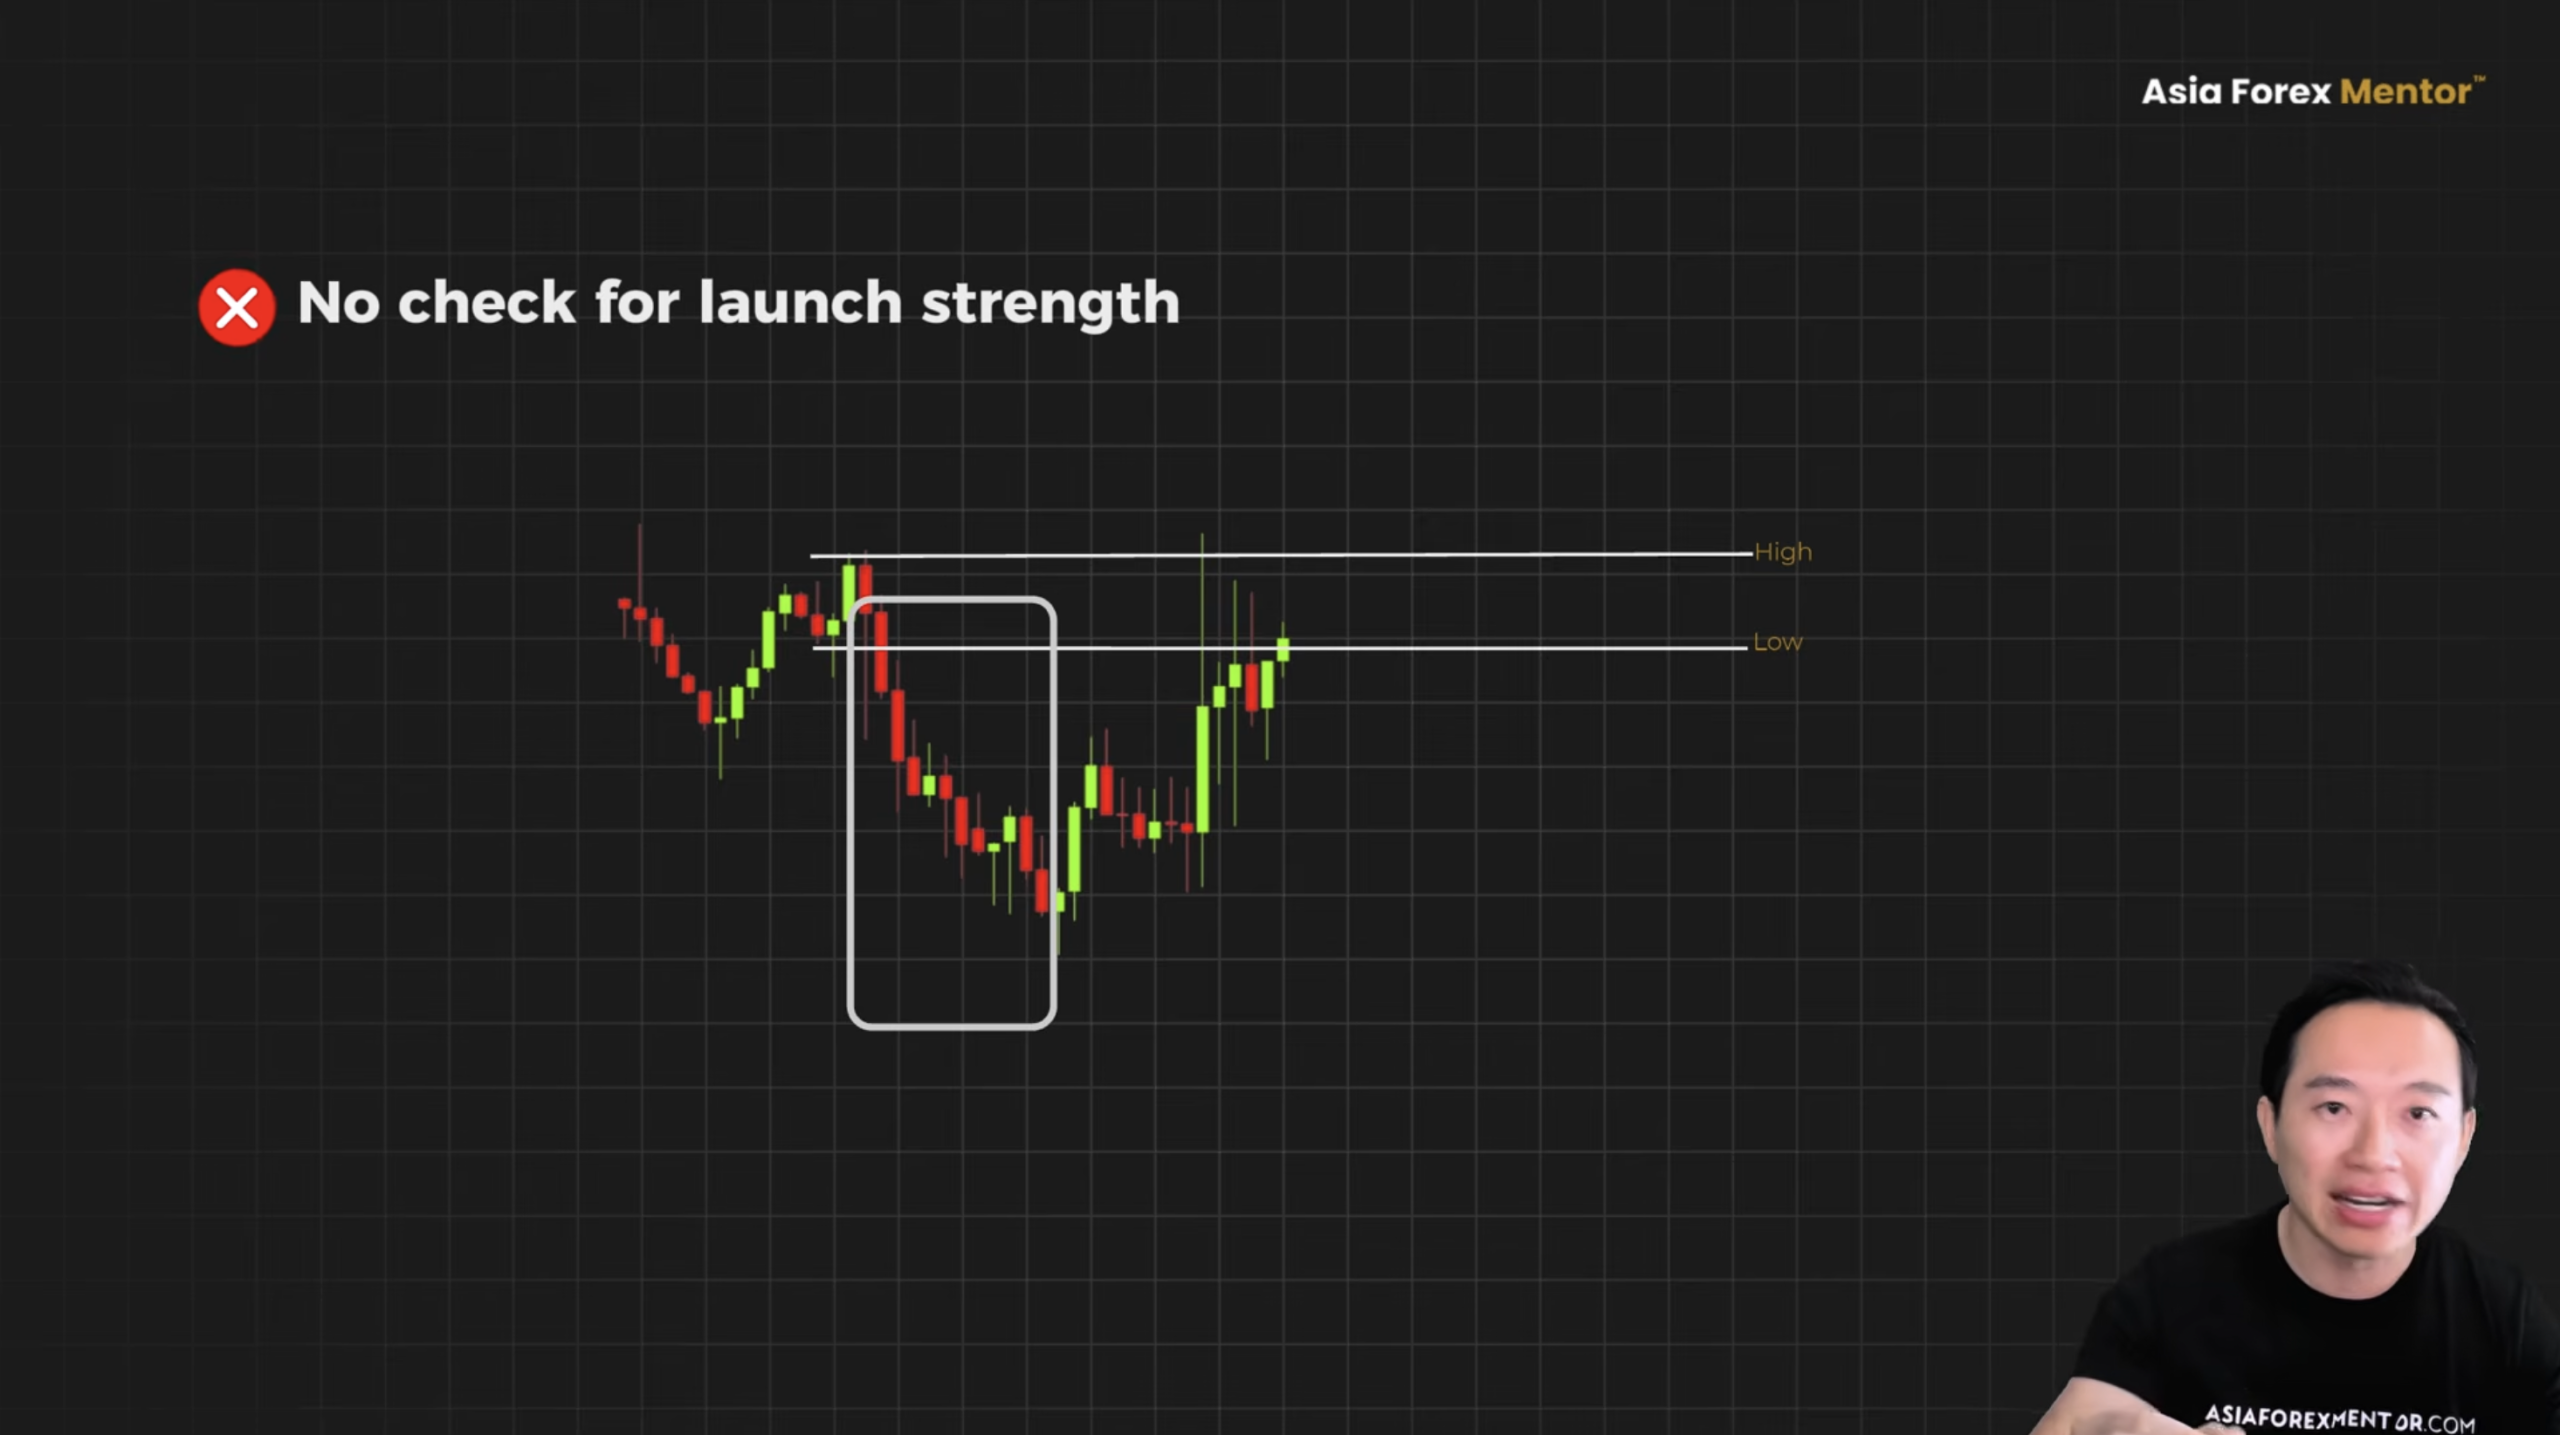
Traders see a candle before an impulse. They mark the zone, they wait for price to retest. There is no check on whether the launch was strong enough. There is no check on whether the zone is fresh enough. The very issue that was just flagged. They just mark it and wait.
The Strong Move Filter

Traders spotted this and tried to fix it. They added a filter.

Look at this chart. Two moves hit the same area. One grinds in slow. The other is sharp and explosive, two candles and done. Traders add a rule: only take the zone when the launch was aggressive. If it is a weak move, skip it. If it is a strong move, take it.
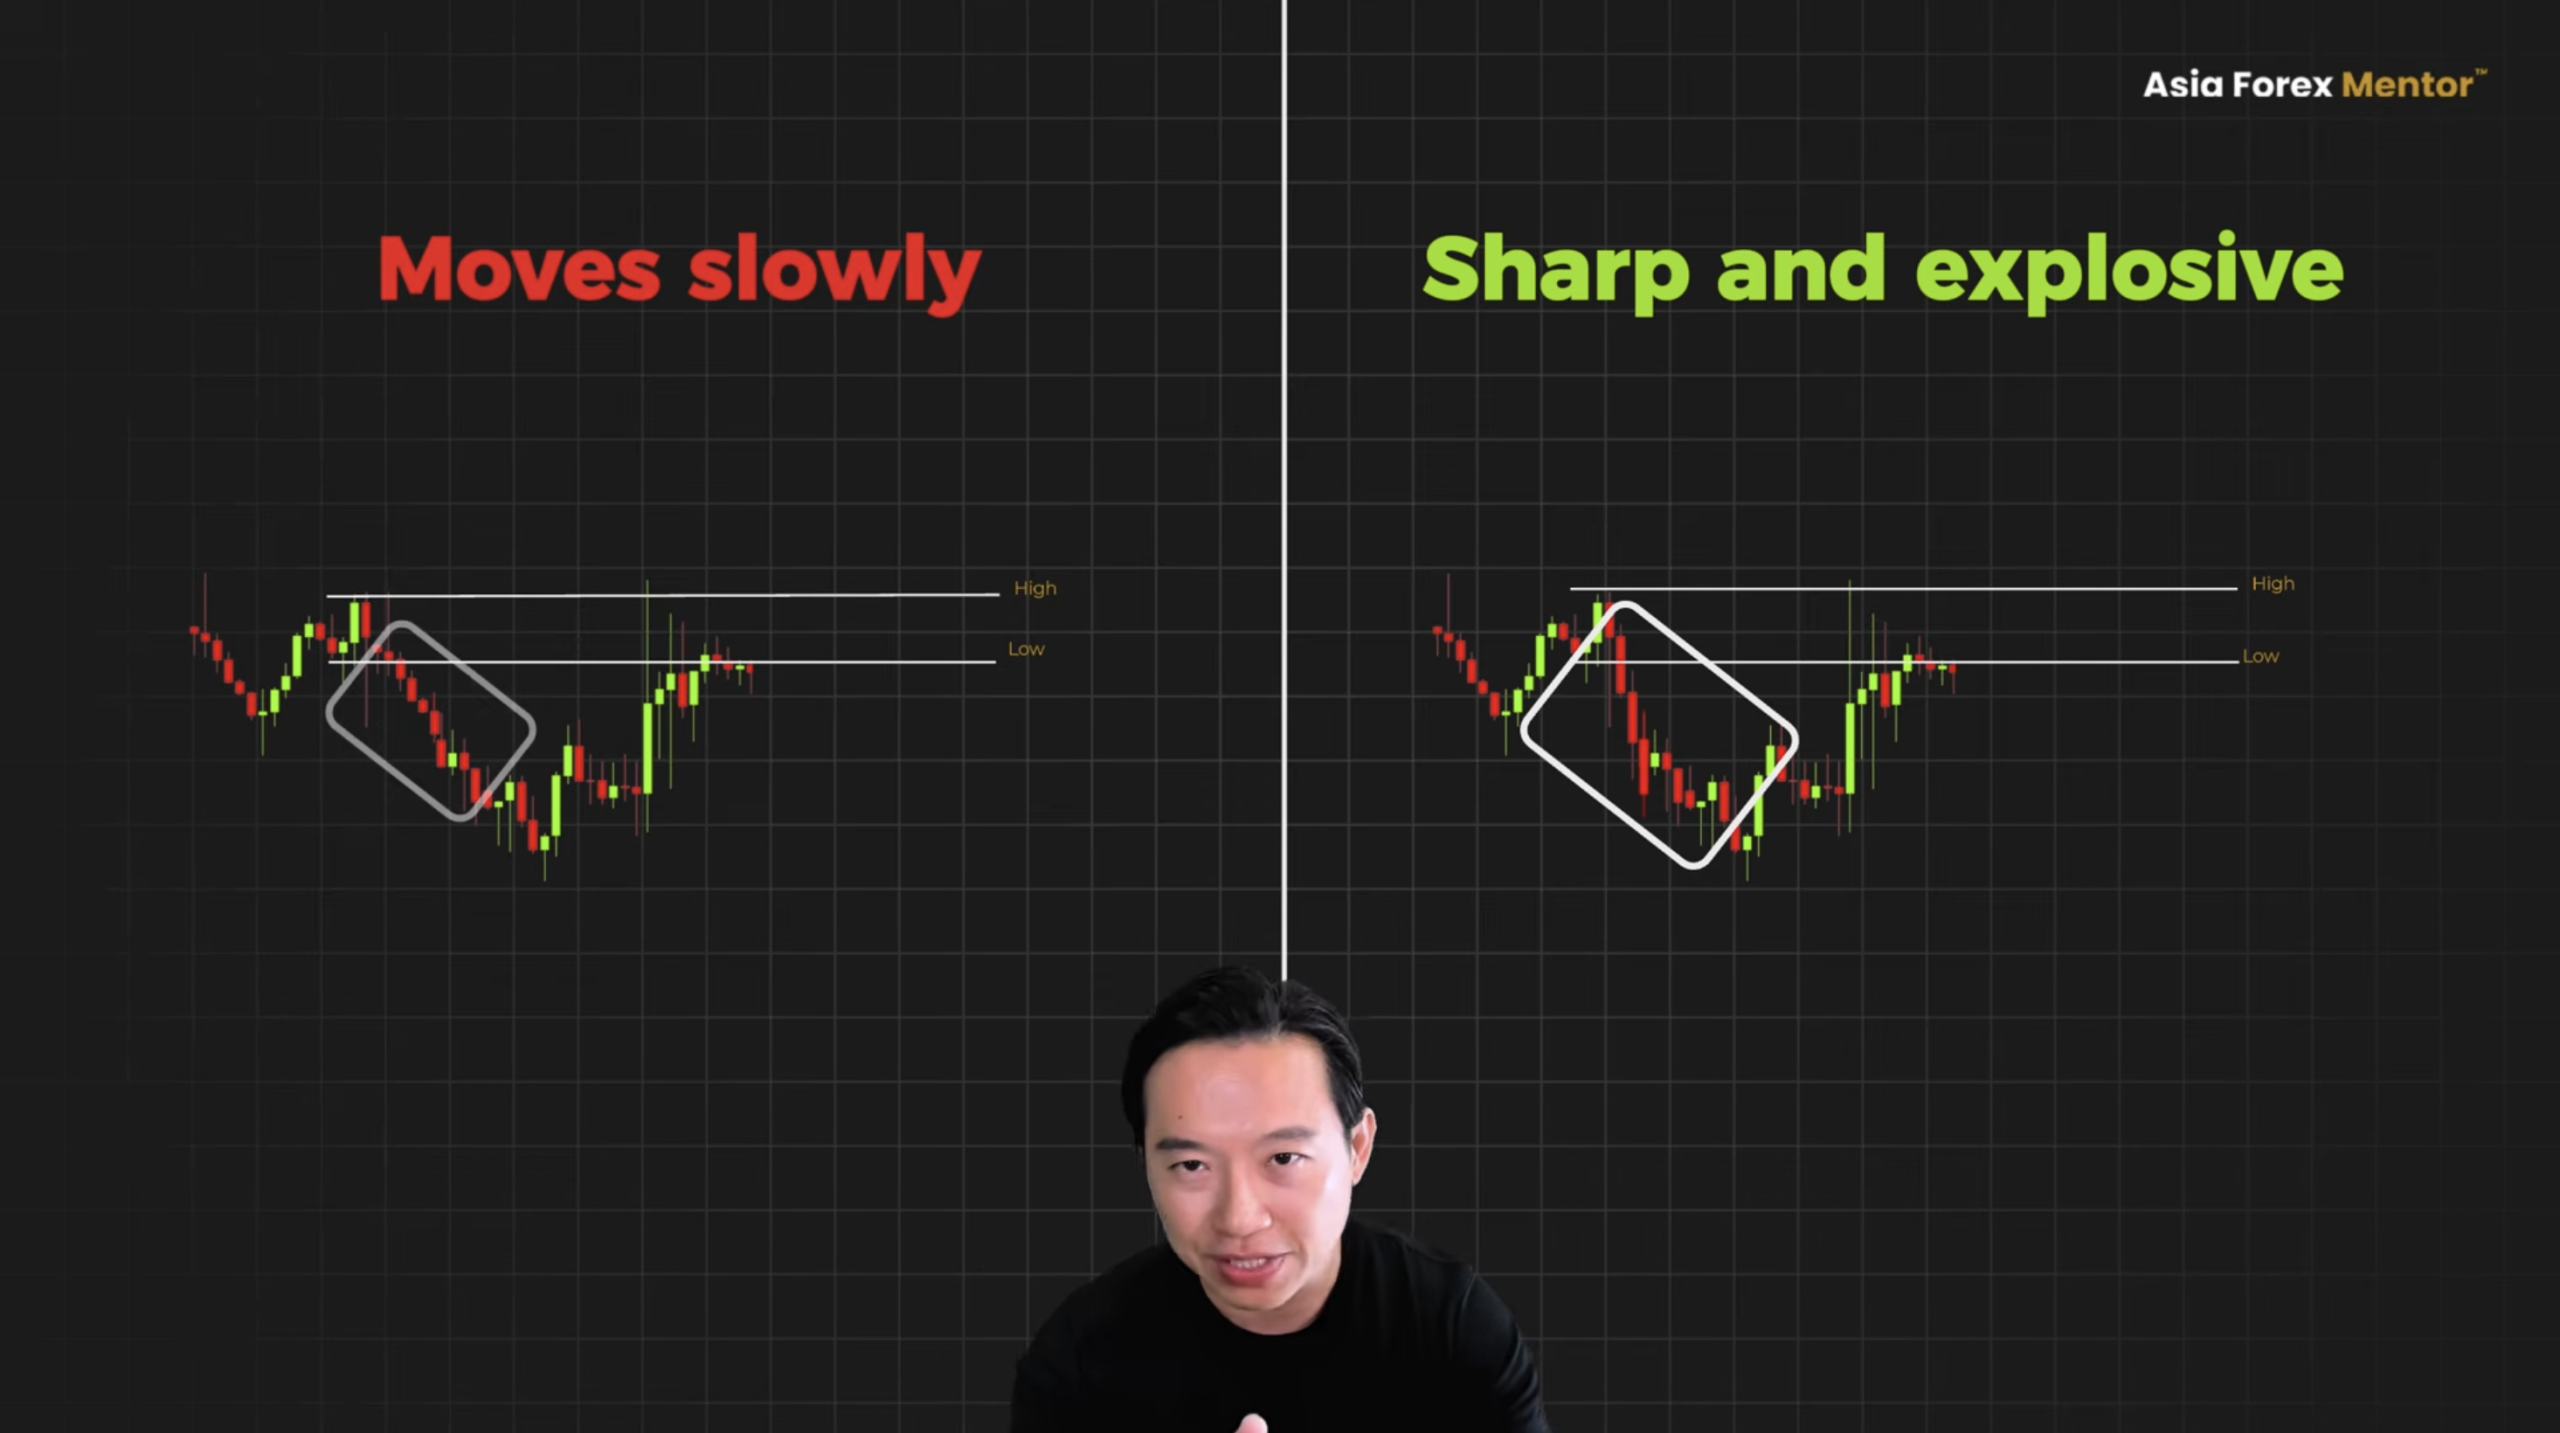
On paper, that makes sense. You cut away the junk and keep the good ones.

But here is where it breaks down. The zone qualifies. Sharp impulse. Two candles. Clean. And it still fails on the retest.

The filter changed what you were taking. It did not change why you were losing.

Here is what no impulse filter can see. The zone forms on a strong impulse. Textbook quality. But this is the third time price has been at this level. Those orders were already absorbed on the first two visits. That zone is spent.
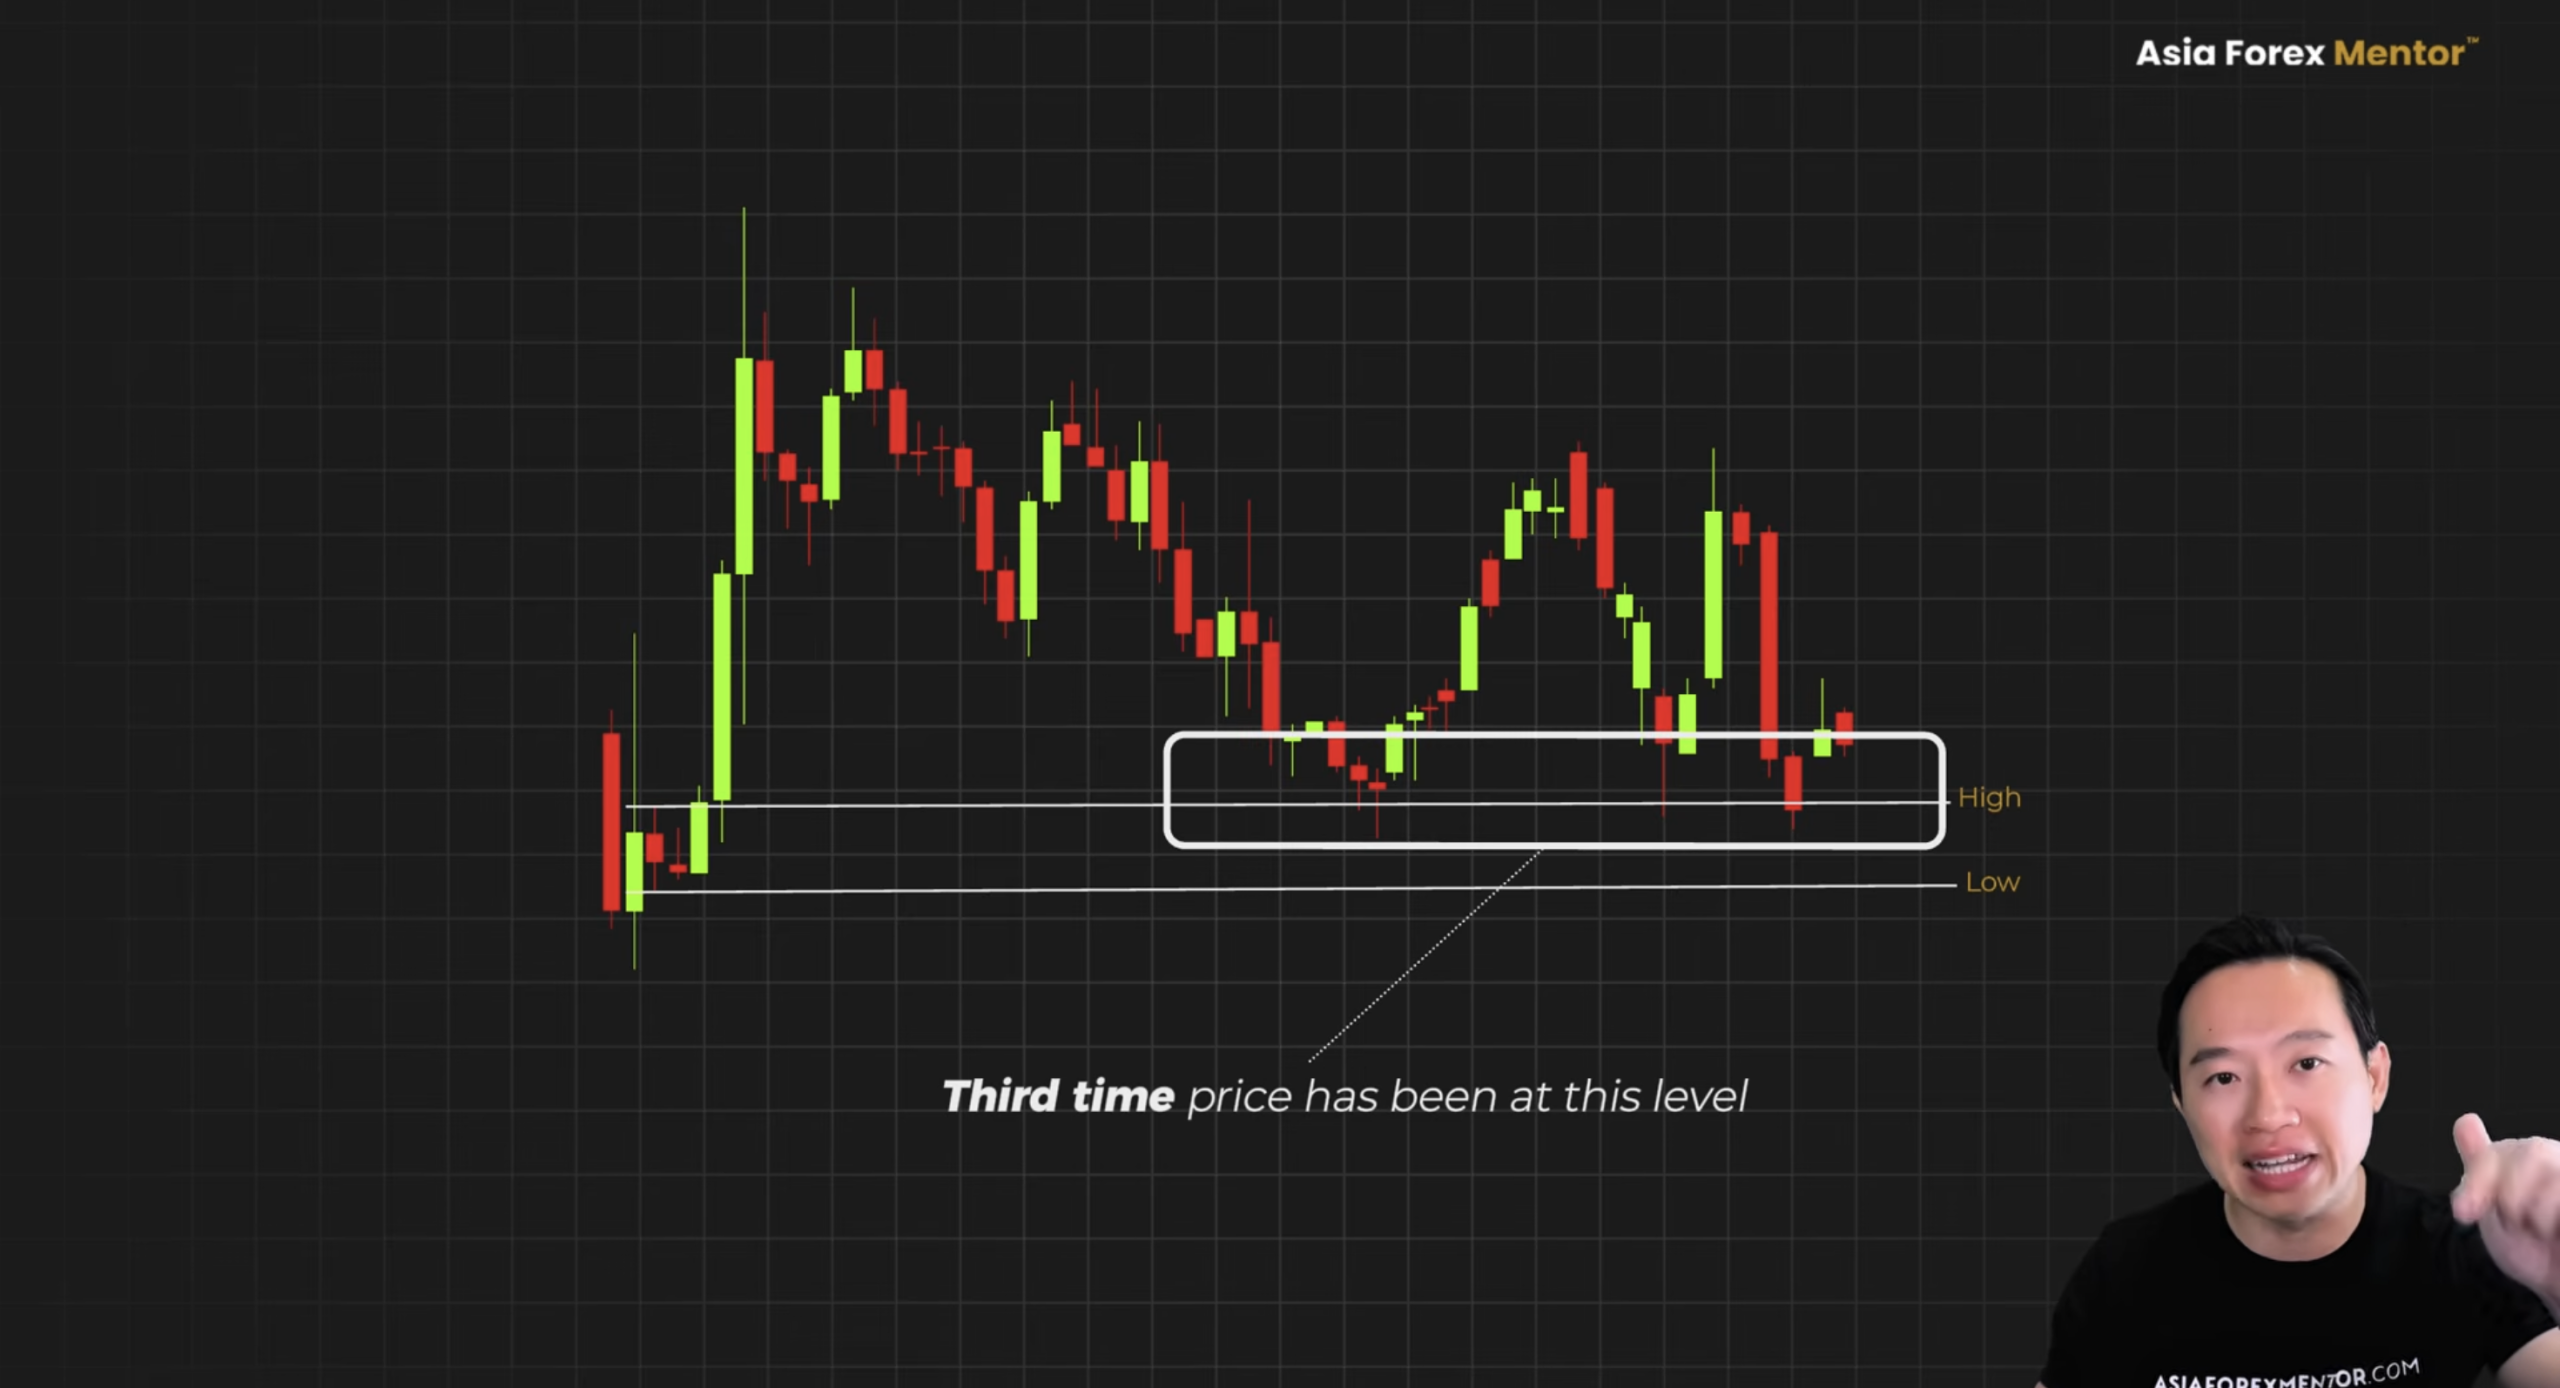
That is the mistake in every filtered version. Harder impulse, tighter rules, cleaner triggers, but they never ask the only question that matters.

Does price actually have a reason to reverse here?

They are sharpening the wrong tool.

The Fully Mechanical Version

The AFM Research Lab made every rule mechanical. A fixed ATR threshold on the launch. A maximum age on the zone. The setup has to clear every one of them before it fires. Completely mechanical, pure rules.

It ran 311 trades. The win rate: 27 percent.

The tighter the filter, the lower the strike rate. Not higher. Every rule qualified. The risk to reward was clean. The entry trigger was objective. The edge still was not there.
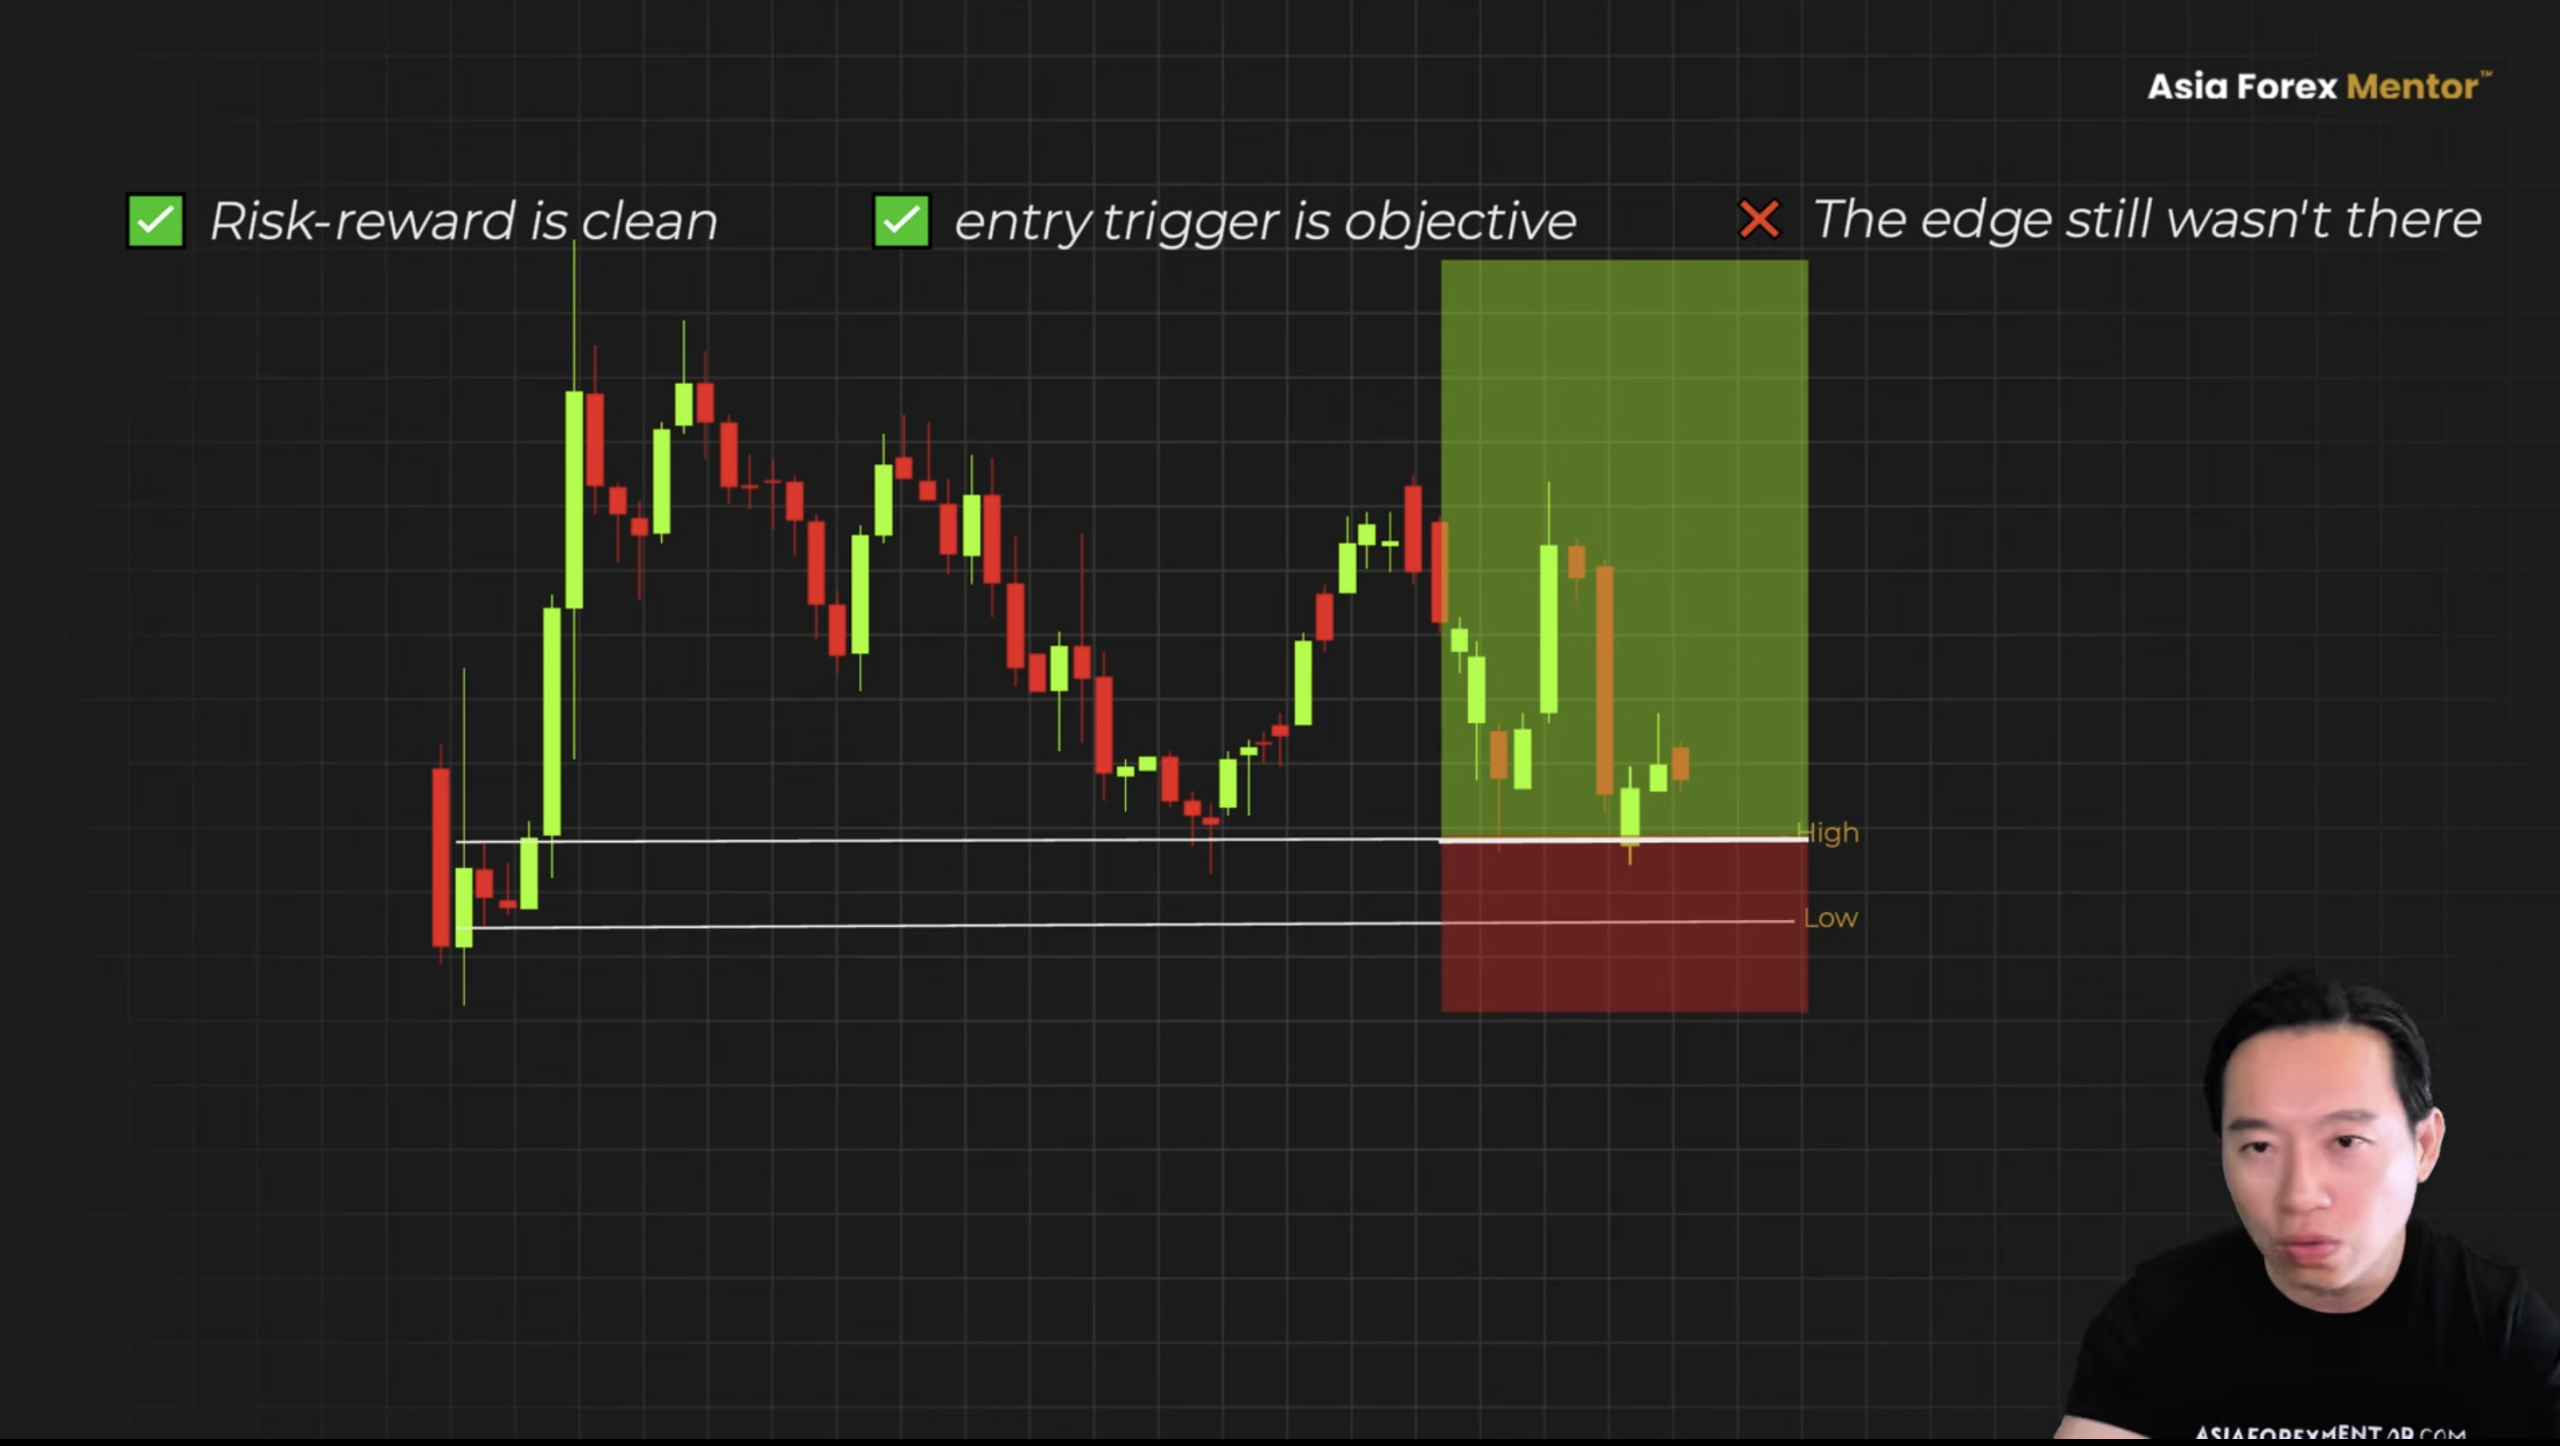
That is the real insight. Every version, textbook, filtered, mechanically optimized, treats the order block as the reason to enter. The zone does not tell you if price will actually care about that zone. It only tells you where it might.

Three methods, same results. Every version lost money as a standalone system.

What The Same Test Revealed

The same test that killed it as a system revealed something else. The one job this concept does better than almost anything.

The AFM Research Lab ran these same tests through a 200-parameter combination. Across four independent windows the optimizer never saw. Then shuffled the trades a thousand times. Every version produced one result.

The order block does not work as a system. It works as context.

Here is what that means. The first thing to check is the trend.

Look at this chart. Clean higher highs, higher lows. Price is pushing up. That is the only environment where a bullish order block carries any weight.
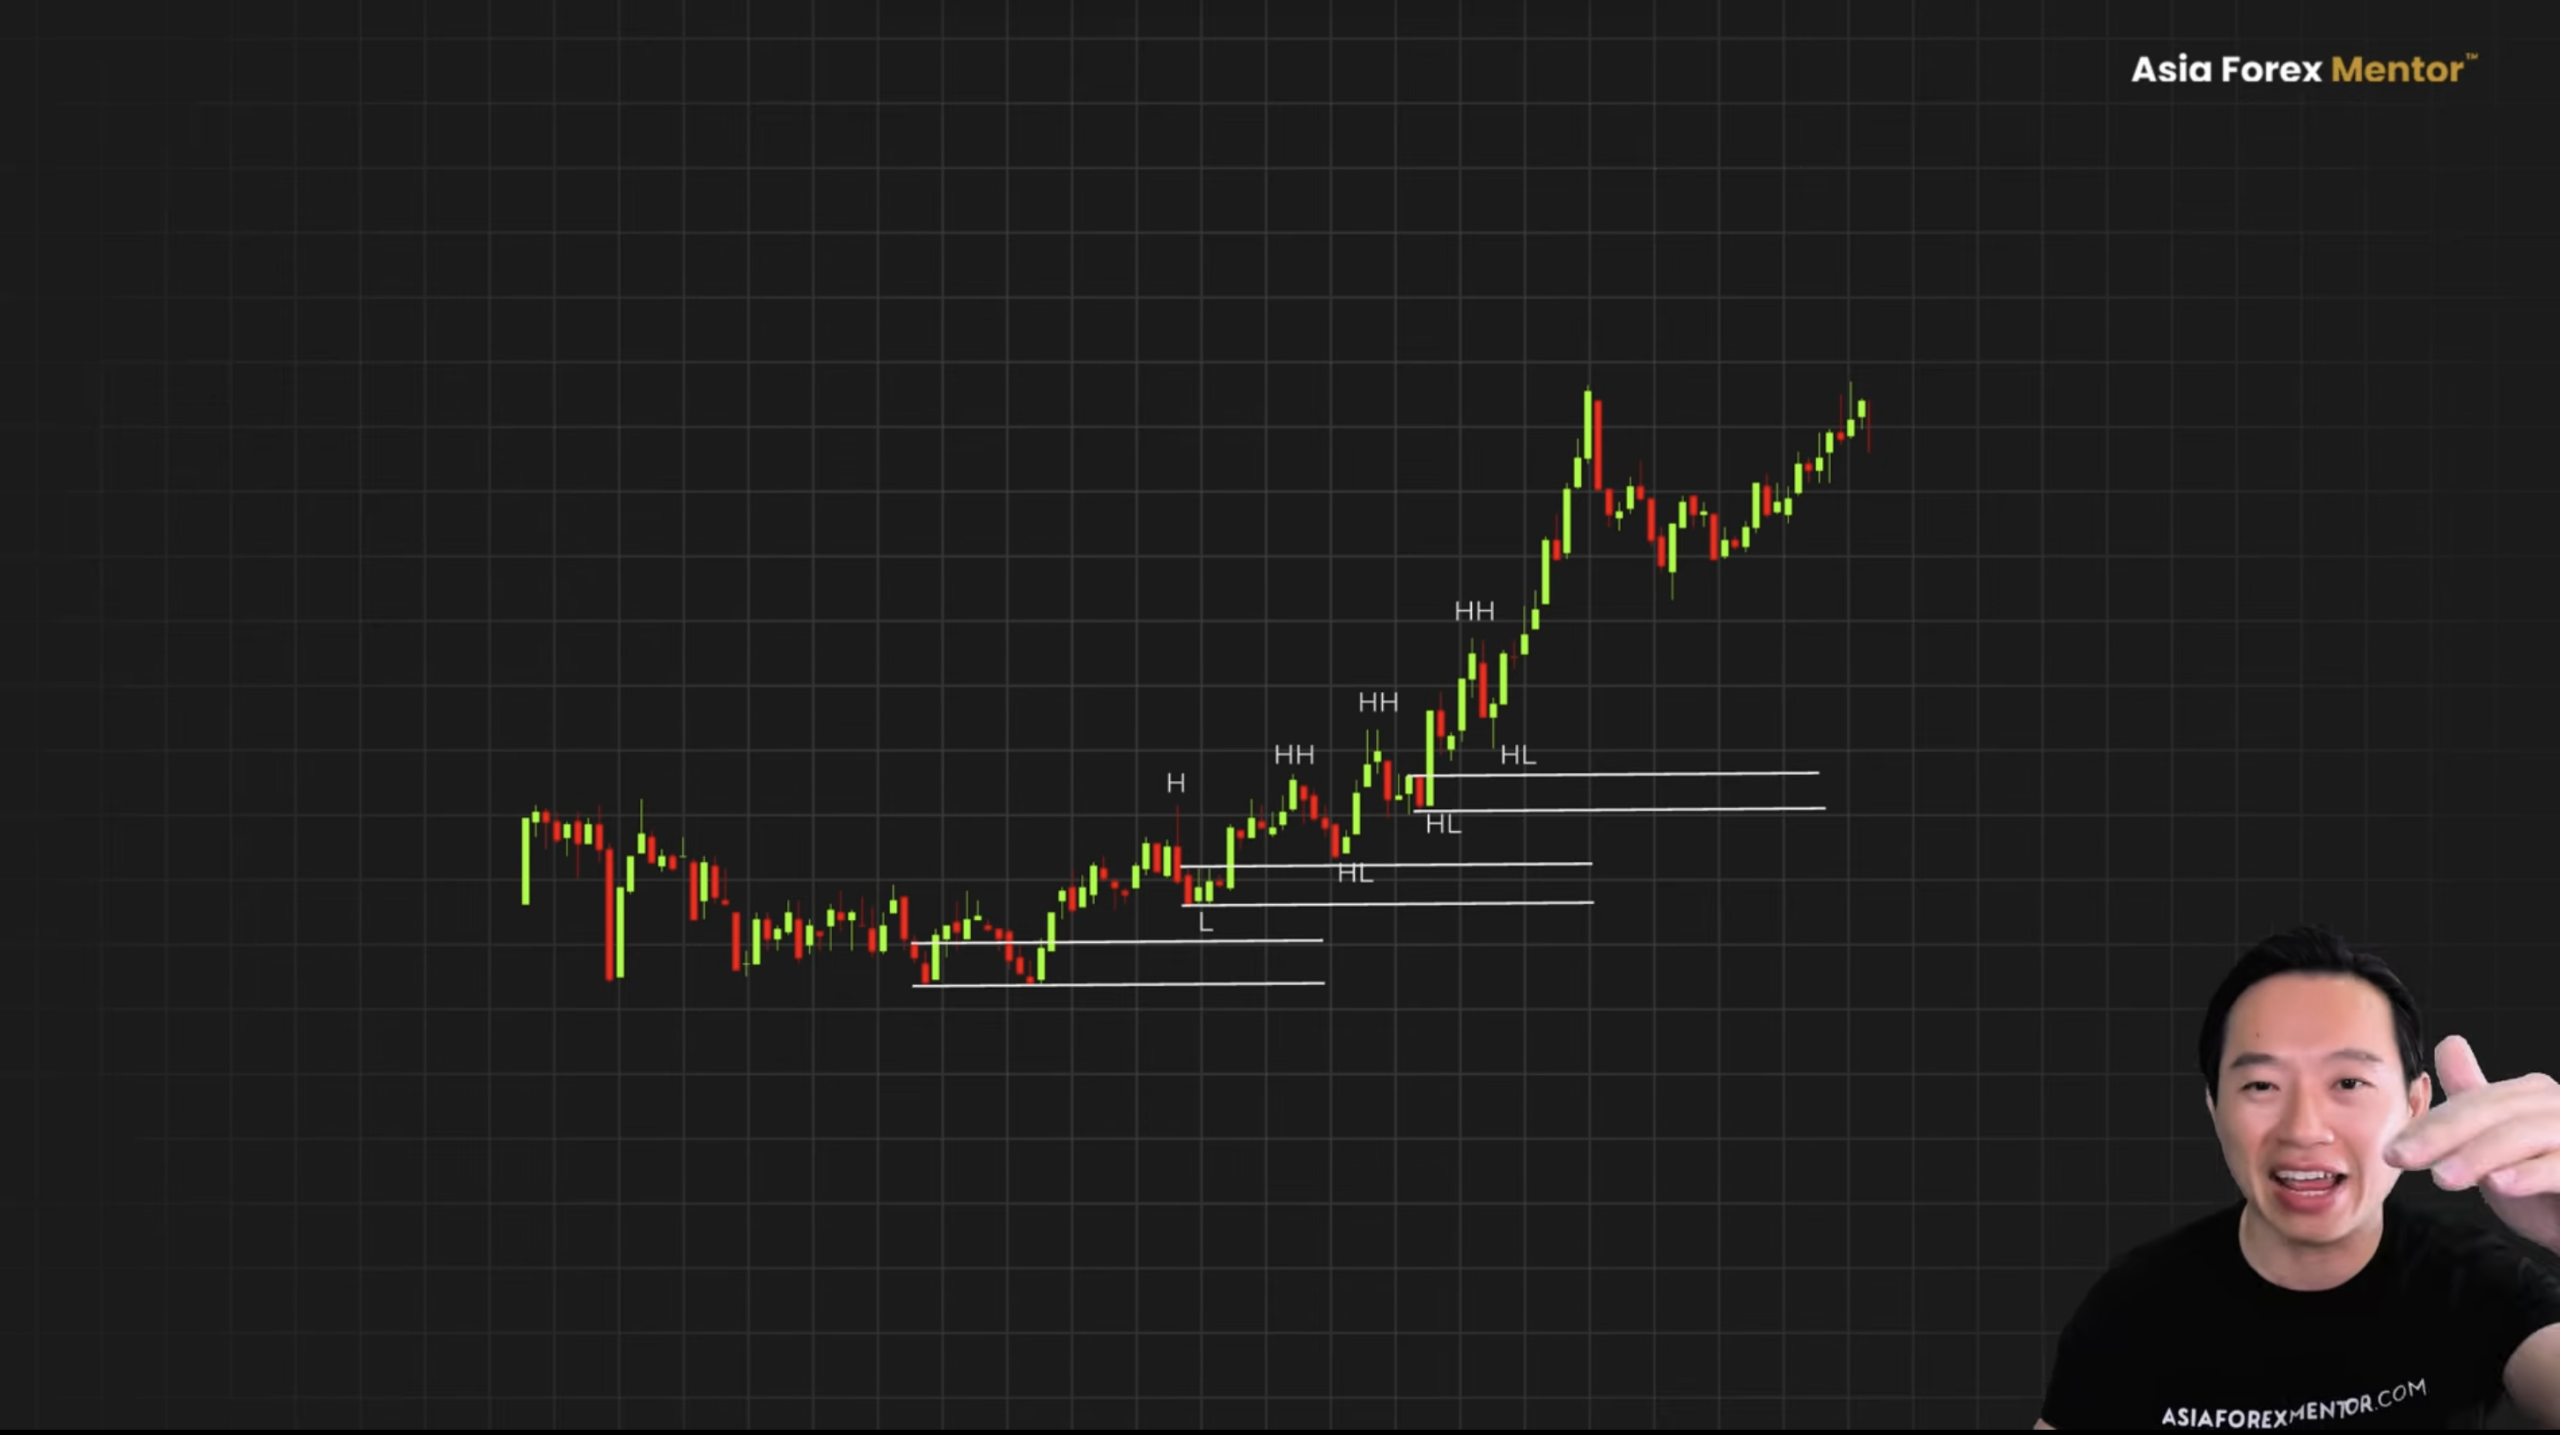
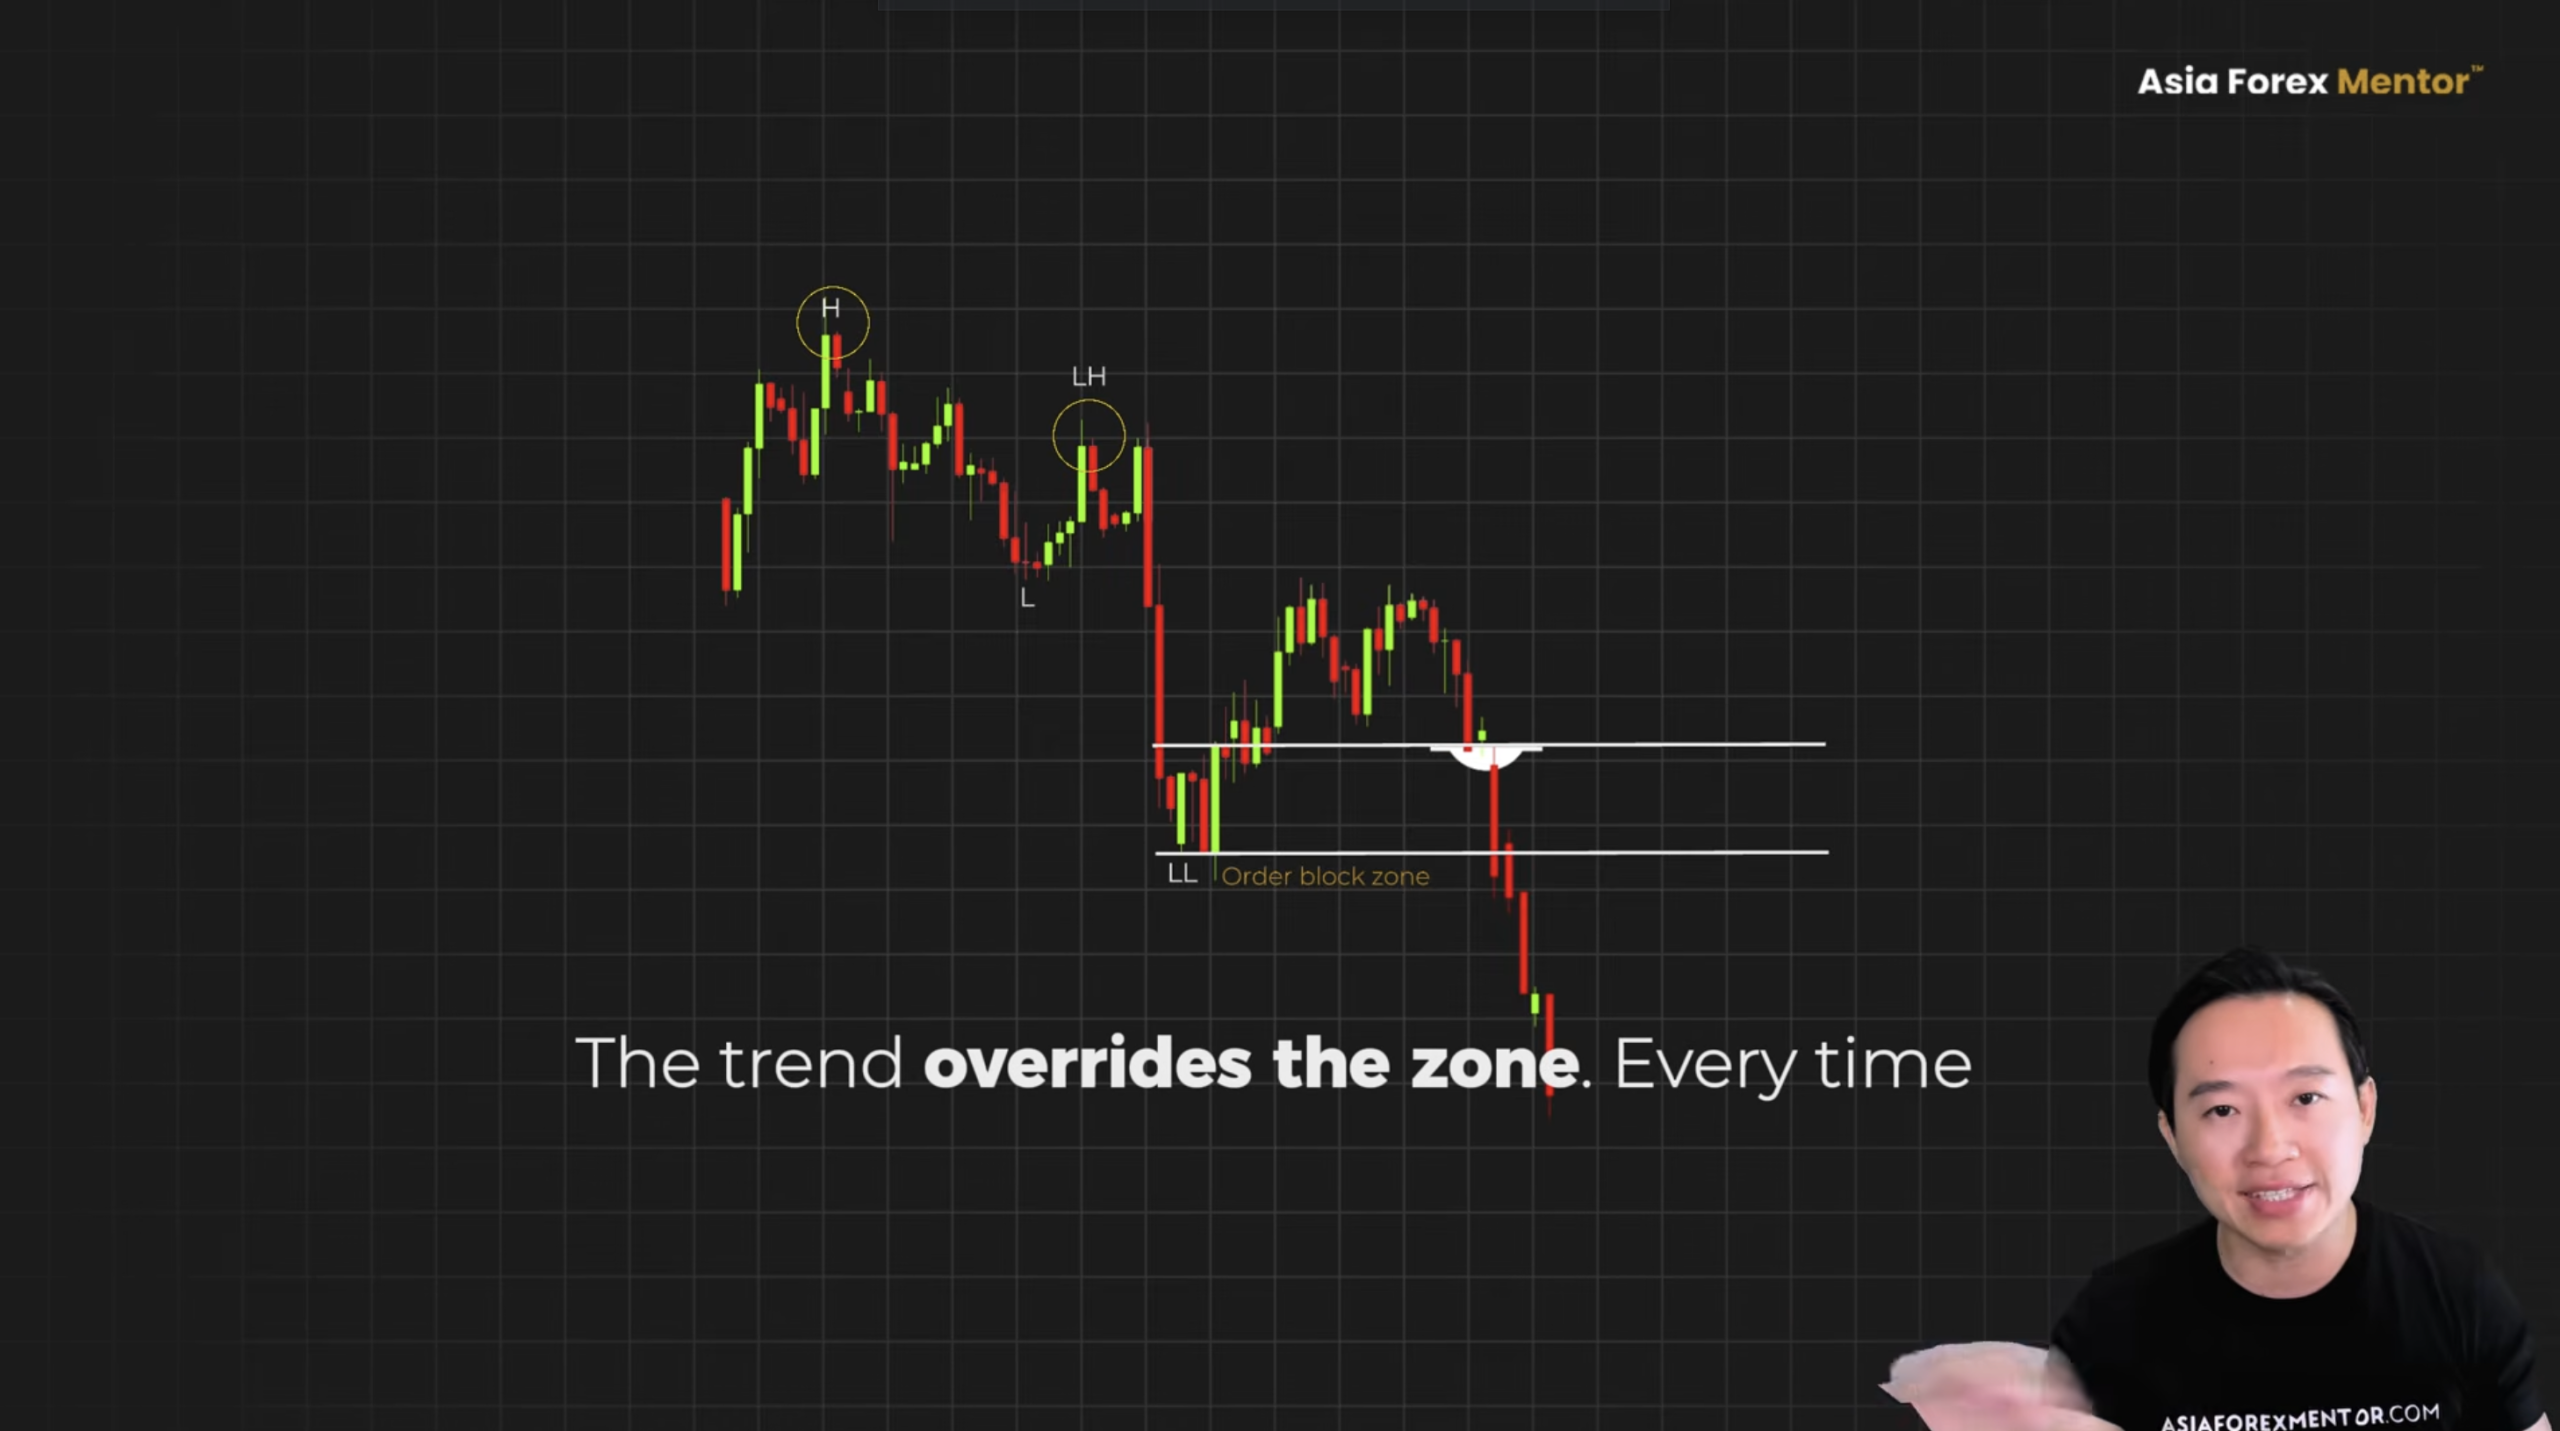
When price is pushing lower, a bullish order block is not support. It is a speed bump. Watch this. Price taps the zone, pauses one candle, and continues straight down. The trend overrides the zone every time.
Now look at the zone itself. The move launching away from it has to be strong.

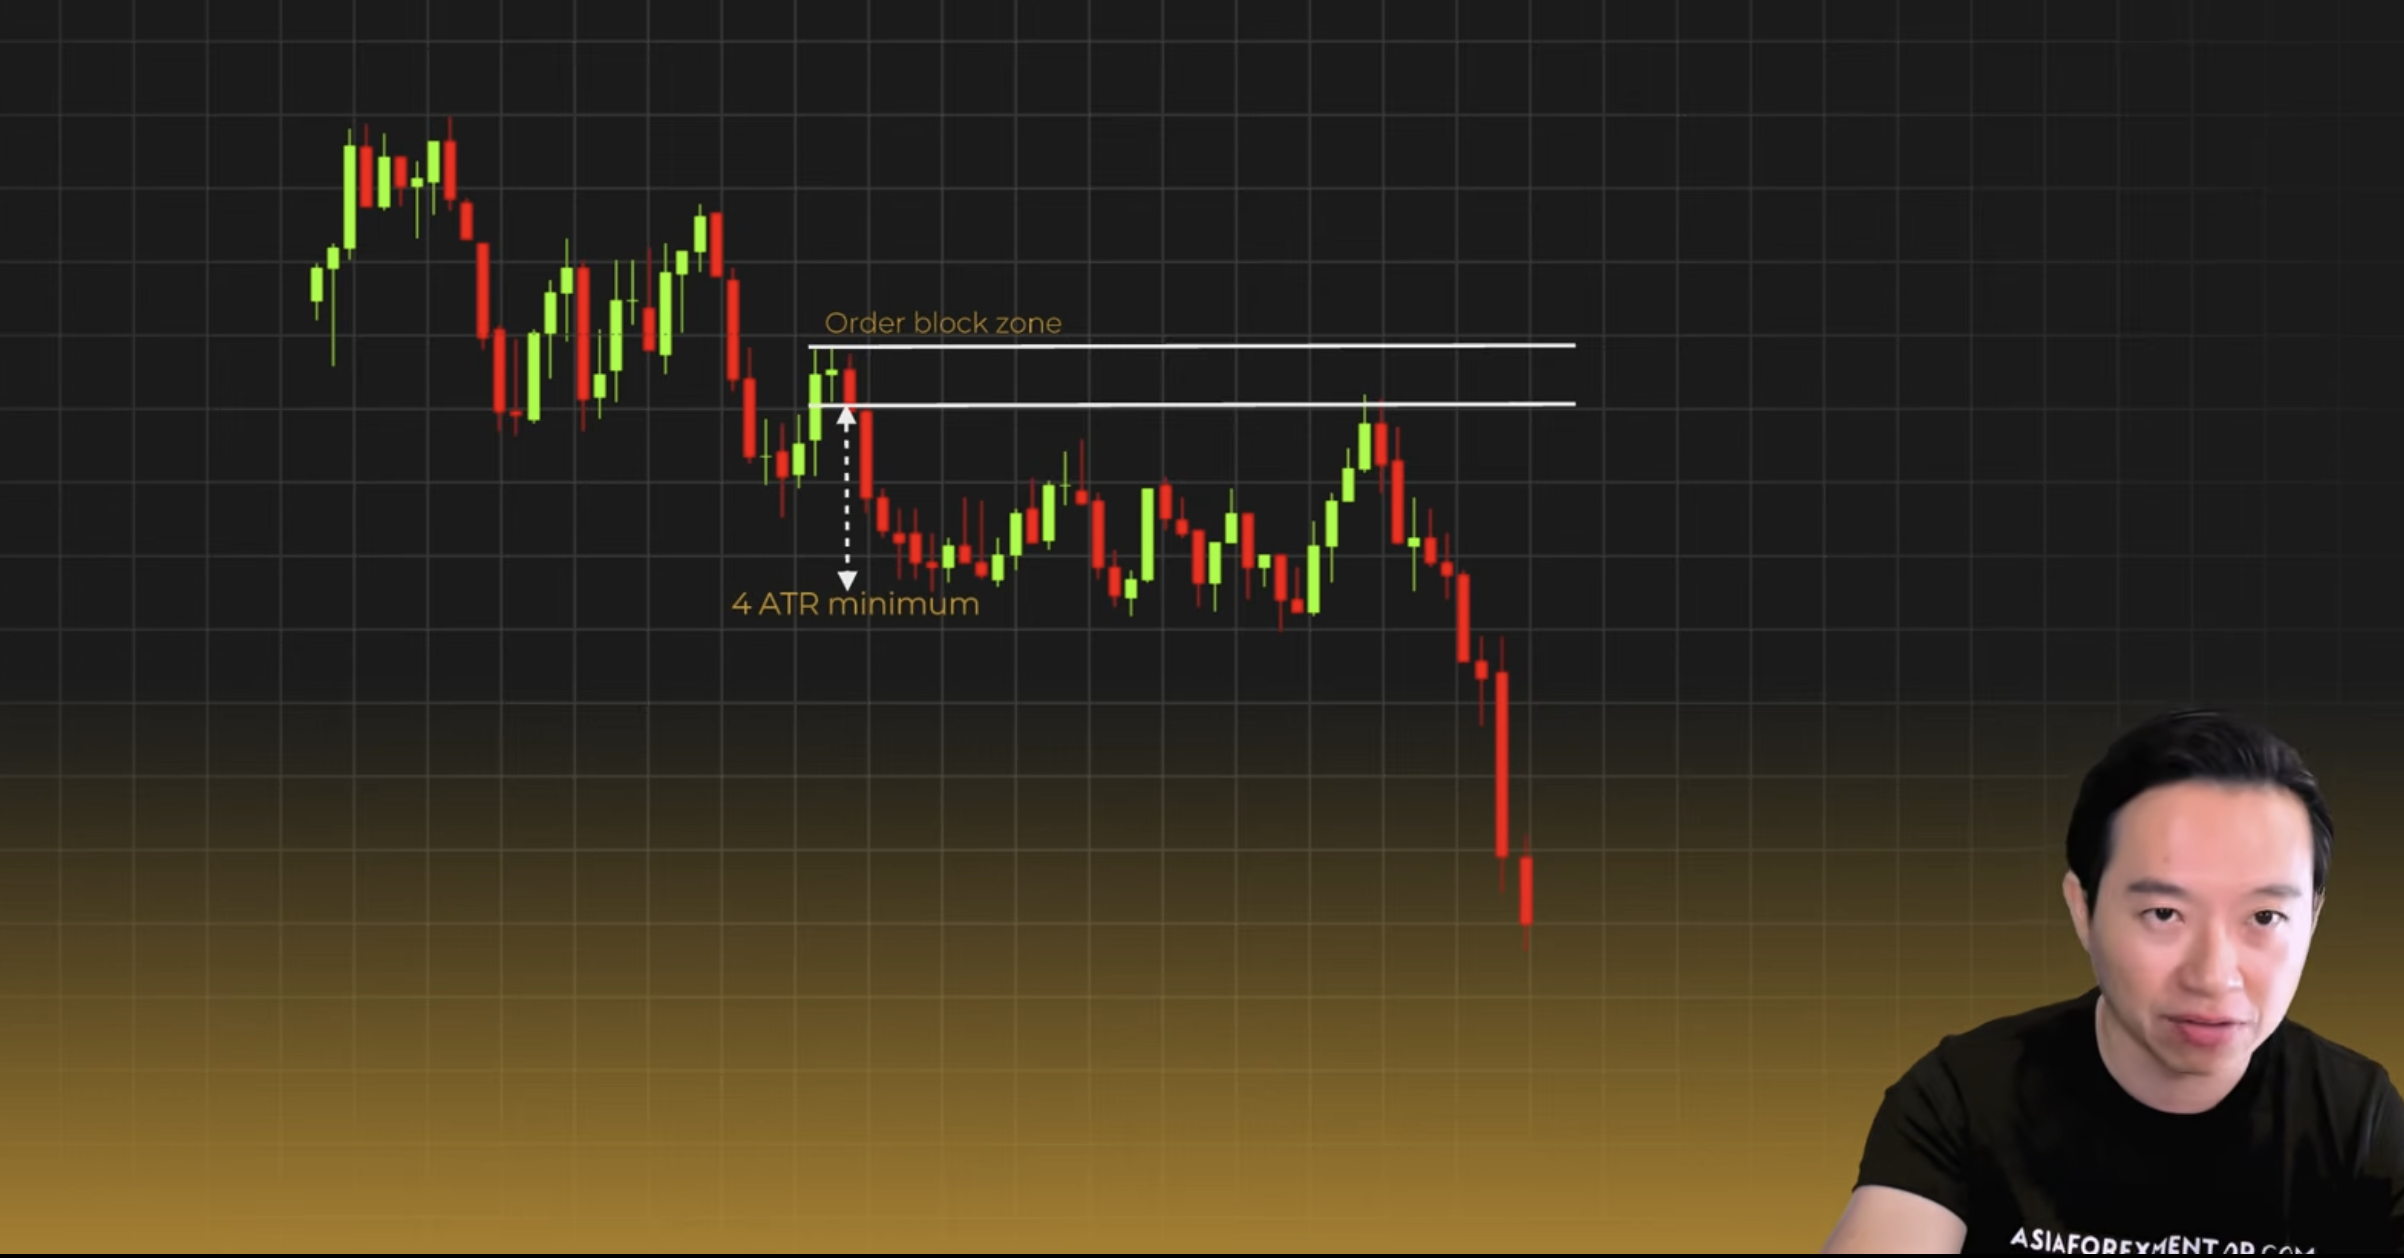
The AFM Research Lab put a number on it: 4 ATR as a minimum. Anything less and the zone has no real weight. It will not hold on the retest.
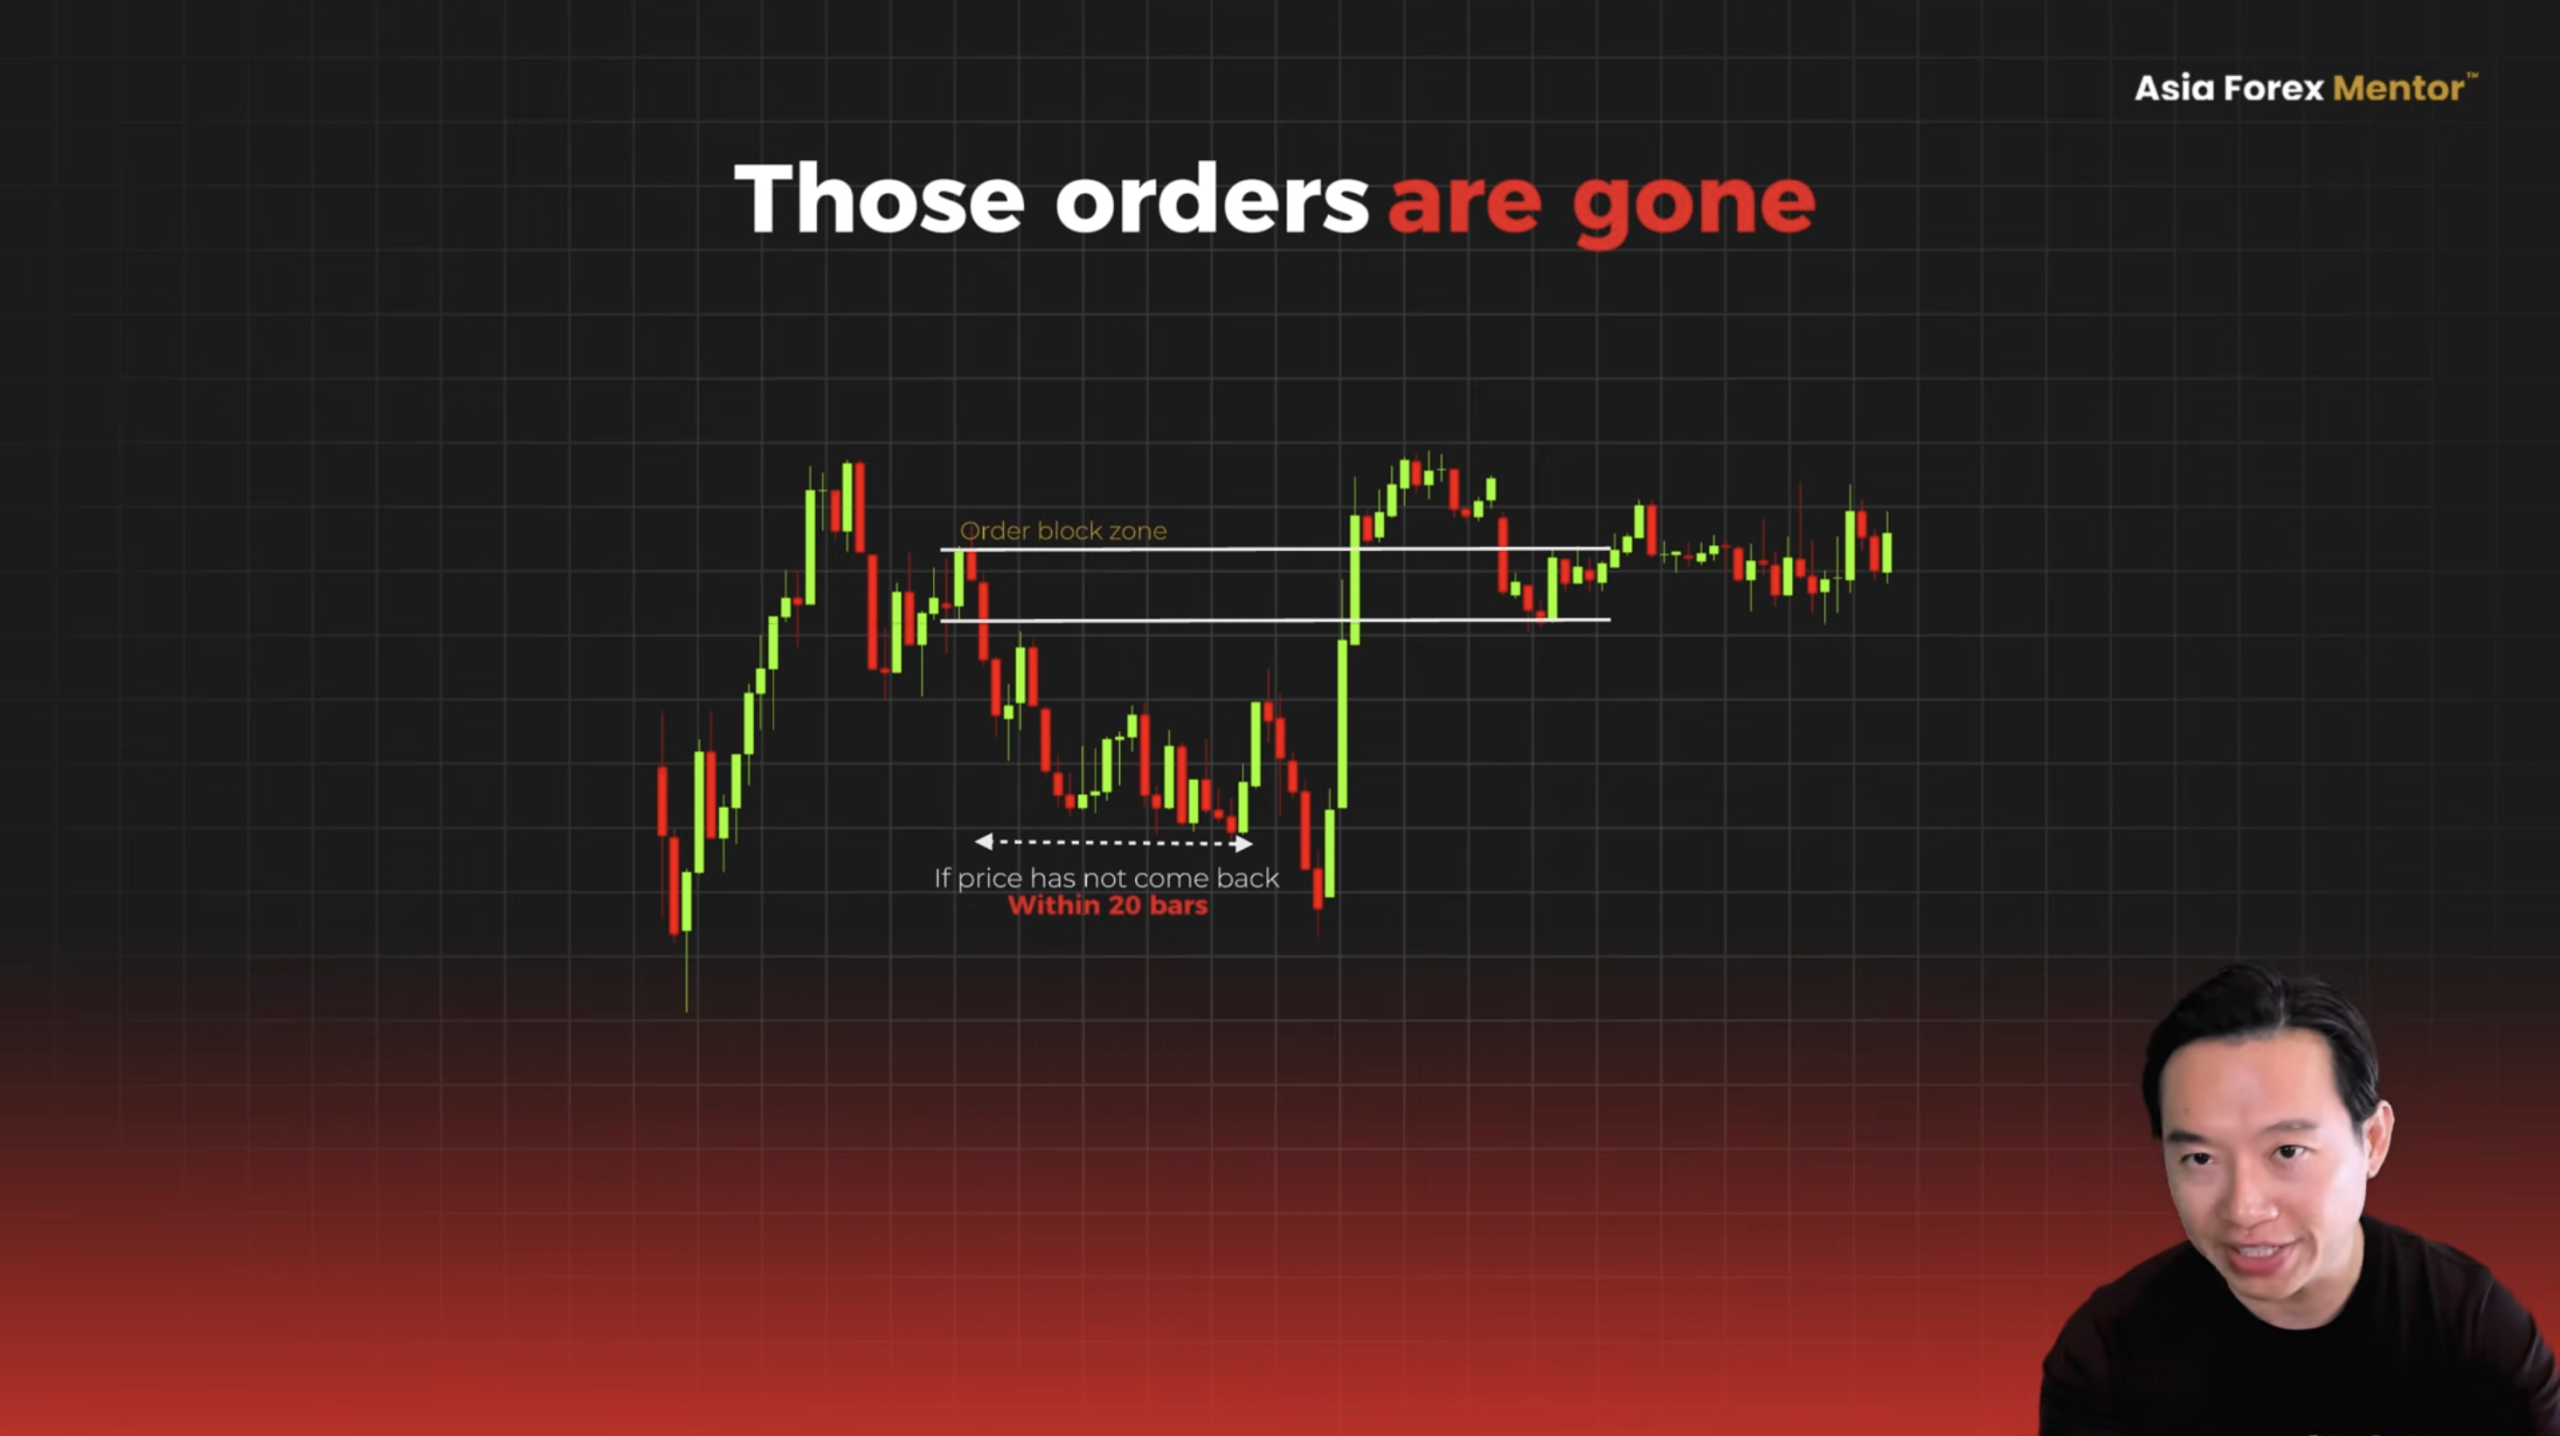
Even a strong zone will go stale if price has not come back to it within 20 bars. Those orders are gone.
If the trigger returns within the 20-bar window, that is the version to act on. Anything older than 20 bars is off the list.
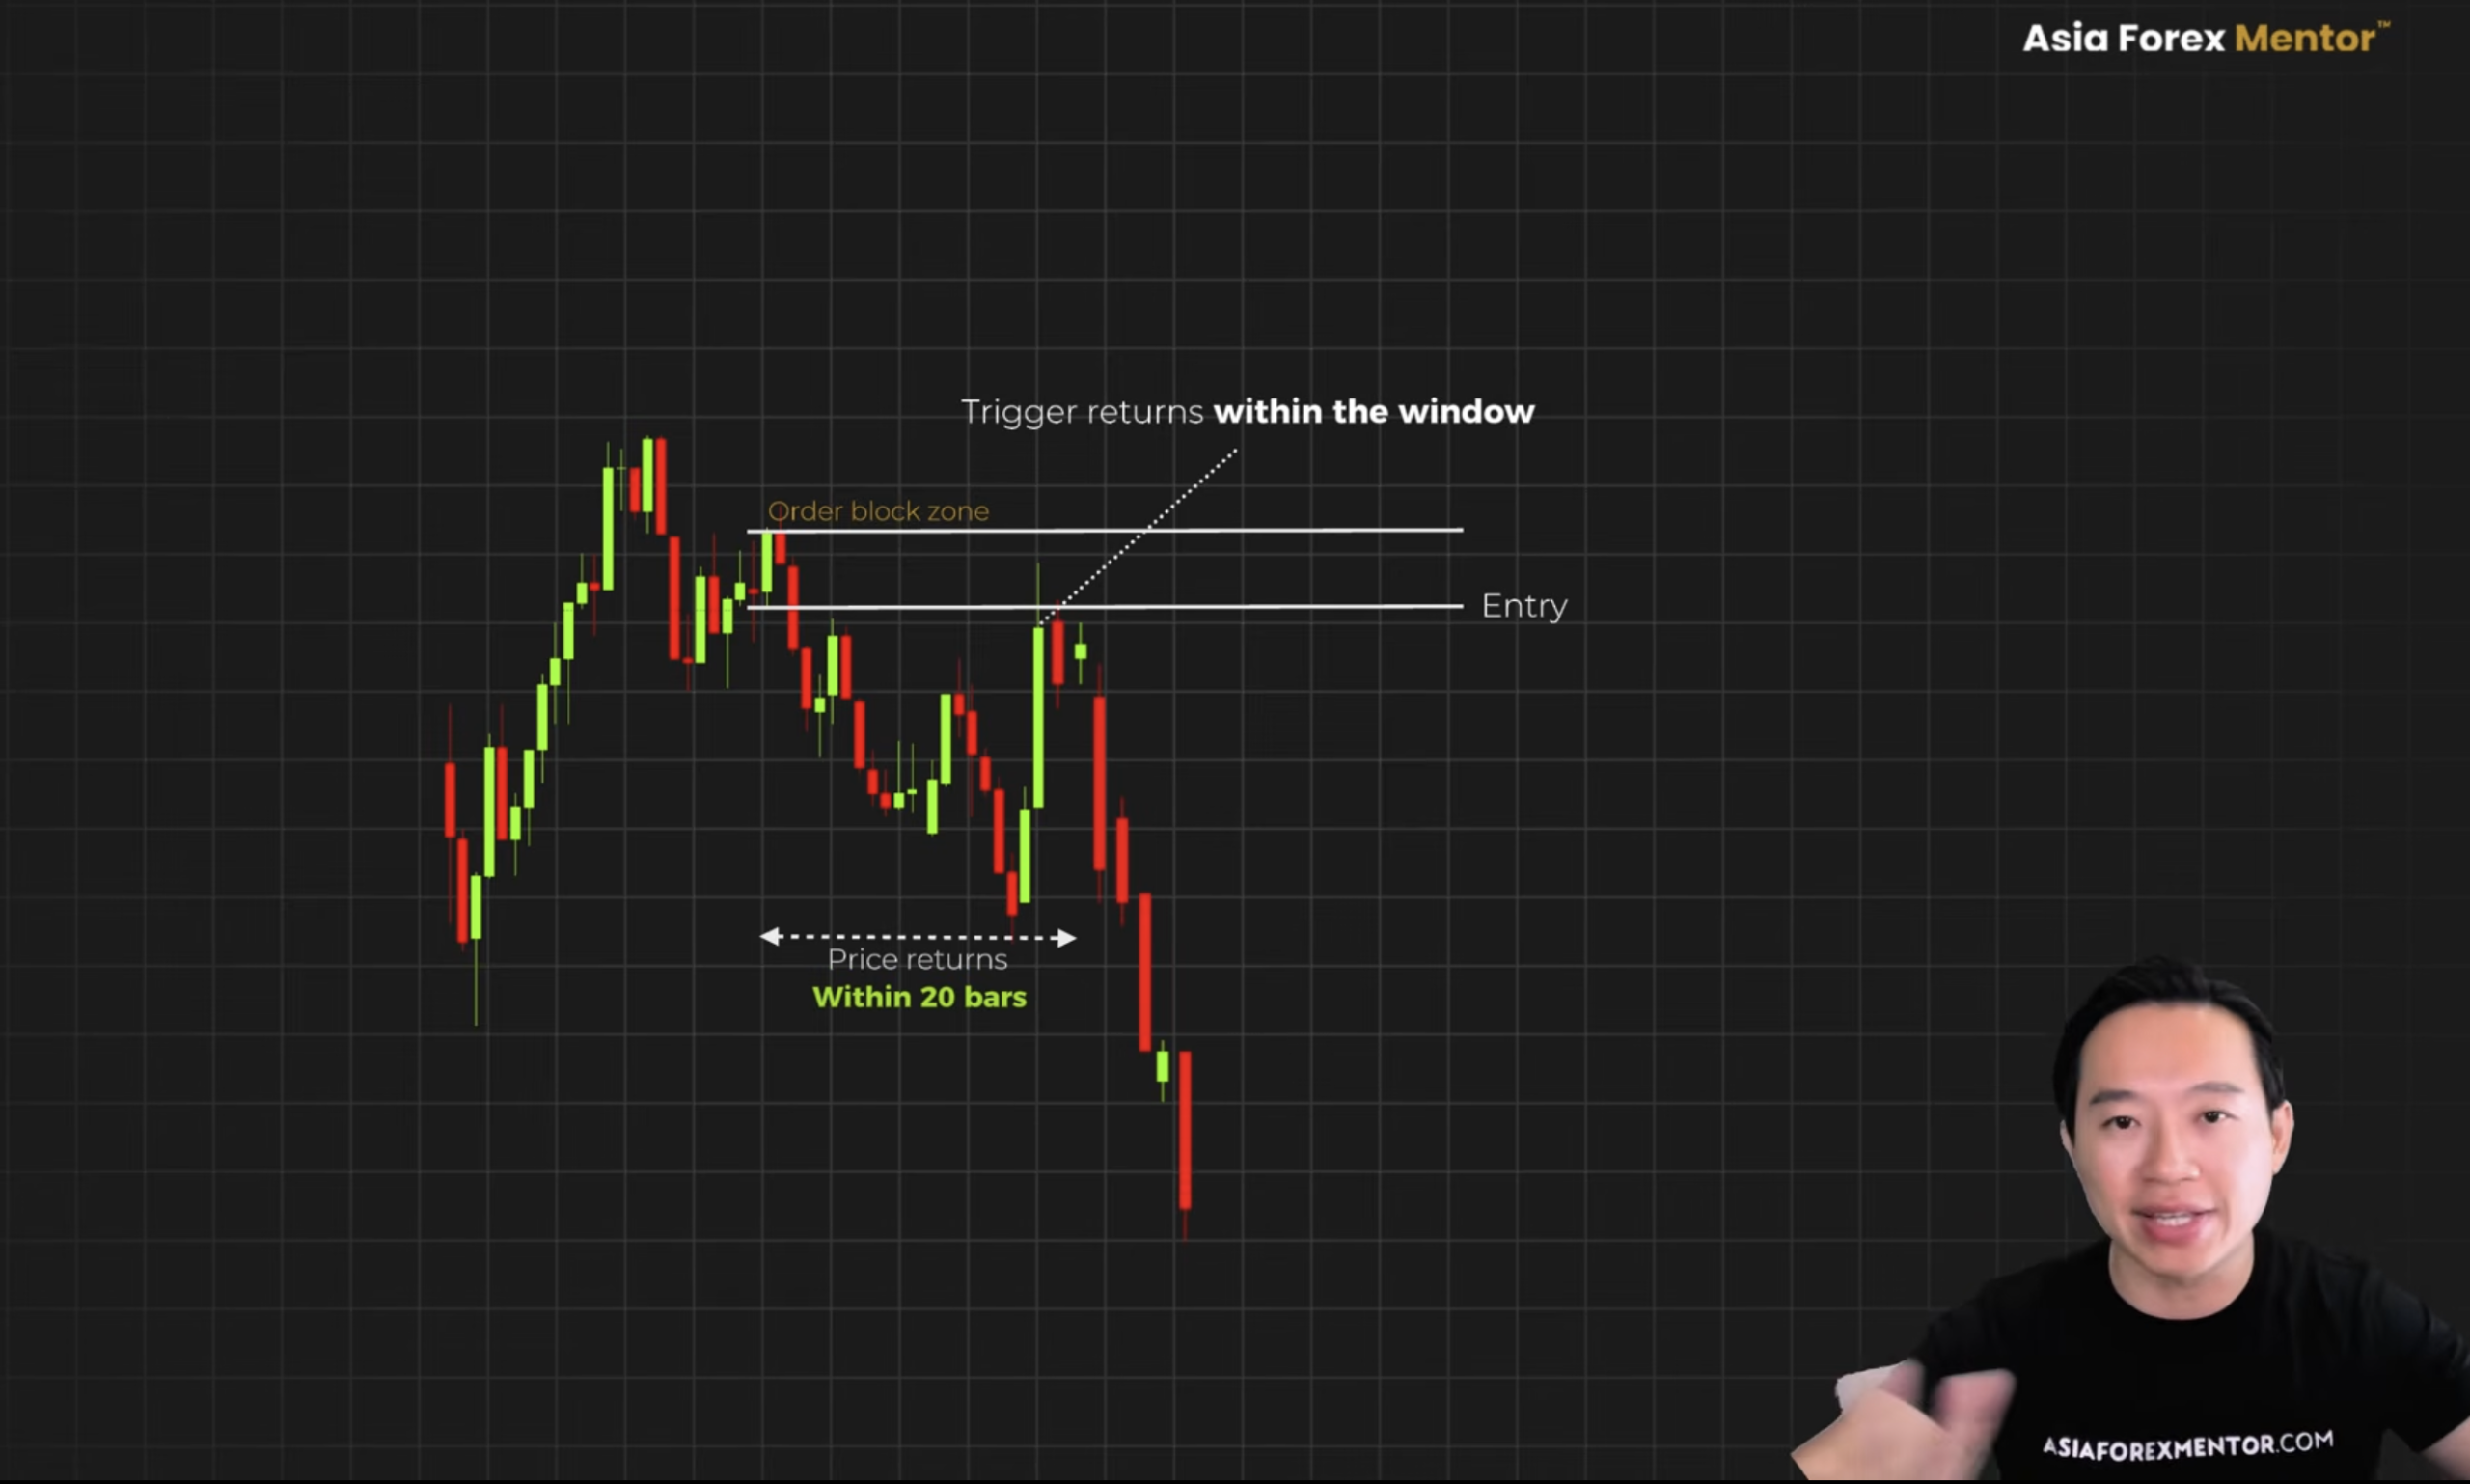
Here is where you are. The trend is in your favor. The zone qualifies. The 4 ATR launch is there. It is fresh within 20 bars.

Most traders would enter right now. But there is one more thing before the trade fires. Here is your trigger. And it is stricter. A touch into the zone is not enough. You are waiting for one specific thing. If that thing does not happen, there is no trade.

Look at this chart. Price dips in and prints a long lower wick and closes inside the zone. Traders see a reaction and enter, and then price keeps dropping.
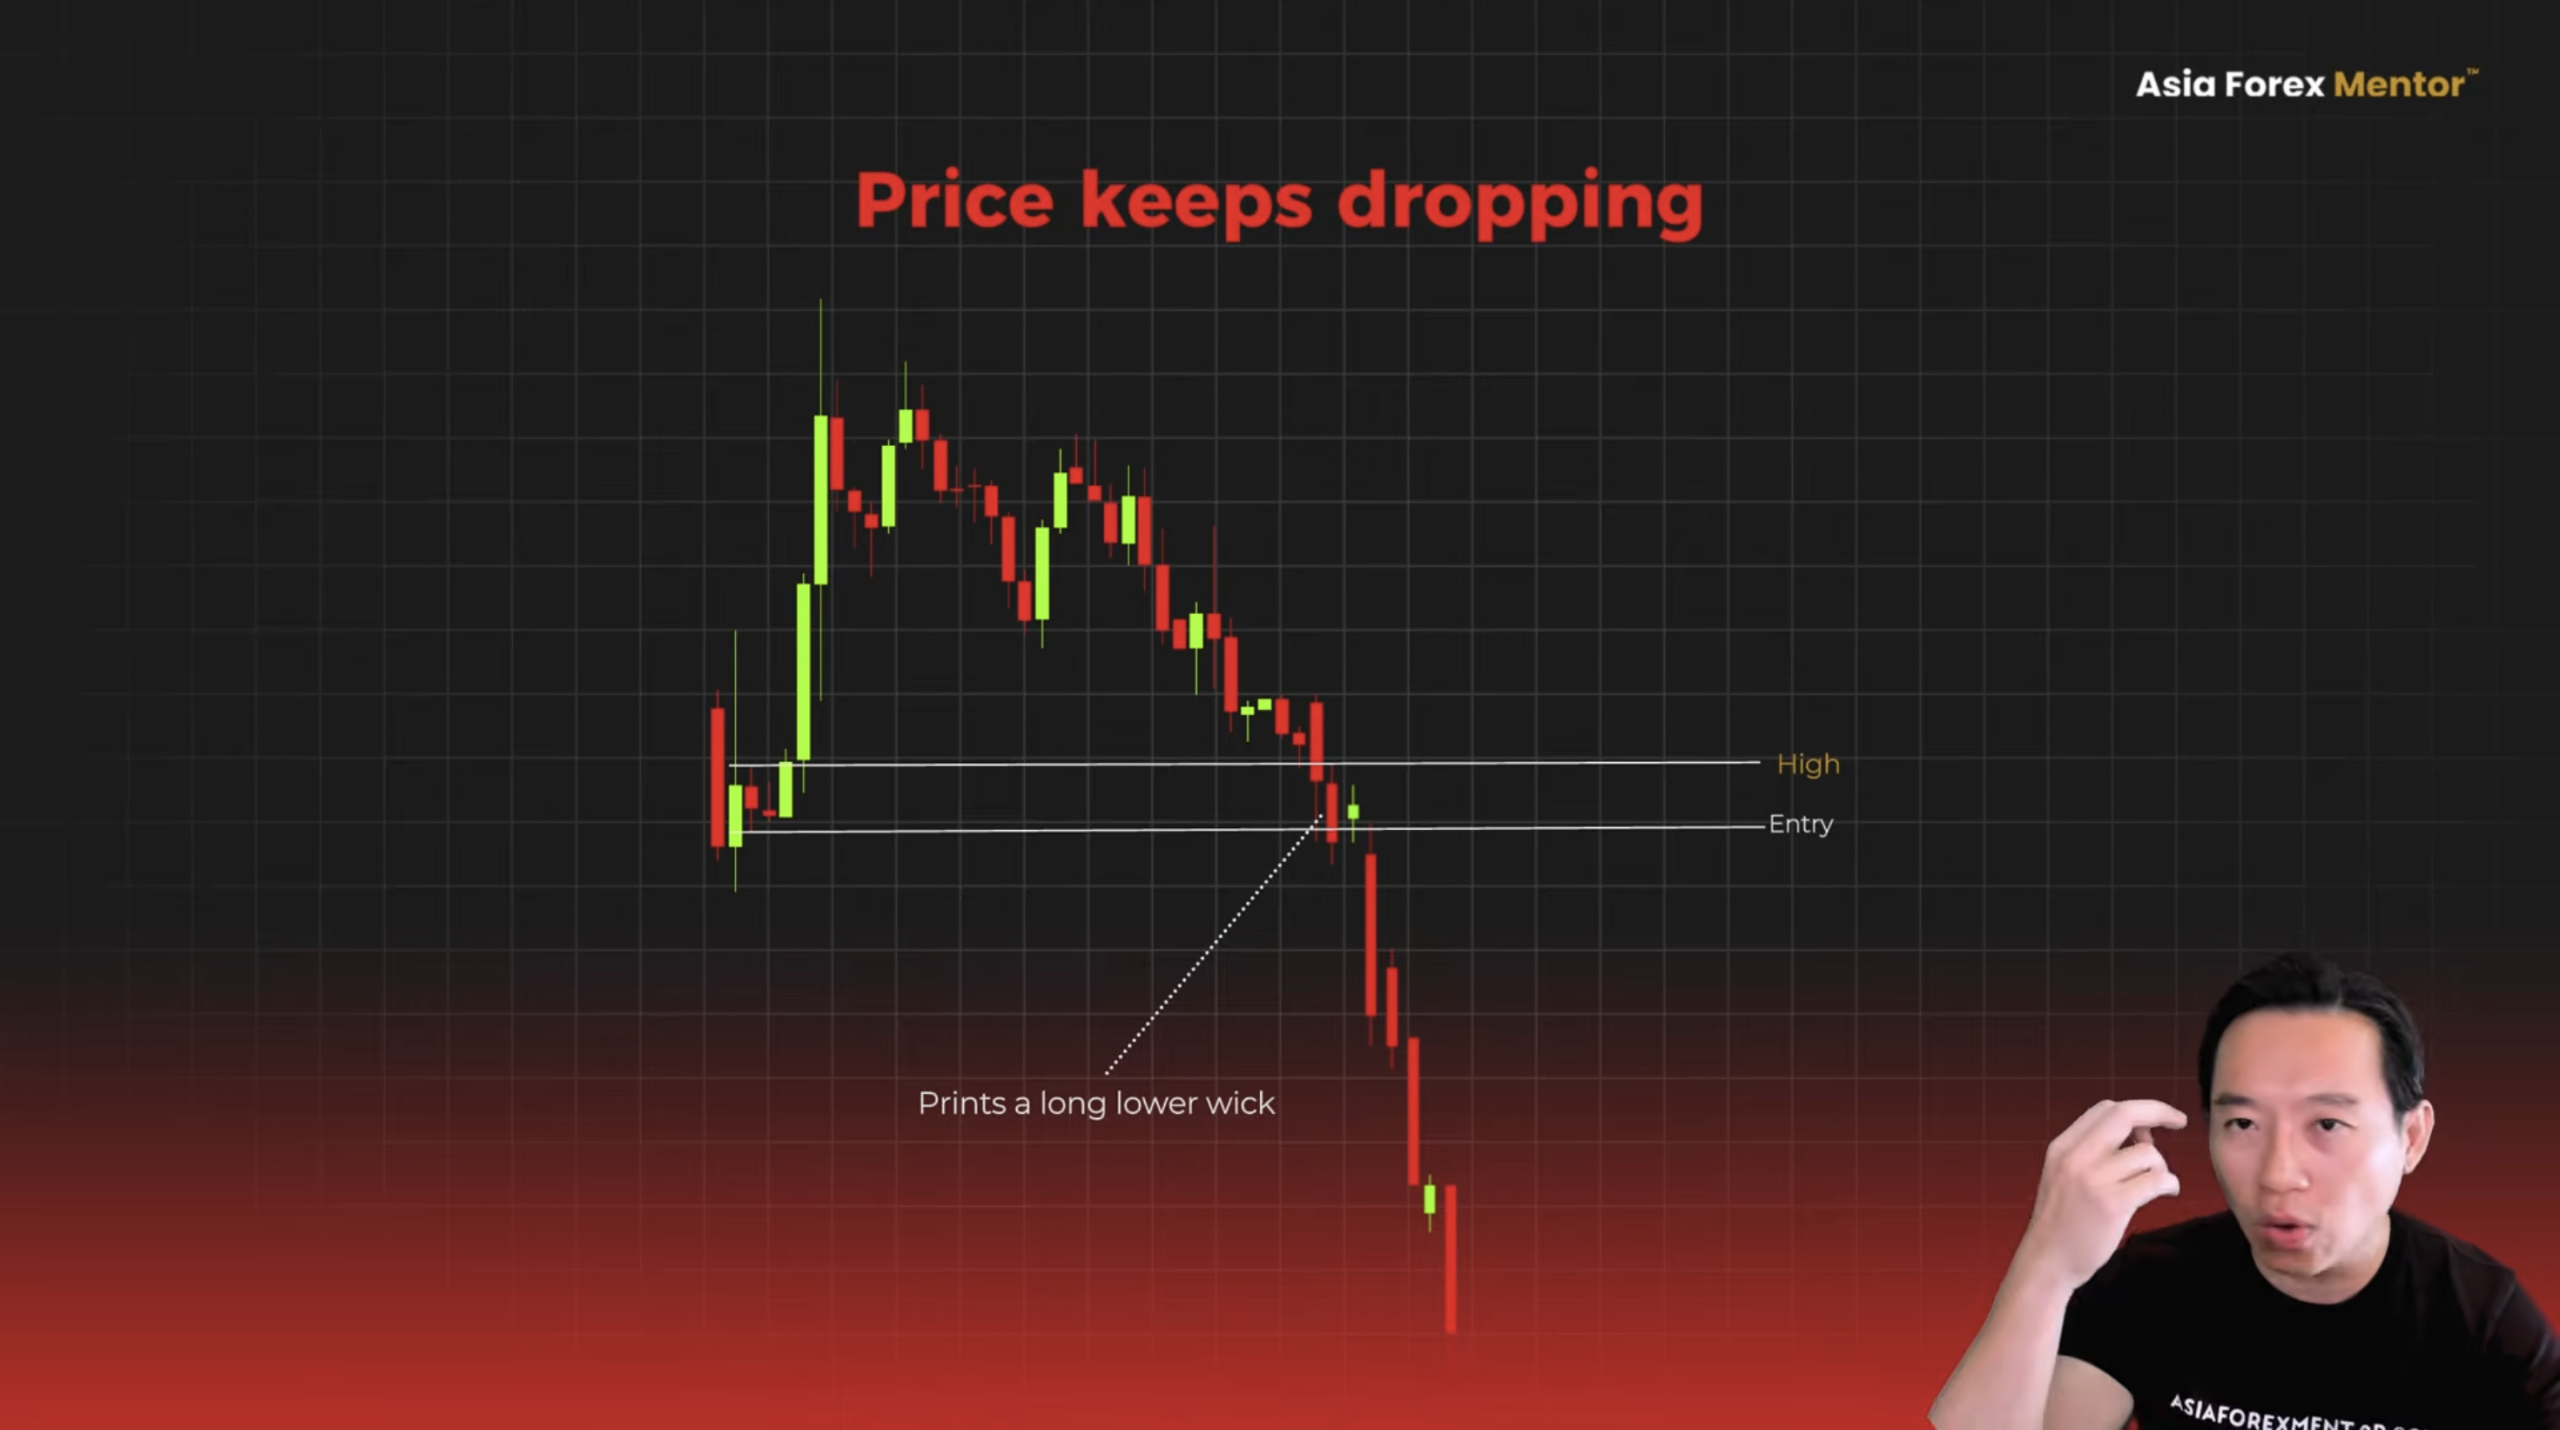
A wick into the zone is not confirmation. What you need is a close. A close above the zone high. If there is no close, there is no trade.
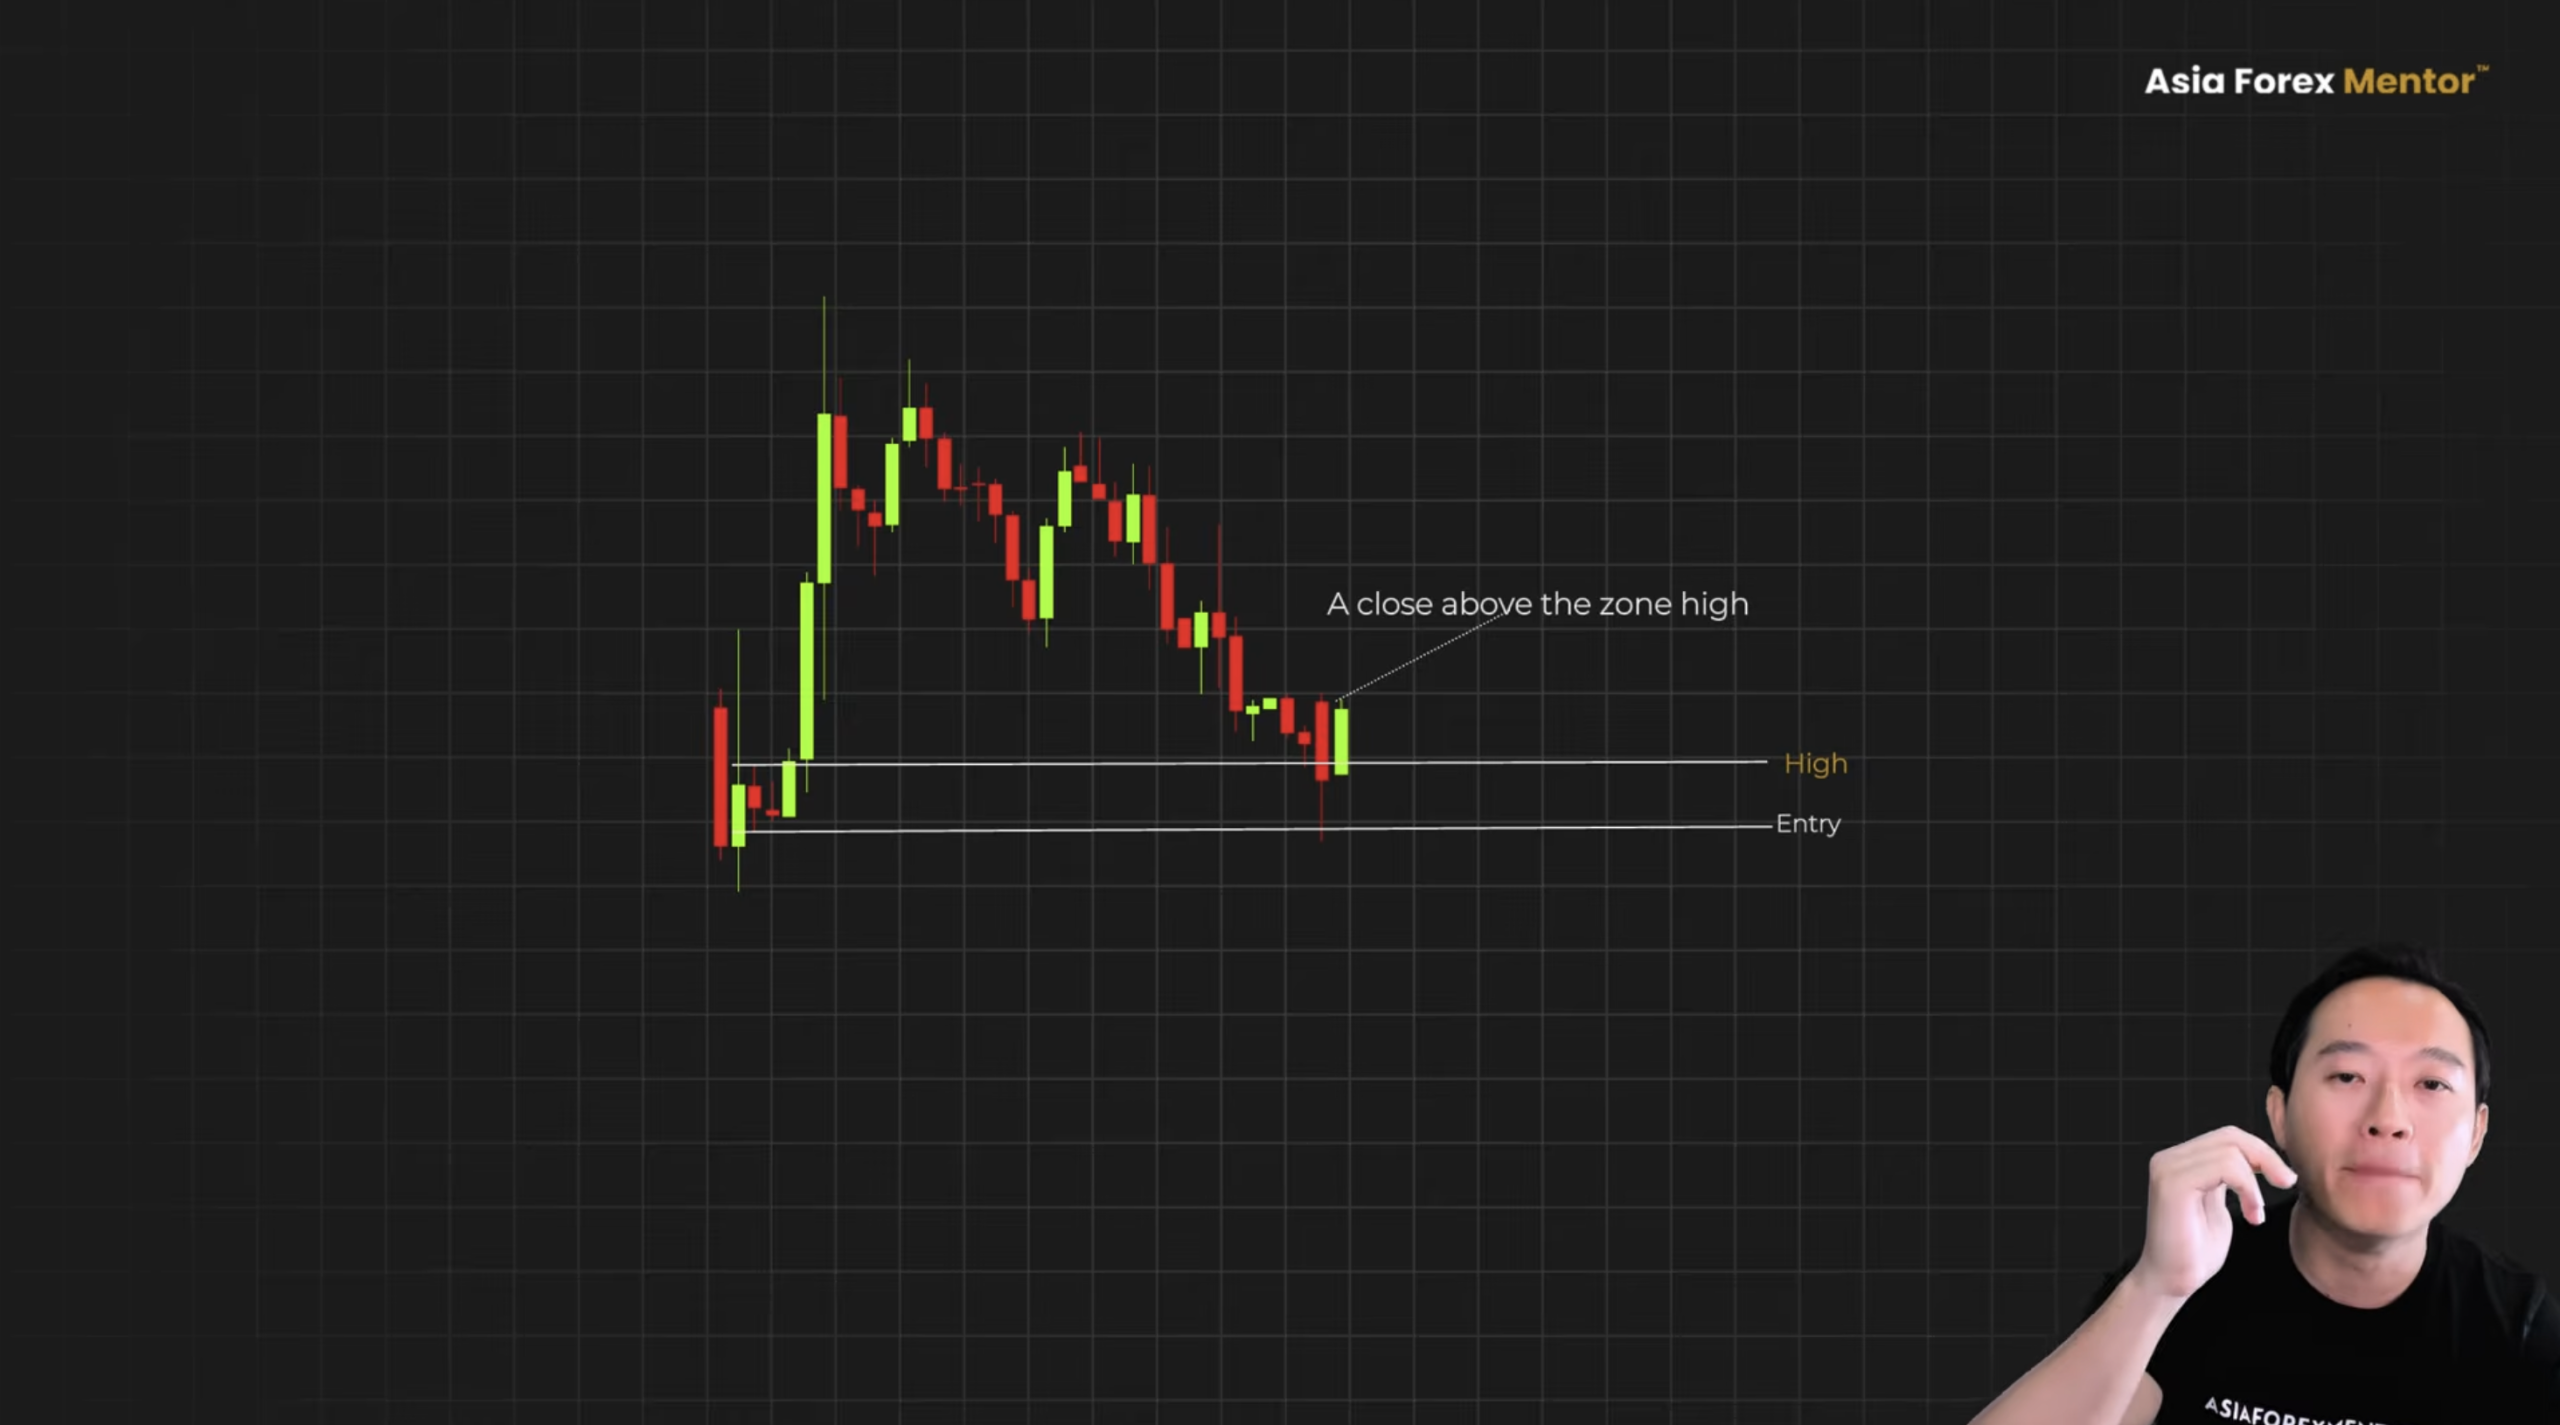
Your stop loss goes below the zone floor. Under the low of the candle that launched the move. Plus a 0.1 ATR buffer.
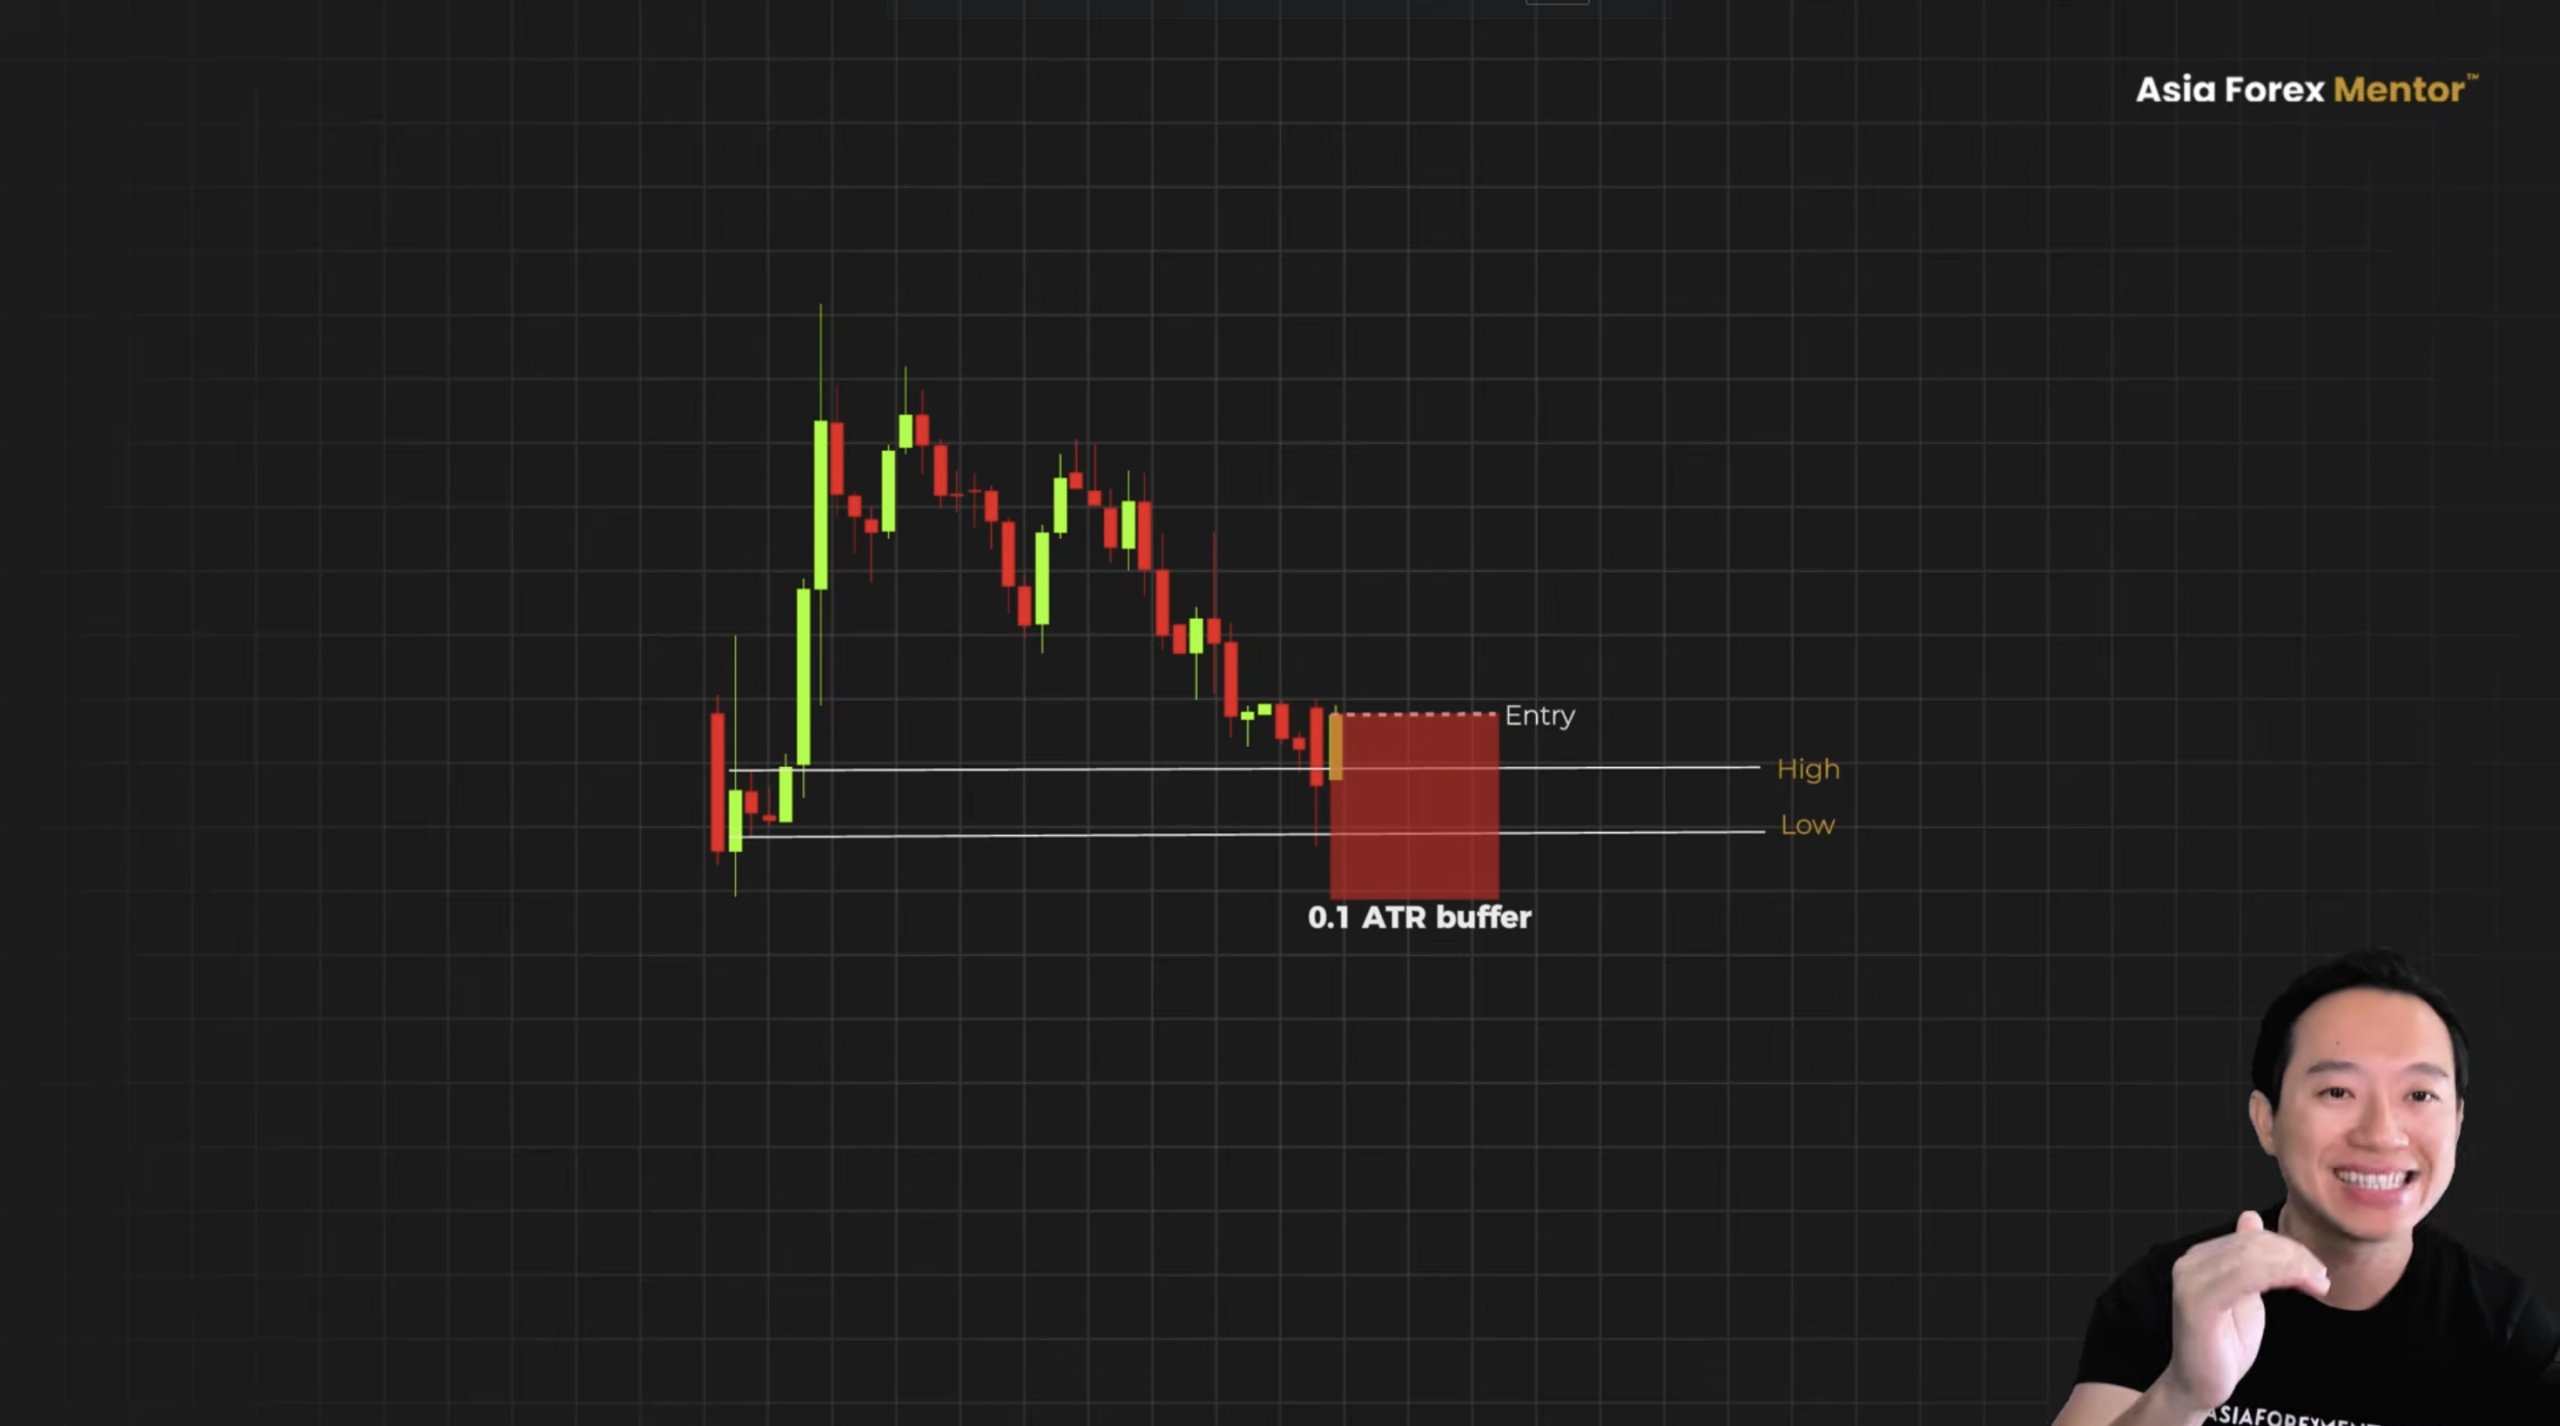
That is where the move started. If price closes back below it, the zone failed and you are out. You get out of the trade before it gets worse. Once it is set, it stays there. It never moves up into the zone.

For your take profit target, look at the next higher-timeframe swing high. That is your exit.

The AFM Research Lab landed on four hours, four times your stop distance. Set it, do not move it, and let the trade reach the structure.
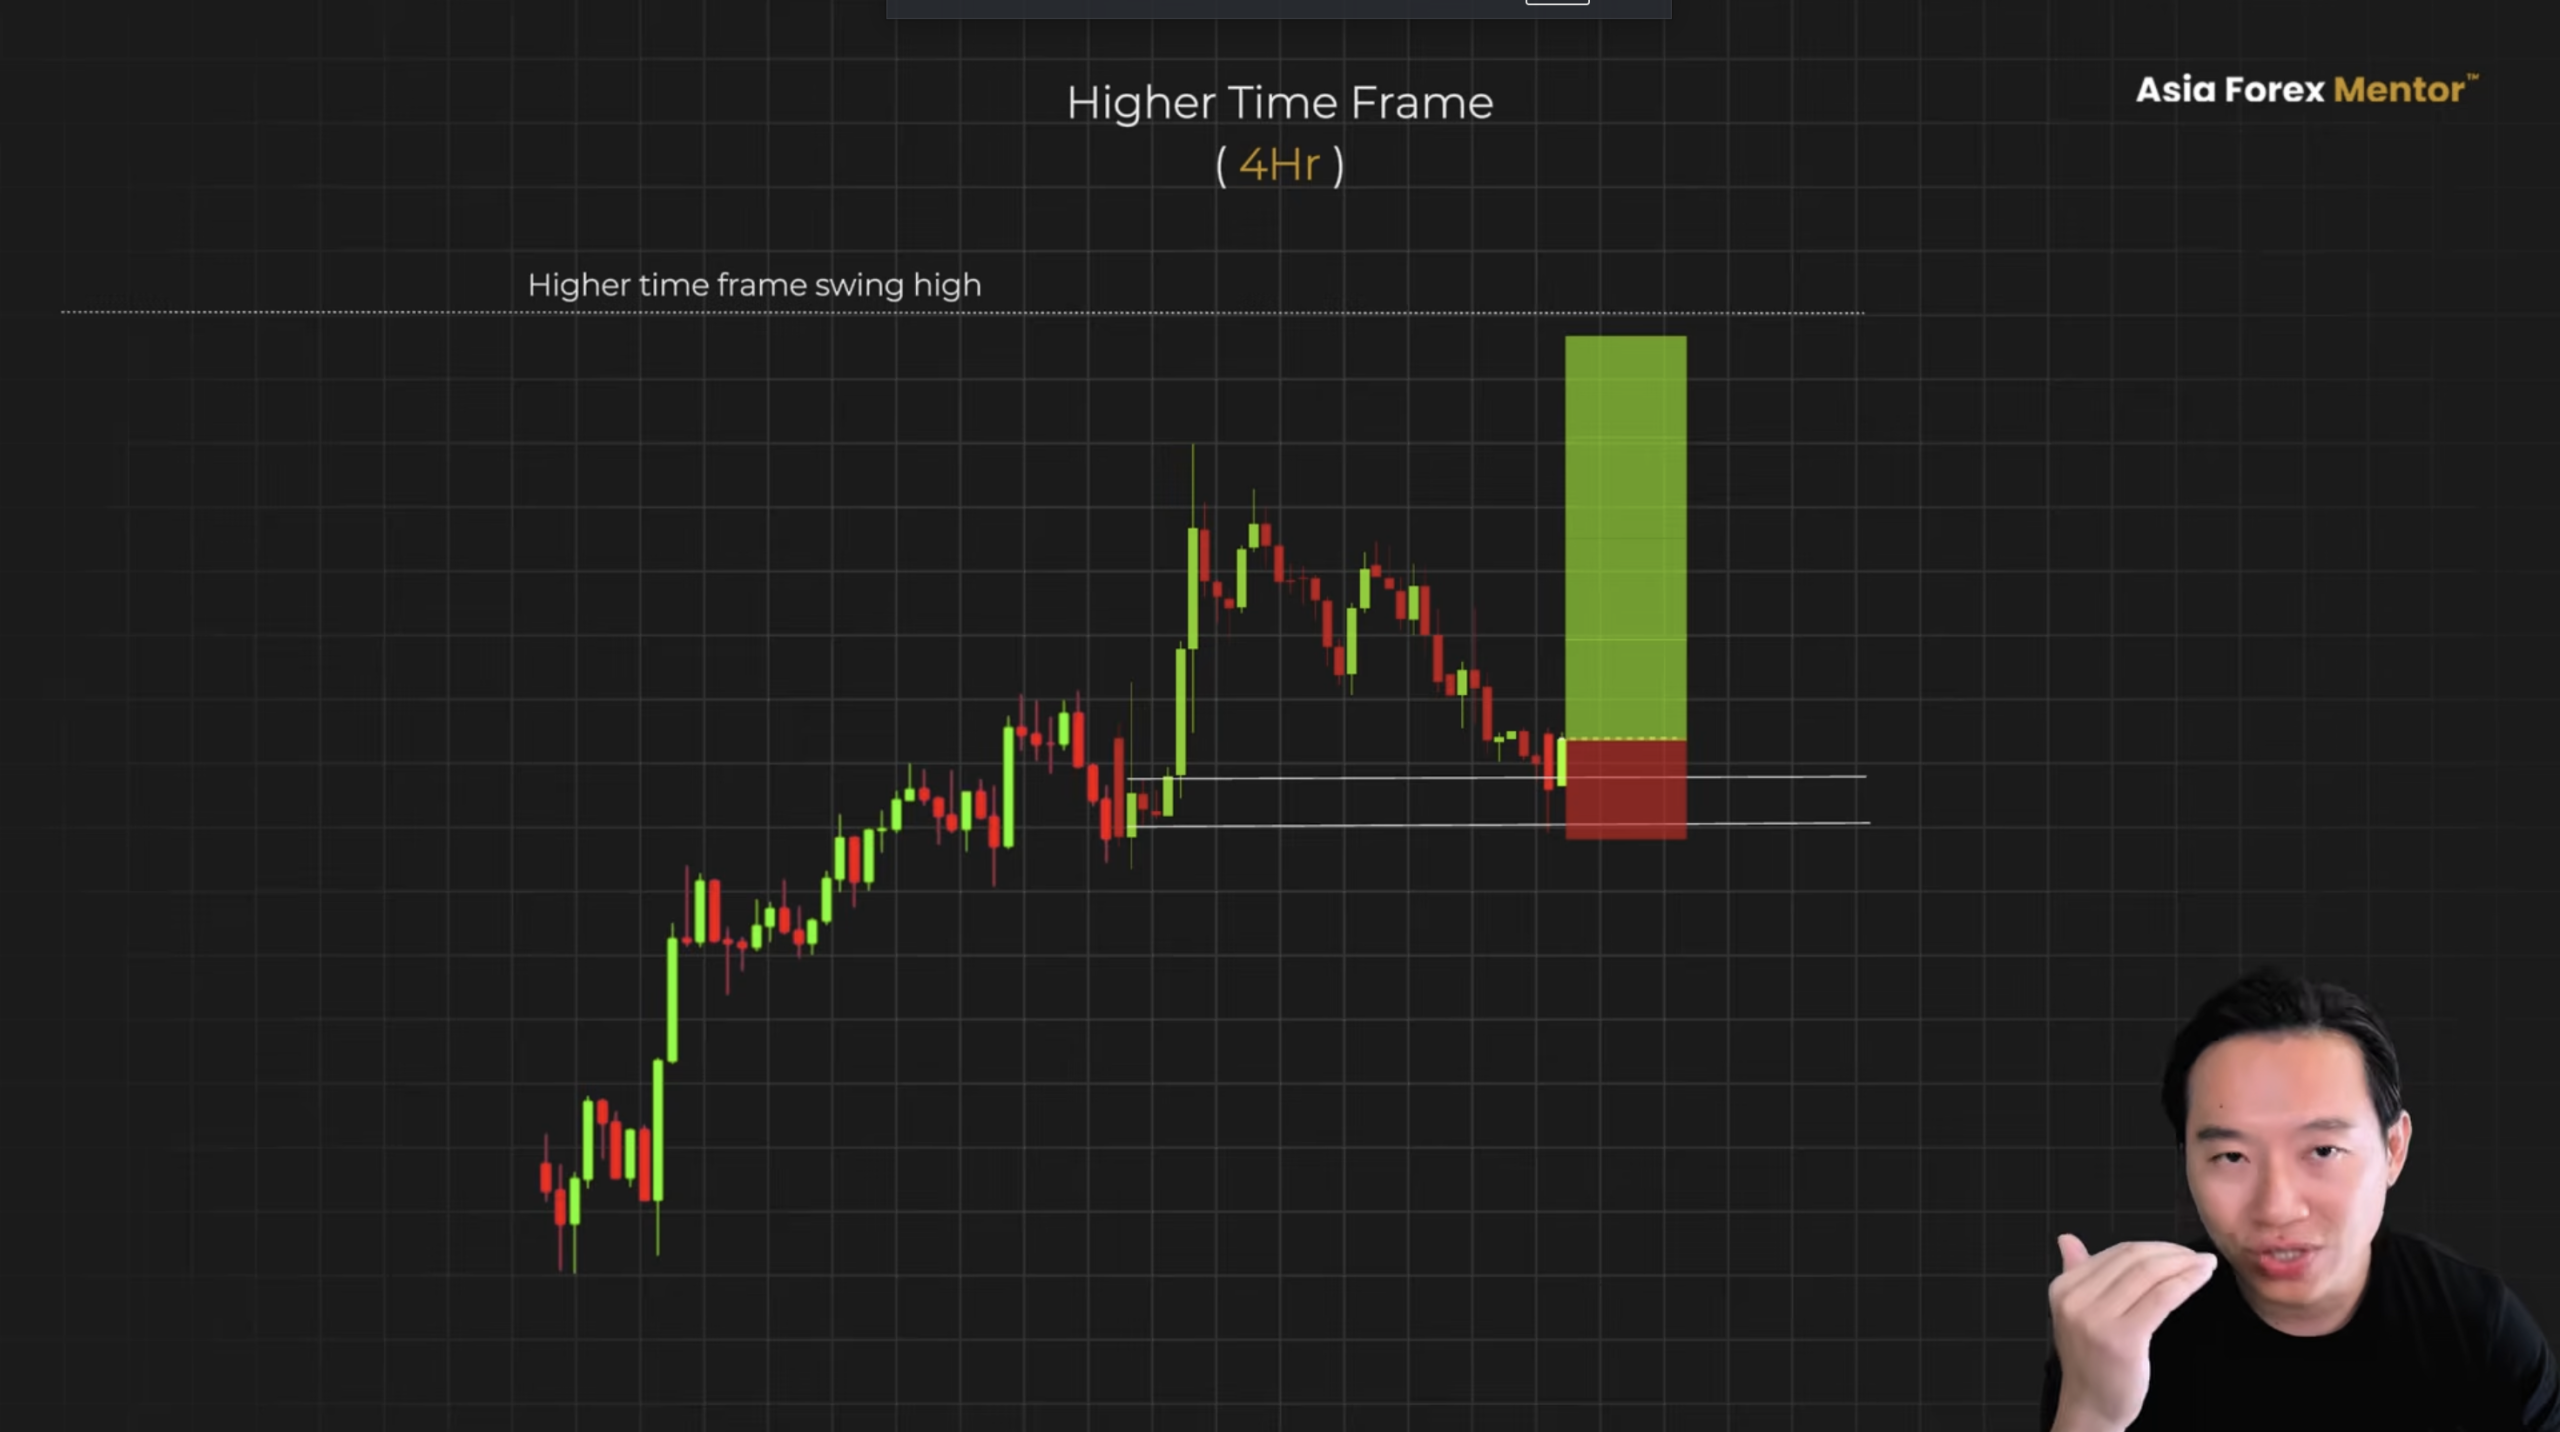
Analysis on the daily timeframe. Execution on the 4-hour timeframe.

The daily tells you the trend and marks the zone. The 4-hour is where you watch for the trigger. Anything below that is reacting to noise, not the zone.
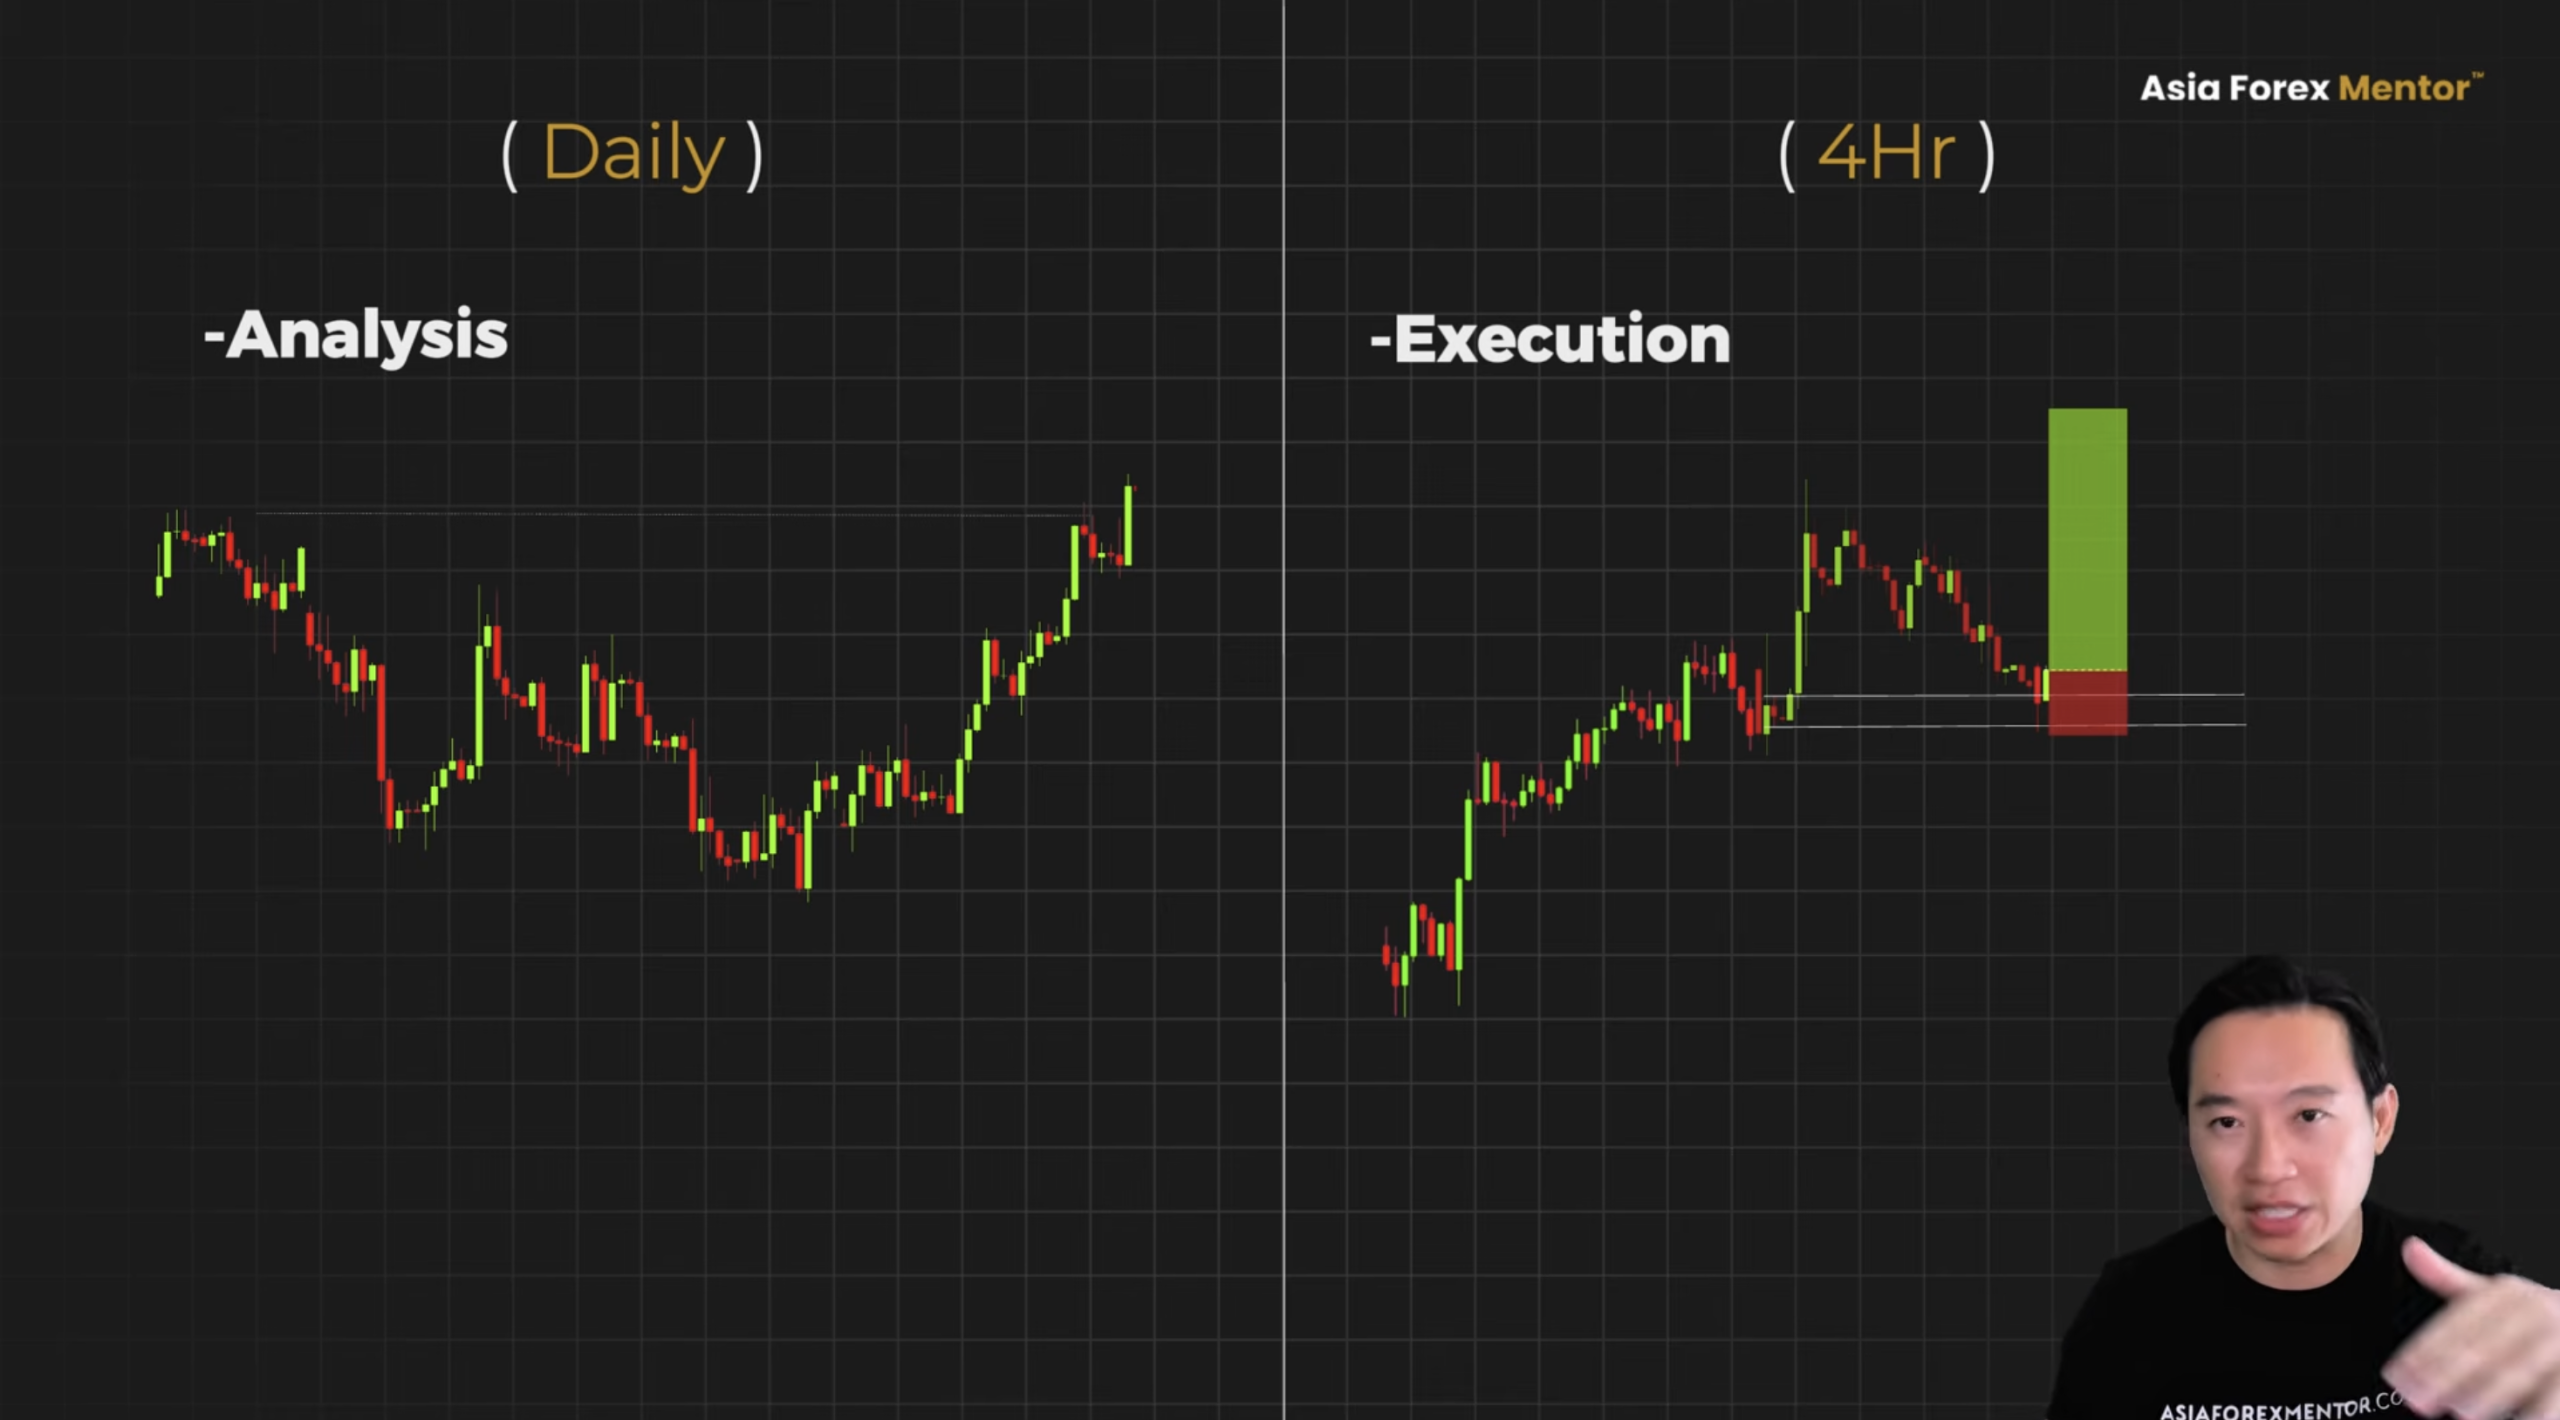
The Method On A Real Chart

Here is the method on a real chart. EURUSD recent price action.

The trend is locked. That same clean structure identified in the setup phase is confirmed on the daily. Price drops back into the bullish order block that launched with a strong move. The zone is fresh. Everything checks out.
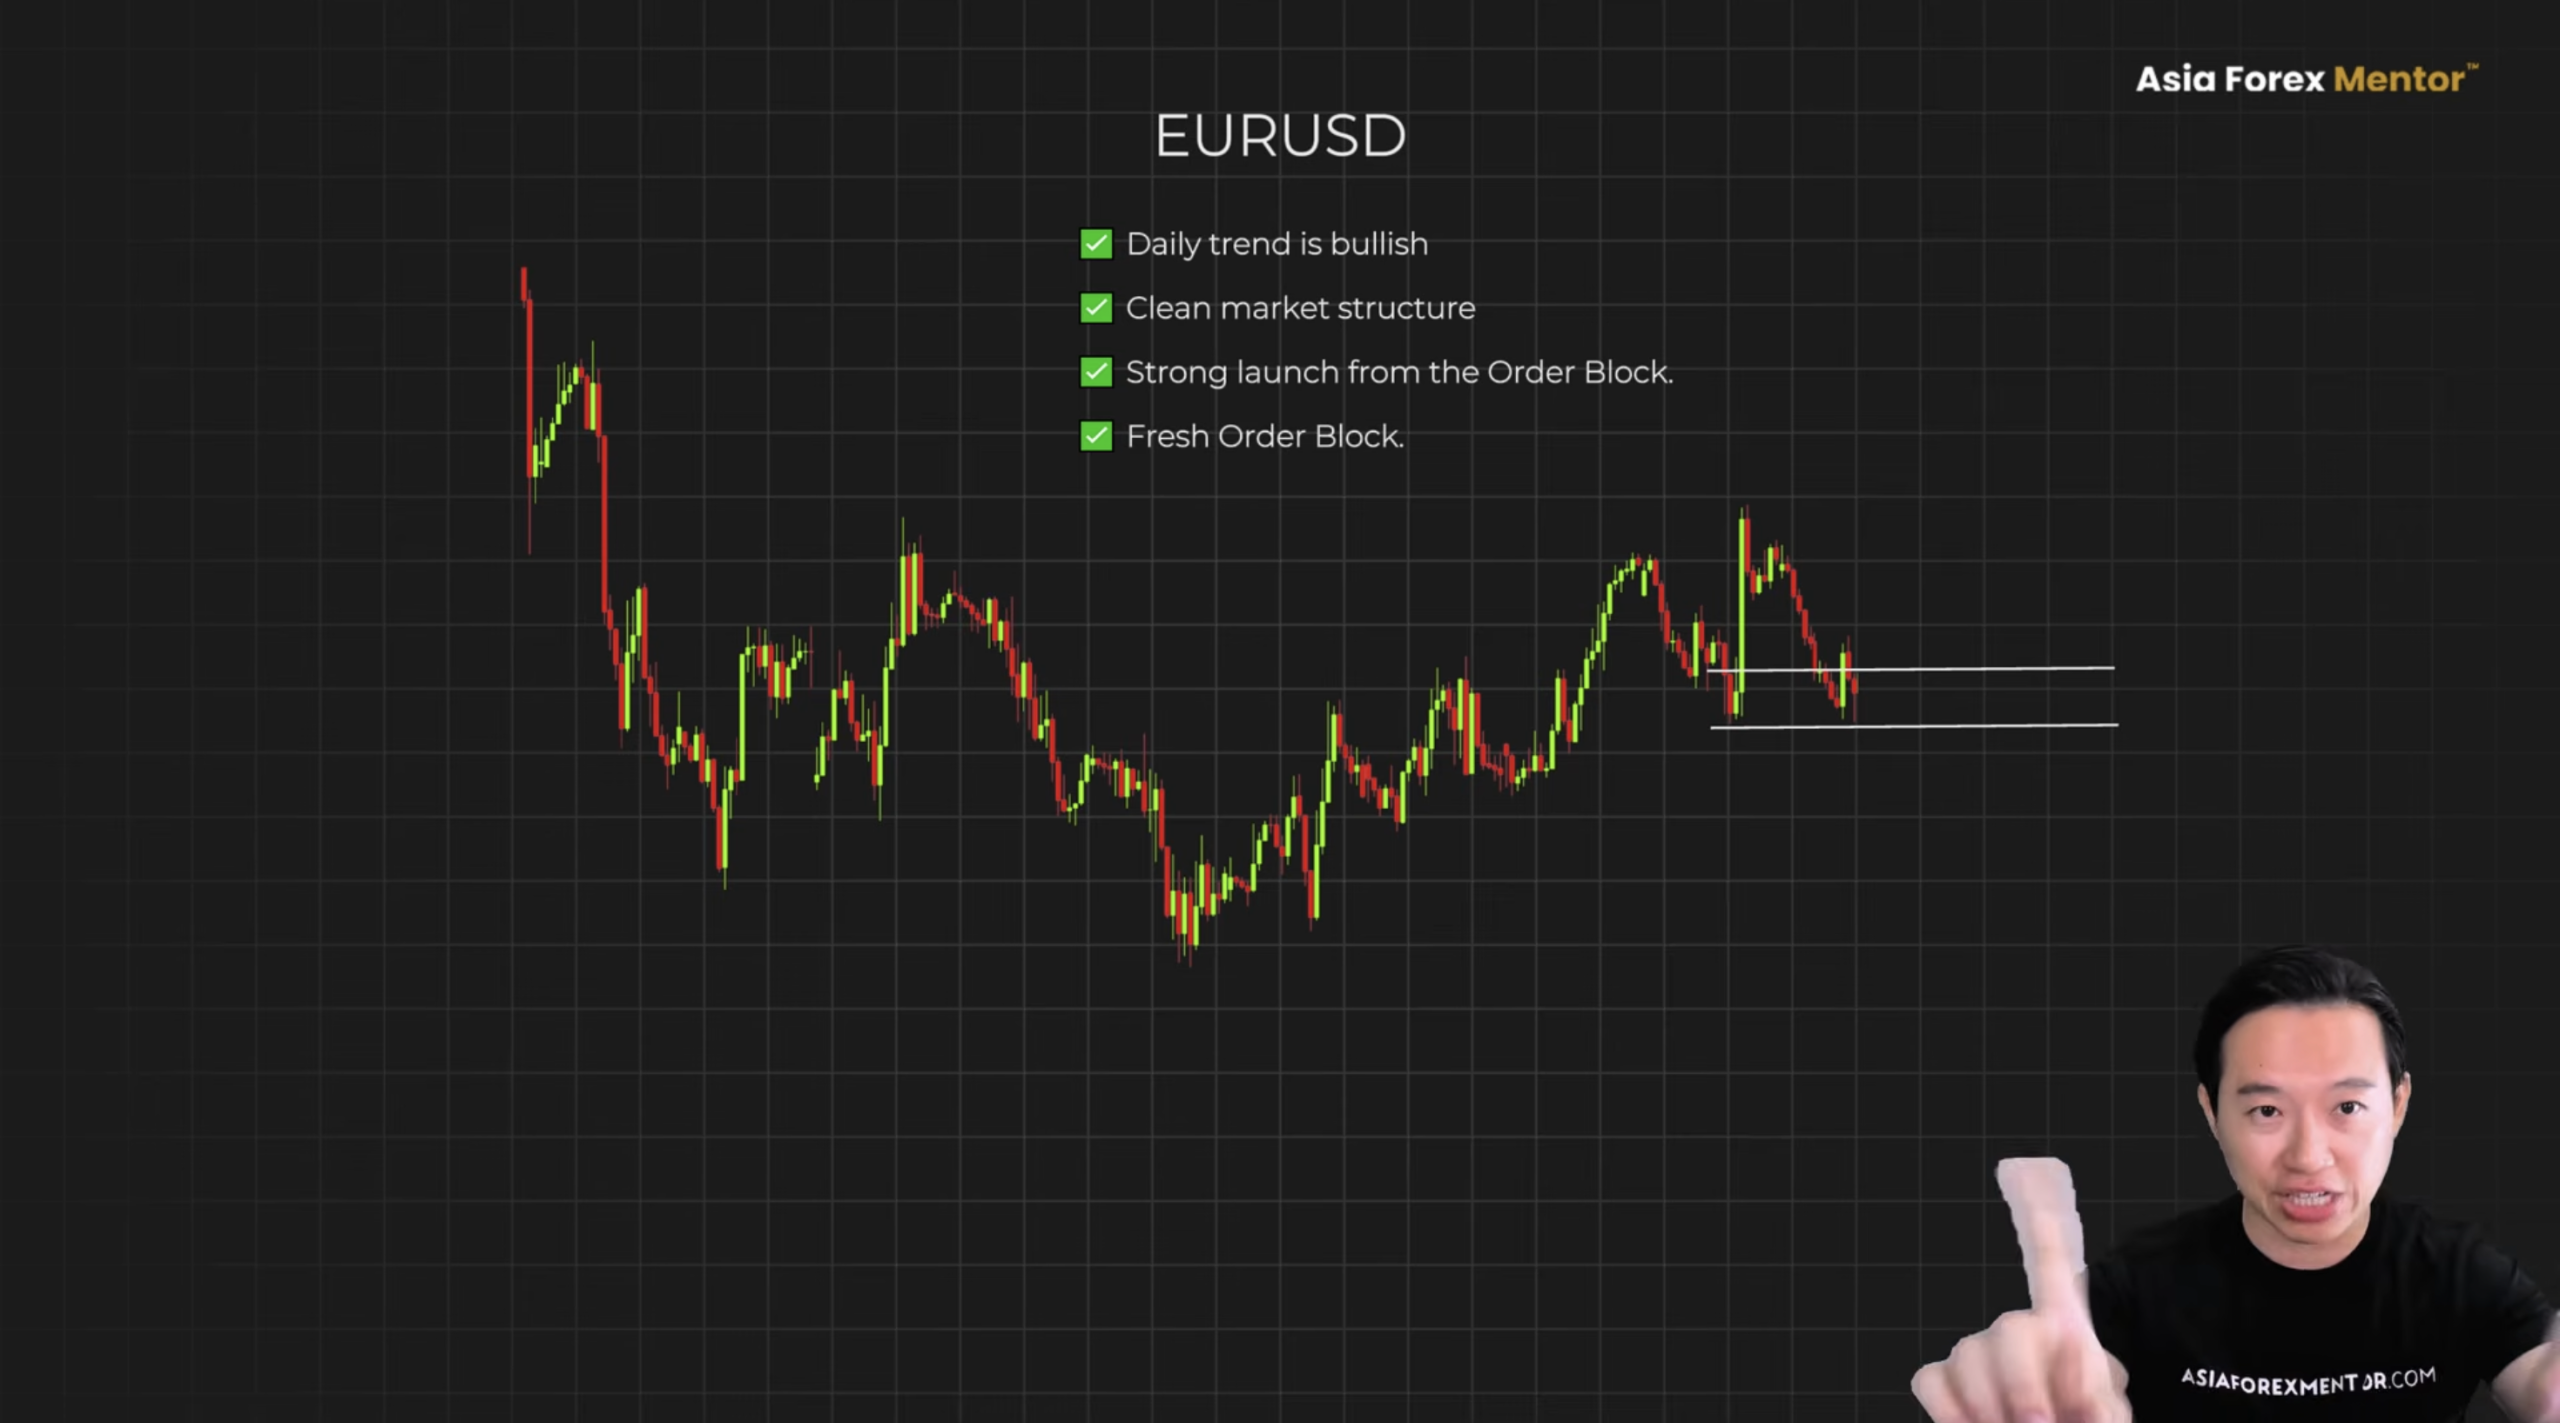
Watch the candle. The trigger fires. All conditions are met cleanly. Entry on the close. Stop loss below the floor, exactly where it was placed. Take profit target at the next swing high. Price lifts and hits the target clean.
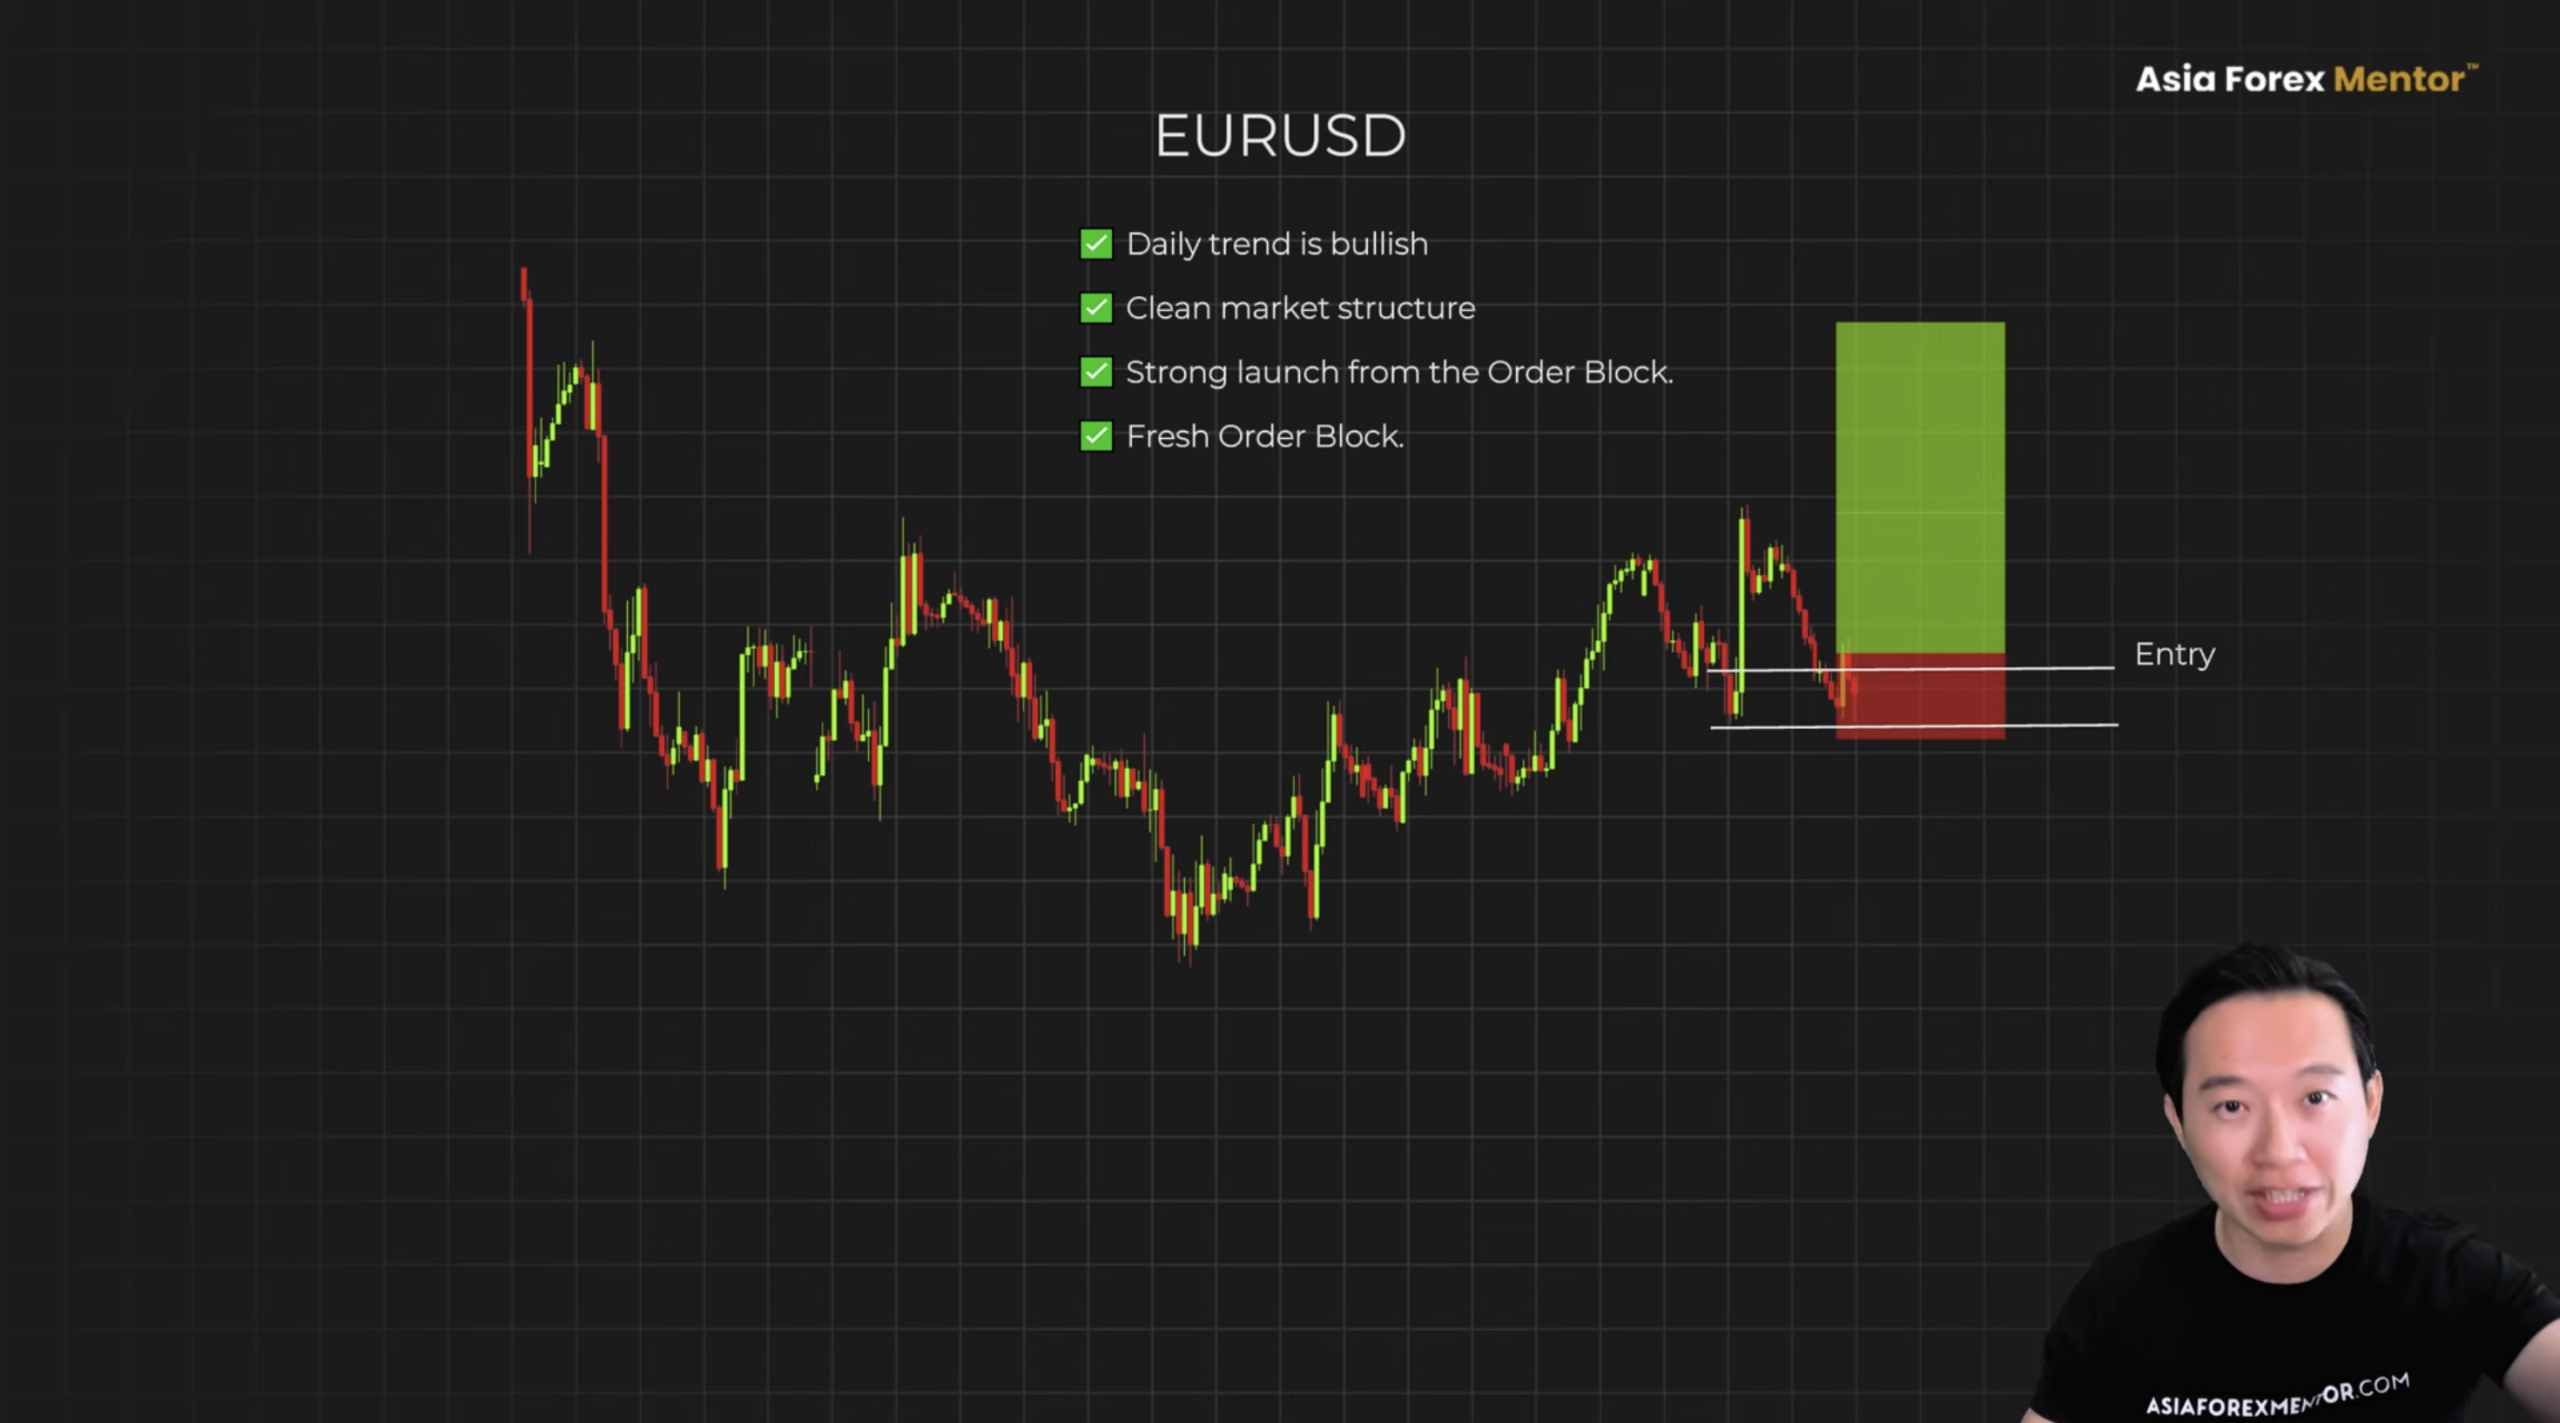
That is the complete method. Notice what every one of those rules is really doing. It is keeping you out of the zones that price was never going to respect.

Also Read: Forex Trading Strategies That Work: A Complete Guide to Consistent Profits

What It All Comes Down To

You saw what happens when you trade the zone as a signal. 5,242 trades. Not a single version held up as a system.

Order blocks were never the problem. Using them alone as a trigger was the problem.

What the AFM Research Lab did revealed something simple. The zone is real. The only thing that needed to change was the job you give it.

The winner was the one that used the zone as context, not as a trigger. Trade only with the trend. Demand a 4 ATR launch. Take it fresh within 20 bars. Wait for the body to close above the zone before you enter.

This shift is what turned the same $10,000 account that the textbook version drained to $571 into $8,000 in profits. Same concept, same zones, tested across thousands of trades. This was the only version with a real edge.

Past performance in backtest results does not guarantee future returns.

Frequently Asked Questions

Do ICT Order Blocks Actually Work?

The AFM Research Lab tested the textbook ICT order block strategy across 5,242 EURUSD trades. Every version lost money as a standalone system. A $10,000 account dropped to $571. The concept is not wrong. Using the zone alone as a trigger is what fails. When the order block is used as context inside a four-filter framework, the same test window produced $8,000 in profits on the same starting account. The zone works. The job most traders give it does not.

Why Do ICT Order Block Trades Keep Getting Stopped Out?

Order block trades get stopped out when the zone has already been visited and the institutional orders absorbed, when the trend is against the trade, or when the launch move away from the zone was too weak to leave real orders behind. The textbook method has no way to check any of this. It qualifies every zone that meets the visual pattern, regardless of whether price has a reason to reverse there. AFM Research Lab testing confirmed this is why the standalone strategy loses across thousands of trades.

What Is The Best Order Block Entry Rule?

The strongest entry rule is a full body candle close above the zone high on the 4-hour chart, after trend alignment, a 4 ATR launch, and zone freshness within 20 bars have all confirmed. A wick into the zone is not confirmation. A touch with no close is not confirmation. AFM Research Lab testing showed that entries triggered on wick reactions failed far more often than entries requiring a full body close through the zone high.

Are ICT Order Blocks A Scam?

ICT order blocks are not a scam. The concept describes real institutional footprints left on the chart before large impulse moves. What fails is the retail version taught across YouTube, which uses the zone as a standalone entry trigger with no check on whether the zone still has orders left in it or whether the trend supports the trade. AFM Research Lab testing showed that 5,242 trades on the textbook version drained the account. The winning version uses the zone as context, not as a trigger.

Where Do You Put A Stop Loss On An Order Block Trade?

The stop loss goes below the zone floor, meaning under the low of the candle that launched the impulse move, plus a 0.1 ATR buffer. That buffer accounts for minor overshoots without invalidating the setup. The zone floor is where the move started. If price closes back below it, the zone has failed and the trade closes. Once set, the stop does not move up into the zone. It stays anchored below the zone floor until the take profit target is reached.
About Ezekiel Chew​

Ezekiel Chew, founder and head of training at Asia Forex Mentor, is a renowned forex expert, frequently invited to speak at major industry events. Known for his deep market insights, Ezekiel is one of the top traders committed to supporting the trading community. Making six figures per trade, he also trains traders working in banks, fund management, and prop trading firms.

ICT Order Block Strategy Proven Across 5,242 Real Trades

Written by:

Updated:

September 7, 2026
Most traders following the ICT order block strategy are using a method that turned a $10,000 account into $571. The checklist looked clean on every single trade.
About This Guide
Written by Ezekiel Chew, founder of Asia Forex Mentor and institutional forex trader with over 20 years of experience. This article examines the ICT order block strategy as stress-tested across 5,242 EURUSD trades by AFM Research Lab. It covers why the textbook method fails, what the data shows, and the exact 4-filter system that produces a genuine edge. Asia Forex Mentor has trained more than 100,000 traders across 50+ countries.
Quick Answer
The ICT order block strategy works as context, not a standalone trigger. The textbook method loses money at scale. Four filters, trend alignment, a 4 ATR launch, a 20-bar freshness window, and a full-body close above the zone high, convert order blocks into high-probability setups with a verified edge across thousands of trades.
🎥 Watch the full method explained on video: https://youtu.be/jfUjh4sMTF0?si=nPV8mLB01H6MJCnj

Key Takeaways

 The following points frame the strategy before each section covers it in detail:

  • The textbook ICT order block method fails at scale because it treats the zone as a trigger rather than as context.
  • Adding a strong move filter changes which setups qualify but does not change why they lose. Filters cannot detect a zone that has already been visited and absorbed.
  • Trend alignment on the higher timeframe determines whether an order block carries weight or is nothing more than a speed bump.
  • A launch of at least 4 ATR away from the zone is the minimum threshold. Weaker moves produce zones that do not hold on the retest.
  • Any zone older than 20 bars is spent. Fresh zones only.
  • The trigger is a full-body candle close above the zone high on the 4-hour chart. A wick into the zone is not confirmation.

The ICT Order Block Rule

Everything you have been taught about the ICT order blocks the normal way is costing you money. The AFM Research Lab tested the textbook order block across 5,242 trades on EURUSD. Then they added the two fixes that all traders reach for, a strong move filter and fully optimized rules. Every single version lost money.

At the AFM Research Lab, one approach was found that actually holds up, and it changes everything about how this concept is used. Get this one rule right and you stop entering zones that price blows through.

Take a look at this chart. Price comes back to the zone. It hits the exact level where the candle had formed. And then it reverses hard.

The Setup Everyone Starts With

Find the candle right before the big move. Mark the high to the low as your zone. Wait for price to come back to it and enter.

That is the version taught everywhere. On the surface, the logic is sound. But that is exactly where the problem starts. The concept is not wrong. What costs traders money is the application. What they actually do once that zone is drawn.

If you look at this chart, one bear candle and then price launches hard. The candle is your order block. You mark it high to low. You draw the zone, you wait for price to come back to it. The idea is that the big institutional orders are still sitting there. On the chart, it looks airtight.

Price comes back, closes inside the zone, that is a trigger. You go long. Put your stop loss below the candle low and target 2R above it. This is what retail traders have been taught for years. It looks clean.

Watch this. Price hits the zone and stalls for a candle or two. Then it blows straight through. The stop loss got hit.

The AFM Research Lab ran through this exact setup across 5,242 trades. A $10,000 account became $571. That is not a rough patch. That is the strategy bleeding the account dry.

Here is the real take from the data. Every textbook condition was met. The candle, the zone, the retest, they were all clean. Price tapped in and kept right on going. Nothing on the checklist told you this one would fail. The checklist was never the problem.

The Mistake Traders Make

Traders see a candle before an impulse. They mark the zone, they wait for price to retest. There is no check on whether the launch was strong enough. There is no check on whether the zone is fresh enough. The very issue that was just flagged. They just mark it and wait.

The Strong Move Filter

Traders spotted this and tried to fix it. They added a filter.

Look at this chart. Two moves hit the same area. One grinds in slow. The other is sharp and explosive, two candles and done. Traders add a rule: only take the zone when the launch was aggressive. If it is a weak move, skip it. If it is a strong move, take it.

On paper, that makes sense. You cut away the junk and keep the good ones.

But here is where it breaks down. The zone qualifies. Sharp impulse. Two candles. Clean. And it still fails on the retest.

The filter changed what you were taking. It did not change why you were losing.

Here is what no impulse filter can see. The zone forms on a strong impulse. Textbook quality. But this is the third time price has been at this level. Those orders were already absorbed on the first two visits. That zone is spent.

That is the mistake in every filtered version. Harder impulse, tighter rules, cleaner triggers, but they never ask the only question that matters.

Does price actually have a reason to reverse here?

They are sharpening the wrong tool.

The Fully Mechanical Version

The AFM Research Lab made every rule mechanical. A fixed ATR threshold on the launch. A maximum age on the zone. The setup has to clear every one of them before it fires. Completely mechanical, pure rules.

It ran 311 trades. The win rate: 27 percent.

The tighter the filter, the lower the strike rate. Not higher. Every rule qualified. The risk to reward was clean. The entry trigger was objective. The edge still was not there.

That is the real insight. Every version, textbook, filtered, mechanically optimized, treats the order block as the reason to enter. The zone does not tell you if price will actually care about that zone. It only tells you where it might.

Three methods, same results. Every version lost money as a standalone system.

What The Same Test Revealed

The same test that killed it as a system revealed something else. The one job this concept does better than almost anything.

The AFM Research Lab ran these same tests through a 200-parameter combination. Across four independent windows the optimizer never saw. Then shuffled the trades a thousand times. Every version produced one result.

The order block does not work as a system. It works as context.

Here is what that means. The first thing to check is the trend.

Look at this chart. Clean higher highs, higher lows. Price is pushing up. That is the only environment where a bullish order block carries any weight.

When price is pushing lower, a bullish order block is not support. It is a speed bump. Watch this. Price taps the zone, pauses one candle, and continues straight down. The trend overrides the zone every time.

Now look at the zone itself. The move launching away from it has to be strong.

The AFM Research Lab put a number on it: 4 ATR as a minimum. Anything less and the zone has no real weight. It will not hold on the retest.

Even a strong zone will go stale if price has not come back to it within 20 bars. Those orders are gone.

If the trigger returns within the 20-bar window, that is the version to act on. Anything older than 20 bars is off the list.

Here is where you are. The trend is in your favor. The zone qualifies. The 4 ATR launch is there. It is fresh within 20 bars.

Most traders would enter right now. But there is one more thing before the trade fires. Here is your trigger. And it is stricter. A touch into the zone is not enough. You are waiting for one specific thing. If that thing does not happen, there is no trade.

Look at this chart. Price dips in and prints a long lower wick and closes inside the zone. Traders see a reaction and enter, and then price keeps dropping.

A wick into the zone is not confirmation. What you need is a close. A close above the zone high. If there is no close, there is no trade.

Your stop loss goes below the zone floor. Under the low of the candle that launched the move. Plus a 0.1 ATR buffer.

That is where the move started. If price closes back below it, the zone failed and you are out. You get out of the trade before it gets worse. Once it is set, it stays there. It never moves up into the zone.

For your take profit target, look at the next higher-timeframe swing high. That is your exit.

The AFM Research Lab landed on four hours, four times your stop distance. Set it, do not move it, and let the trade reach the structure.

Analysis on the daily timeframe. Execution on the 4-hour timeframe.

The daily tells you the trend and marks the zone. The 4-hour is where you watch for the trigger. Anything below that is reacting to noise, not the zone.

The Method On A Real Chart

Here is the method on a real chart. EURUSD recent price action.

The trend is locked. That same clean structure identified in the setup phase is confirmed on the daily. Price drops back into the bullish order block that launched with a strong move. The zone is fresh. Everything checks out.

Watch the candle. The trigger fires. All conditions are met cleanly. Entry on the close. Stop loss below the floor, exactly where it was placed. Take profit target at the next swing high. Price lifts and hits the target clean.

That is the complete method. Notice what every one of those rules is really doing. It is keeping you out of the zones that price was never going to respect.

Also Read: Forex Trading Strategies That Work: A Complete Guide to Consistent Profits

What It All Comes Down To

You saw what happens when you trade the zone as a signal. 5,242 trades. Not a single version held up as a system.

Order blocks were never the problem. Using them alone as a trigger was the problem.

What the AFM Research Lab did revealed something simple. The zone is real. The only thing that needed to change was the job you give it.

The winner was the one that used the zone as context, not as a trigger. Trade only with the trend. Demand a 4 ATR launch. Take it fresh within 20 bars. Wait for the body to close above the zone before you enter.

This shift is what turned the same $10,000 account that the textbook version drained to $571 into $8,000 in profits. Same concept, same zones, tested across thousands of trades. This was the only version with a real edge.

Past performance in backtest results does not guarantee future returns.

Frequently Asked Questions

Do ICT Order Blocks Actually Work?

The AFM Research Lab tested the textbook ICT order block strategy across 5,242 EURUSD trades. Every version lost money as a standalone system. A $10,000 account dropped to $571. The concept is not wrong. Using the zone alone as a trigger is what fails. When the order block is used as context inside a four-filter framework, the same test window produced $8,000 in profits on the same starting account. The zone works. The job most traders give it does not.

Why Do ICT Order Block Trades Keep Getting Stopped Out?

Order block trades get stopped out when the zone has already been visited and the institutional orders absorbed, when the trend is against the trade, or when the launch move away from the zone was too weak to leave real orders behind. The textbook method has no way to check any of this. It qualifies every zone that meets the visual pattern, regardless of whether price has a reason to reverse there. AFM Research Lab testing confirmed this is why the standalone strategy loses across thousands of trades.

What Is The Best Order Block Entry Rule?

The strongest entry rule is a full body candle close above the zone high on the 4-hour chart, after trend alignment, a 4 ATR launch, and zone freshness within 20 bars have all confirmed. A wick into the zone is not confirmation. A touch with no close is not confirmation. AFM Research Lab testing showed that entries triggered on wick reactions failed far more often than entries requiring a full body close through the zone high.

Are ICT Order Blocks A Scam?

ICT order blocks are not a scam. The concept describes real institutional footprints left on the chart before large impulse moves. What fails is the retail version taught across YouTube, which uses the zone as a standalone entry trigger with no check on whether the zone still has orders left in it or whether the trend supports the trade. AFM Research Lab testing showed that 5,242 trades on the textbook version drained the account. The winning version uses the zone as context, not as a trigger.

Where Do You Put A Stop Loss On An Order Block Trade?

The stop loss goes below the zone floor, meaning under the low of the candle that launched the impulse move, plus a 0.1 ATR buffer. That buffer accounts for minor overshoots without invalidating the setup. The zone floor is where the move started. If price closes back below it, the zone has failed and the trade closes. Once set, the stop does not move up into the zone. It stays anchored below the zone floor until the take profit target is reached.
ezekiel chew asiaforexmentor

About Ezekiel Chew

Ezekiel Chew, founder and head of training at Asia Forex Mentor, is a renowned forex expert, frequently invited to speak at major industry events. Known for his deep market insights, Ezekiel is one of the top traders committed to supporting the trading community. Making six figures per trade, he also trains traders working in banks, fund management, and prop trading firms.

RELATED ARTICLES

Join the Live Event
Get Your Free Ticket Now

I consent to receiving emails and/or text message reminders for this event.

REGISTER FOR THE MASTERCLASS!